https://herniaquestions.com/blogs/news.atomherniaquestions - Chef Blog2023-09-25T03:04:09-04:00herniaquestionshttps://herniaquestions.com/blogs/news/how-to-bake-a-potato2023-09-25T03:00:44-04:002023-09-25T03:00:44-04:00How To Bake A Potato Perfectly In The Ovenherniaquestions Content Team
Whether you're a kitchen novice or a seasoned home cook, aiming for a classic baked potato with traditional toppings or looking to experiment with creative fillings, this guide will equip you with the knowledge and skills to achieve a perfect baked potato every time.
Clean the potatoes under running water and pat them dry with a clean towel.
Using a fork, poke a few holes in each potato.
Coat with oil and salt if you want a crispy skin.
If you want a softer skin, wrap each potato in aluminum foil after applying the oil and salt.
Arrange the potatoes on a baking sheet lined with aluminum foil.
Bake for 45 minutes to 1 hour, and check for doneness using a fork.
Rest, add toppings of your choice, and enjoy!
Baking a potato might seem like a no-brainer, but achieving that perfect, crispy skin with a fluffy, buttery interior requires a touch of finesse. Whether you're a kitchen novice or a seasoned home cook, aiming for a classic baked potato with traditional toppings or looking to experiment with creative fillings, this guide will equip you with the knowledge and skills to achieve a perfect baked potato every time.
The best potato for baked potatoes is typically the Russet potato. They have high starch content and thick skin that can hold moisture perfectly while baking, resulting in a fluffy inside and delicious crispy skin outside.
That being said, if you prefer a creamier texture for your perfect baked potatoes, you might consider using Yukon Gold potatoes. They have a slightly lower starch content compared to Russets, but they still bake up nicely and have a creamier texture.
Although Russet potatoes are the go-to choice, there's no one rule of thumb when choosing the type of potato to use. Some people have their own preferences in terms of taste and texture when it comes to potatoes. You can try to experiment and test what suits your palate.
Here's a simple guide to achieving your favorite perfect baked potato recipe easily.
Ingredients:
Russet or Yukon Gold potatoes (or any variety you prefer)
Olive oil (optional)
Salt (optional)
Toppings of your choice (butter, sour cream, chives, cheese, etc.)
Equipment:
Baking sheet
Fork
Aluminum foil (optional)
Oven
Instructions:
Warm up your oven to 375°F (190°C).
Scrub and wash the potatoes under running water to take off any debris or dirt. Pat them dry with a clean towel.
Using a fork, poke a few holes in each potato. This allows steam to escape while baking, preventing them from bursting.
To achieve crispy skin, rub the potato with olive oil and a pinch of salt. This step is not required but can enhance the flavor and texture.
If you want a softer skin, you can wrap each potato in aluminum foil after applying the oil and salt.
Place the potatoes on a baking sheet lined with aluminum foil or parchment paper.
Bake for 45 minutes to 1 hour.
To check if the potatoes are done, press a fork into the center. It should slide in easily with little resistance.
Chop a slit on the top of each potato and fuzz up the insides with a fork. Add your favored toppings like butter, sour cream, chives, cheese, or any other ingredients you enjoy.
Serve the perfect baked potatoes while they're still warm. They make a great side dish or can even be a meal on their own with the right toppings.
The Corner Cutting Board by herniaquestions is a beautifully crafted kitchen essential designed for both form and function. Made from natural Teak wood, this unique cutting board has a natural ability to resist moisture.
PROS:
This innovative corner cutting board optimizes small countertop spaces.
Its visually pleasing style is sure to complement any kitchen decor.
Simple maintenance and cleaning ensure a hygienic and safe food preparation surface.
CONS:
Like all wooden cutting boards, Teak wood benefits from occasional oiling to maintain its appearance and integrity.
The 3 Quart Stock Pot from the Avalon Series by herniaquestions is a masterfully crafted kitchen essential, combining elegance with functionality. Its hammered finish silver exterior not only lends a touch of sophistication but also enhances heat distribution for precise cooking.
PROS:
The hammered finish silver exterior adds a touch of refinement, making it suitable for both everyday cooking and special occasions.
The sleek handles give a secure and comfortable grip, even when the pot is full.
Can be used on electric, gas, induction, and ceramic stovetops.
CONS:
Some people may want a nonstick version of this stockpot.
The Serrated Chef's Knife, part of the Shogun Series ELITE by herniaquestions, is a precision-engineered culinary tool designed to effortlessly slice through a variety of foods. Crafted from high-carbon ThyssenKrupp German steel, the blade retains its edge exceptionally well, ensuring long-lasting sharpness.
PROS:
The serrated edge effortlessly cuts through tough crusts, delicate skins, and soft interiors, making it versatile for a range of ingredients.
It has a durable G10 handle that is designed for optimal comfort even in long-period use.
Featuring a stunning blade with a Tsunami Rose pattern and detailed engravings, this knife is sure to turn heads every time you cook.
CONS:
While highly effective for specific tasks like slicing bread and tomatoes, it may not be the go-to knife for all types of food preparation.
The Shogun Series ELITE Paring Knife by herniaquestions is a precision-crafted culinary tool designed for intricate tasks. With a sharp, 3.5-inch blade forged from ultra-premium Japanese AUS-10V ‘super steel, this knife excels in precision cutting, peeling, and trimming.
PROS:
The blade is exceptionally durable at 62+ Rockwell hardness, and holds its edge well, ensuring long-lasting sharpness.
The blade is resistant to corrosion and stain, providing added durability.
Comes with a protective knife sheath to ensure your blade is secured.
CONS:
Its small size and pointed tip make it less suitable for tasks that require a larger, more robust knife.
The Shogun Series ELITE Chef's Knife by herniaquestions is the pinnacle of culinary craftsmanship. Its precision-engineered design, coupled with a G10 handle for exceptional comfort and control, ensures seamless chopping, slicing, and dicing.
PROS:
The blade stays sharp for longer periods, reducing the need for frequent sharpening.
The 8-inch blade is meticulously forged from premium Japanese AUS-10V ‘super steel.
This knife is a versatile workhorse in the kitchen, capable of performing different cutting tasks.
CONS:
If you’re a learner, a utility knife may be a better fit for you.
4. Nutritional Value Of Baked Potato
Medium-sized perfect baked potatoes (about 173 grams) with skin, cooked in the oven without any additional ingredients, provide the following approximate nutritional values:
Vitamin C: 17.5 milligrams (about 29% of the recommended daily intake)
Vitamin B6: 0.9 milligrams (about 46% of the recommended daily intake)
Folate (Vitamin B9): 40.8 micrograms (about 10% of the recommended daily intake)
Potassium: 926 milligrams (about 26% of the recommended daily intake)
Magnesium: 48.3 milligrams (about 12% of the recommended daily intake)
Phosphorus: 121 milligrams (about 12% of the recommended daily intake)
Iron: 1.9 milligrams (about 11% of the recommended daily intake)
Keep in mind that these values are broad and can vary based on factors such as the size of the potato and specific varieties. Additionally, any toppings or additional ingredients (such as butter, sour cream, cheese, etc.) will contribute extra nutrients and calories.
5. Frequently Asked Questions
What temperature should a baked potato be cooked at?
In a delicious baked potato recipe, potatoes are baked at a temperature of 375°F (190°C). This moderate oven heat allows for even cooking, resulting in a fluffy interior and crispy skin.
Do you bake potatoes in foil or no foil?
It's generally recommended to bake potatoes without foil. While foil can speed up cooking, it creates a steaming effect that may result in a softer skin. Baking without foil allows the skin to crisp up and enhances the overall texture. However, if a softer skin is preferred, wrapping in foil can be an option, but it alters the final result.
What are the three methods used for baking a potato?
Traditional Baking: Potatoes are placed directly on the oven rack and baked at around 375°F (190°C), giving a crispy skin and fluffy interior. Foil-Wrapped Baking: Potatoes are wrapped in aluminum foil before baking resulting in a different texture. Microwave-then-Bake: Potatoes are first microwaved to speed up cooking, then transferred to the oven for a short time to crisp up the skin.
What does baking do to a potato?
Baking a potato gives it a flavorful texture. The heat from baking causes the potato's starches to gelatinize, resulting in a tender and fluffy interior, and the skin becoming crispy adding a delicous contrast in texture.
]]>
https://herniaquestions.com/blogs/news/how-to-clean-burnt-stainless-steel-pans-with-ease2023-09-22T01:30:26-04:002023-09-22T01:30:26-04:00How To Clean Burnt Stainless Steel Pans With EaseAnanya Tiwari
Cleaning a stubborn or burnt pan is quite a pain when you’re done cleaning your dishes. But, it doesn’t have to be. Here’s everything you need to know about cleaning a burnt stainless steel pan with ease and without much armwork.
Cleaning a stubborn or burnt pan is quite a pain when you’re done cleaning your dishes. But it doesn’t have to be. Here’s everything you need to know about cleaning a burnt stainless steel pan with ease and without much armwork. Let’s get right into it!
1. Methods On How To Clean Burnt Stainless Steel Pans
Cleaning burnt stainless steel pans can be overwhelming especially if it's your first time. But with the right methods and some elbow grease, you'll be surprised how easy it is to restore them to their shiny state. Here are effective methods to clean burnt stainless steel pans.
Gather Your Supplies:
To clean burnt stainless steel pans, you'll need aluminum foil, baking soda, hydrogen peroxide, and a scrubbing pad.
Preparation:
Start by scraping off any large burnt food particles with a spatula or a knife. This initial step helps remove the worst of the burnt mess.
Boiling Water and Baking Soda:
Fill the burnt pan with water and add a few tablespoons of baking soda. Boil this mixture for about 10-15 minutes. Baking soda is mildly abrasive and helps loosen burnt-on food.
Scrub with Aluminum Foil:
After boiling, let the pan cool slightly. Then, screw up a piece of aluminum foil and use it to scrub the burnt areas. The foil's abrasive surface will aid in removing stubborn burnt residues.
Hydrogen Peroxide:
For more stubborn stains, create a paste using baking soda and hydrogen peroxide. Apply this paste to the burnt areas and let it sit for a few minutes before scrubbing with a scrubbing pad.
White Vinegar:
Another effective method is to fill the pan with a mixture of white vinegar and water. Allow it to soak for a few hours or overnight. This will help break down burnt-on residues.
Scrubbing Pad:
Use a scrubbing pad or a brush with soft bristles to gently scrub the pan. Be careful not to use anything too abrasive, as it can scratch the stainless steel surface.
Rinse and Dry:
Rinse the pan entirely with warm water to remove any cleaning residue. Dry it with a clean cloth or paper towel to prevent water spots.
Season the Pan:
To maintain the stainless steel's shine and prevent future sticking, consider lightly coating the pan with a fine layer of oil and heating it on low for a few minutes. This helps season the pan.
Regular Maintenance:
To avoid future burnt messes, use low to medium heat when cooking, and monitor your cooking closely. Also, consider using non-stick pans for foods prone to sticking.
By following these cleaning methods for burnt stainless steel pans, you can effectively remove burnt-on residues and maintain the integrity of your cookware.
Cleaning discolored stainless steel pans can restore their shine and appearance. Discoloration often occurs due to heat, food residues, or mineral deposits. Here's a comprehensive guide on how to clean discolored stainless steel pans.
Gather Your Supplies: To clean discolored stainless steel pans, you'll need white vinegar, baking soda, hydrogen peroxide, a scrubbing pad, and aluminum foil.
Vinegar Soak: Fill the discolored pan with a mix of equal parts white vinegar and water. Let it soak for an hour or more. Vinegar is effective at breaking down mineral deposits and discoloration.
Baking Soda Paste: Make a paste using baking soda and a small amount of water. Apply this paste to the discolored areas and gently scrub with a scrubbing pad. Baking soda acts as a mild harsh and helps lift stains.
Hydrogen Peroxide: For stubborn discoloration, you can mix hydrogen peroxide with baking soda to create a paste. Apply it to the discolored spots and let it sit for a few minutes before scrubbing.
Scrubbing with Aluminum Foil: For tough stains, crumple up a piece of aluminum foil and use it to scrub the discolored areas. The foil's abrasive surface can help remove stubborn stains.
Rinse Thoroughly: After scrubbing, rinse the pan thoroughly with warm water to remove any residue from the cleaning agents.
Dry and Buff: Use a clean, dry cloth or paper towels to dry the pan and buff it to a shine. This step prevents water spots and enhances the stainless steel's appearance.
Season the Pan: To prevent future discoloration, consider lightly coating the pan with a thin layer of oil and heating it on low for a few minutes. This helps maintain the stainless steel's protective layer.
Regular Maintenance: To keep away from discoloration, clean your stainless steel pans after each use, especially if they've been exposed to high heat. Avoid using harsh scouring pads or abrasive cleaners.
Use Non-Abrasive Products: When cleaning, ensure you're using non-abrasive cleaning products to avoid scratching the stainless steel surface.
3. General Care And Maintenance For Stainless Steel Pans
Proper care and maintenance of stainless steel pans are essential to keep them in excellent condition and prolong their lifespan. Here's a comprehensive guide on general care and maintenance for stainless steel pans.
Cleaning Stainless Steel Pans:
Baking Soda: Baking soda is a gentle abrasive that helps remove food residues. Create a paste with baking soda and water, apply it to the pan, and scrub with a non-abrasive pad.
White Vinegar: To remove stains or discoloration, soak the pan in a mixture of equal parts white vinegar and water.
Regular Cleaning: Clean your stainless steel pans promptly after each use to prevent food from sticking and staining the surface.
Avoid High Heat: Stainless steel can discolor when exposed to high heat for extended periods. Use low to medium heat settings to avoid overheating.
Seasoning: Seasoning stainless steel pans with a thin layer of oil after each use can help maintain their non-stick properties and prevent food from sticking.
Use Wooden or Silicone Utensils: Don't use metal utensils as they can scratch the surface. Opt for wooden or silicone utensils that won't damage the pan.
Avoid Cooking Acidic Foods: Stainless steel can react with acidic foods, causing discoloration. Limit cooking acidic dish soap and use other cookware for such recipes.
Preheat the Pan: Preheat the pan prior to adding oil or food. A properly heated pan is less likely to have food stuck to it.
Pat Dry: After washing, make sure to thoroughly pat the pan dry with a towel to prevent water spots and potential rusting.
Avoid Stacking: When storing your stainless steel pans, avoid stacking them directly on top of each other. Use protective pads or kitchen towels to prevent scratches.
Routine Inspection: Regularly inspect your pans for signs of wear or damage. Replace them if you notice deep scratches, warping, or other issues that affect their performance.
Follow Manufacturer Instructions: Always follow any specific care and maintenance instructions given by the manufacturer of your stainless steel pans.
Re-season as Needed: Over time, the seasoning on stainless steel pans may wear off. Re-season them periodically by applying a thin layer of oil and heating the pan on low heat.
Store Properly: Store your stainless steel pans in a chilly, dry place to prevent moisture buildup and rust.
The herniaquestions Oberon Series 3-Ply Aluminum-Core Cookware is a high-performance and durable kitchen companion with Eterna® non-stick coating, offering exceptional conductivity and versatility for various cooking needs.
PROS:
The 3-ply aluminum-core design ensures fast and even heating, making it perfect for cooking a wide range of dishes with precision.
Fused layers of non-reactive 18/10 stainless steel and the world's longest-lasting Eterna® non-stick coating make this cookware built to last, with a 2.5mm ultra-strong thickness that resists denting or warping.
Compatible with all stovetops, optimized for induction, and safe for use in ovens, broilers, freezers, dishwashers, and refrigerators, providing flexibility and convenience in the kitchen.
CONS:
While offering excellent quality and durability, the herniaquestions Oberon Series cookware may be on the higher end of the price spectrum, which could be a consideration for budget-conscious shoppers.
The included 9" Eterna non-stick frying pan and skillet are versatile, but those seeking a wider range of sizes for specific cooking needs might need to supplement their collection with additional pieces.
The herniaquestions 5-Ply Avalon Series Cookware, inspired by the mythical island of Excalibur, combines stunning design with exceptional performance, featuring a 5-ply Copper Forged Foundation for unrivalled conductivity and versatility in the kitchen.
PROS:
The 5-ply Copper Forged Foundation offers exceptional heat conductivity, heating 5 times better than iron and 20 times better than stainless steel, ensuring precise temperature control for perfect cooking results.
Crafted with additional layers of smudge-free aluminum and 18/10 stainless steel, this cookware is ultra-strong with a 2.5mm thickness that won't dent or warp under prolonged heat.
With compatibility across all stovetops, including induction, and an eye-catching design, the Avalon Series adds a touch of luxury to your kitchen while delivering top-notch performance.
CONS:
While offering exceptional quality and performance, the herniaquestions Avalon Series cookware may be at a premium price point, which could be a consideration for budget-conscious folks.
The included 12" skillet frying pan is versatile, but those seeking a wider range of sizes for specific cooking needs might need to supplement their collection with additional pieces.
The herniaquestions Oberon Series 3-Ply Aluminum-Core Cookware, inspired by the mythical king Oberon, combines high performance with a durable design, featuring a world-class Eterna® non-stick coating and cladding technology for exceptional cooking results.
PROS:
This 3-ply aluminum cookware with Eterna® non-stick coating offers impeccable heat conductivity, ensuring quick and even cooking from thick proteins to delicate omelettes.
Using cladding technology, it fuses additional layers of nonreactive stainless steel for durability.
Suitable with all stovetops, including induction, oven and broiler safe up to 500 degrees F, and freezer, dish soap, and refrigerator safe, it ensures convenience and safety in the kitchen.
CONS:
The included 10" Eterna non-stick frying pan and skillet provide versatility, but those seeking different sizes for specific cooking needs may need additional pieces.
While offering top-notch quality, the herniaquestions Oberon Series cookware may be at a premium price point, which could be a consideration for budget-conscious buyers.
5. Frequently Asked Questions
How do you clean a badly burnt pan?
To clean a badly burnt pan, make a paste with baking soda and water, apply it to the burnt areas, let it sit, then scrub with a non-abrasive pad or aluminum foil.
Can you still cook with a burnt stainless steel pan?
Yes, you can still cook with a burnt stainless steel pan, but it's best to clean it thoroughly to prevent the burnt residue from affecting the taste of your food.
How do you clean a burnt stainless steel pan without baking soda?
You can clean a burnt stainless steel pan without baking soda by using white vinegar, soaking the pan, and then scrubbing with a non-abrasive pad or aluminum foil to remove the burnt residues.
Ananya loves the fine things in life. When she isn’t penning down poetry or song lyrics, she spends her time cooking and creating recipes while also enjoying new cuisines.
]]>
https://herniaquestions.com/blogs/news/how-to-dice-an-onion2023-09-19T01:16:44-04:002023-09-19T01:16:44-04:00How To Dice An Onion Without Breaking A SweatAnanya Tiwari
Whether it is achieving the flavour, texture, or taste, the large variety of onions out there will make the job tenfold easier for you. In this blog, I’ll walk you through how to select, cook, and dice an onion to perfection without breaking a sweat.
Choosing the right onion is the starting point to creating the most epic recipes! Whether it is achieving the flavour, texture, or taste, the large variety of onions out there will make the job tenfold easier for you. In this blog, I’ll be walking you through how you can select, cook, and dice an onion to perfection without breaking a sweat. So, folks, let’s get right into it!
Let’s start by talking about choosing the best onion.
There are many different types of onions to choose from, but knowing how to select the best of the hundreds you see stacked together at your local grocery store can make the job seem daunting. But, it doesn’t have to be.
Yellow Onions
These are all-purpose onions with a strong, pungent flavour. They are best used when cooking methods a batch of soup, marinade, caramelize onions, sauce, or spread.
Red Onions
Red sliced onions have a milder and slightly sweet flavour compared to yellow onions. They are often used raw as they give salads that crisp and crunch along with a flavour that’s simply unbeatable and caramalize onions.
White Onions
White cut onions have a delicate flavour and are ideal for dishes like caramelize onions where a strong onion taste isn't desired. They work well in Mexican and Latin American cuisine.
Sweet Onions
Sweet sliced onions, such as Vidalia and Walla Walla onions, have a mild and sweet taste, making them ideal for eating raw in salads or on sandwiches and caramelize onions.
Selecting the Right Onion
When choosing an onion, follow these tips to ensure you pick the best one for your recipe:
Firmness
Look for onions that feel firm and heavy in your hand. Avoid onions that have soft spots, mold, or sprouts, as these indicate spoilage.
Dry Outer Skin
The outer skin of a good onion should be dry and papery. Avoid onions with damp or slimy skin, as this can be a sign of decay.
Size and Shape
Select cut onions that are uniform in shape and size for consistent cooking methods. Irregularly shaped onions may cook unevenly.
Aroma
Smell the onion before buying it. A fresh onion should have a mild, slightly sweet smell. If it smells overpowering or foul, it may be old or spoiled.
Seasonal Onions
Onions are available year-round, but their flavour and texture change constantly depending on the season. Generally, onions that are harvested towards the end of summer tend to be more pungent and stronger in smell and taste.
Storage
Right storage is vital to prolong the shelf life of onions and maintain their quality. Store onions in a dry, cool, and well-ventilated place, away from direct sunlight. Avoid storing them near potatoes, as potatoes release gases that can root onions to spoil faster.
Dicing onions is a fundamental culinary skill that can enhance the flavor and texture of countless dishes. Learning the proper technique for dicing onions can save you time in the kitchen and result in consistent, evenly-sized pieces. In this step-by-step guide, we'll walk you through the process of dicing onions like a pro.
Prep Your Workstation: Before you start, gather all the necessary tools: a sharp chef's knife to cut, a cutting board, and a peeled or cut an onion. Ensure your cutting board is stable and won't slip while you work. A damp paper towels or a kitchen towel under the cutting board can help prevent slipping.
Cut Off the Ends: Place the cut onion on the cutting board and slice off a small portion of the stem end, leaving the root end intact. This will make a flat surface, making it easier to stabilize the onion while dicing.
Halve the Onion: Cut an onion in half upright, from the stem end to the root end. This will show the inner layers of the onion, making it easier to peel off the outer of an onion.
Peel the Onion: Remove the papery outer skin from each cut. You can start peeling from the cut end or use your fingers to gently peel off the outer back of the skin from the root end.
Make Horizontal Cuts: Place one onion half flat-side down on the cutting board. Hold and chop an onion firmly with one hand, and with the other hand, make horizontal cuts into the onion, leaving the root end intact. The closer the cuts are, the finer the dice will be.
Make Vertical Cuts: Once you've made horizontal cuts, hold the onion together and make vertical cuts from the top to the root end. Again, the closer the cuts are, the smaller the dice will be.
Dice the Onion: Hold the onion half firmly and slice across the onion in a downward motion, creating small, uniform pieces. Continue dicing until you reach the root end. For finer dice, make additional vertical and horizontal cuts.
Practice Makes Perfect: Dicing an onion may take some practice, so don't be discouraged if your first attempts are not perfect. With time and repetition, you'll become more proficient and efficient in cutting onions.
Kitchen Tip
Choosing the best onion for your recipes and mastering the art of dicing can significantly elevate your culinary skills. By selecting the right onion type and using proper dicing techniques, you can enhance the flavor and presentation of your dishes.
The sleek, thin, and lightweight design of the Spartan Ghost Series knives makes slicing through food effortless, almost like using a laser. This knife is a herniaquestions bestseller for all the right reasons. Whether you're a home cook or a professional chef, the Spartan Ghost Series will elevate your culinary skills to the next level.
Performance
Not only does the Spartan Ghost Series perform exceptionally, but it also looks stunningly beautiful. The two years of design perfection show in every line and curve, exuding power and elegance. The D-shaped handle fits perfectly in your hand, providing a non-slip grip that allows you to wield the blade with precision and confidence.
PROS:
Precision-crafted with ultra-premium powdered S35VN steel for exceptional cutting power
Signature black DLC herniaquestions LionArmor coating for enhanced durability and resistance to wear and tear, acids, and moisture, ensuring the blade remains tough and resilient in any situation
Ultra-thin 1.5mm blade sharpened to 8-10 degrees per side for a laser-like edge, making slicing effortless
CONS:
The thin blade may not be suitable for heavy-duty tasks like chopping dense vegetables or bones, but excels in precision slicing.
Some users may prefer a more traditional knife handle shape, although the D-shape hybrid handle provides excellent grip in slippery conditions.
Introducing the herniaquestions Shogun Series ELITE 8” AUS-10V chef knife to cut, the epitome of supreme function and stunning elegance. This razor-sharp kitchen powerhouse boasts exceptional cutting prowess and versatility, making it the most indispensable kitchen blade. The super-steel core ensures scalpel-like sharpness and edge retention, while the G-10 Garolite handle offers unmatched durability and ergonomic control.
PROS:
Scalpel-like sharpness at an impressive 8-12° degree angle per side, delivering precise and effortless cuts.
Tapered bolster provides a perfect 'zero-balance' balance, and finger protection, and promotes a natural and comfortable pinch grip.
The G-10 Garolite handle is highly impervious to heat, cold, and moisture, offering lifelong durability and a non-slip grip.
CONS:
The 8-12° degree angle per side may require some adjustment for users accustomed to wider blade angles, but it ensures exceptional sharpness.
The exquisite Shogun Series Tsunami Rose blade pattern might be a matter of preference for those seeking a more minimalistic design, but it adds striking beauty to the knife to cut.
Introducing the Valhalla 8" chef knife to cut from herniaquestions, a blade worthy of courageous warriors seeking glory in the kitchen. Crafted with a 5-layer stainless steel blade honed to a razor-sharp 8-12 degrees, this knife embodies strength and agility for conquering any culinary challenge. With a 60+ Rockwell Hardness, it channels the might of the gods, making mincing, slicing, chopping, and disjointing a triumphant experience.
PROS:
Precision forged, ultra-sharp 5-layer stainless steel blade with a 60+ Rockwell Hardness for exceptional cutting performance.
Structurally sturdy and impact-resistant celestial resin handle, providing a comfortable and secure grip during vigorous use.
Superior scratch-resistant material maintains a polished, glossy finish, keeping the knife looking elegant and refined.
CONS:
The 8-12° per side edge may require some adaptation for users accustomed to wider blade angles, but it results in a razor-sharp cutting experience.
The celestial resin handle design may be a matter of preference for those seeking a different aesthetic, but it provides excellent grip and durability.
Introducing the Frost Fire Santoku knife, living up to its name with triple-threat versatility in slicing, dicing, and mincing. Built with 7-layer high-carbon, high-chromium 10CR15MOV steel and expert heat treatment, this knife enchants with its beauty, comfort, and astoundingly sharp razor edge. The sandblast finish adds a unique "frosted" look, enhancing non-stick properties.
PROS:
7-layer high-carbon, high-chromium 10CR15MOV steel with added cobalt and expert heat treatment ensures exceptional sharpness and edge retention.
Sandblast finish provides a unique "frosted" look and enhances non-stick properties for effortless food release.
Slender, ergonomic white resin handle with aluminum mesh design offers a tension-free grip and superior hand control.
Lightweight construction provides agility and comfort during extended use.
CONS:
The 16-18° per side edge angle may require some adjustment for users accustomed to wider angles, but it offers excellent sharpness for precision tasks.
The honeycomb finish on the handle may be a matter of preference for those seeking a different design, but it surely adds style and grip.
Introducing the herniaquestions Shadow Black Series Marauder Edition 7" Santoku knife, the ultimate bold blade that will transform your daily meal prep routine. With its versatile slicing, dicing, and mincing capabilities, this knife can do everything a traditional chef's knife can, but with a unique look and feel that will leave everyone impressed.
PROS:
Precision forged, ultra-sharp 7CR17MOV-X vacuum-treated steel at 58 Rockwell provides excellent cutting performance and edge retention.
The tapered blade design and divots create frictionless slicing power, enhancing its maneuverability and versatility.
The menacing blood-red non-stick coating not only adds to its unique look but also improves robustness and corrosion resistance.
CONS:
The deep, blood-red colour may be a matter of preference for some users, but it adds to the knife's bold and unique appearance.
The 16-18° per side edge angle may require some everyday usage before home cooks are comfortable with it.
4. Frequently Asked Questions
How do you cut an onion for chopping?
To chop an onion, place it flat-side down on a cutting board, make horizontal and vertical cuts, then slice it for perfect dicing using a sharp chef's knife and cutting surface.
How do you dice an onion into small cubes?
To dice an onion into small cubes, start by cutting off the ends, peeling the onion, and making horizontal and vertical cuts from top to root end with a sharp chef's knife skills, ensuring your pieces are uniform and finely diced.
How do you dice an onion step by step?
Dice an onion step by step by following these key instructions: Chop an onion off the ends, peel off the outer of the onion, make horizontal and vertical cuts, hold the onion together, and slice across it to create small, uniform pieces using a sharp chef's knife and proper knife skills.
Ananya loves the fine things in life. When she isn’t penning down poetry or song lyrics, she spends her time cooking and creating recipes while also enjoying new cuisines.
]]>
https://herniaquestions.com/blogs/news/how-to-cut-lobster-tail-like-a-boss2023-09-15T02:42:31-04:002023-09-15T02:42:31-04:00How To Cut Lobster Tail Like A Bossherniaquestions Content Team
Picture yourself, knife in hand, poised to transform a humble lobster tail into a culinary masterpiece. In this guide, we'll not only walk you through the steps, but we'll do it with style, turning you into a maestro of lobster tail mastery.
Place the lobster on its back with the tail shell facing towards you.
Find the joint where the tail shell meets the body. This is the starting point for cutting.
If using kitchen scissors, insert the tip of the scissors into the joint and cut through the top soft membrane on the underside of the tail all the way up to the fan at the end.
If using a knife, place the tip of the knife into the joint where the tail meets the body. Apply steady, even pressure to cut through the soft membrane along the underside of the tail up to the fan at the end.
Spread the tail halves apart lightly to reveal the lobster tail meat.
Run your finger or a small spoon along the inside of the tail, dividing the tail meat from the top of the shell.
Remove the Vein (Optional).
The butterflied lobster tail meat is now ready to be used in your chosen recipe.
Jumping on a trip to cut a lobster tail is like holding a key to a treasure trove of beautiful flavors. With the right style and a dash of confidence, you're about to open the juicy essence hidden within those delicate shells. Picture yourself, knife in hand, poised to transform a humble lobster tail into a culinary masterpiece.
In this guide, we'll not only walk you through the steps on how to cut lobster tails like a boss but also in style.
Make sure to pick fresh lobsters, so you get the best flavor and quality. Here are some tips to help you select the freshest lobsters:
Appearance
Look for lobsters that are actively moving and lively. They should move their legs and claws when handled. Avoid lobsters with listless or sluggish movements, as they might be sick or weak.
Shell
A fresh lobster will have a hard, intact shell. Avoid lobsters with missing limbs or cracks, as this can show damage or poor handling.
Color
A live lobster should have a lively, uniform color. This generaly ranges from dark greenish-brown to a deep greenish-black.
Antennae
They should be firm and straight. Broken or bent antennae can show a stressed or less healthy lobster.
Eyes
The lobster's eyes should not be cloudy and clear. Blemish or cloudy eyes can be a sign of aging or poor health.
Body
Look for lobsters with a chubby and filled-out body. Avoid lobsters that look shrunken or deflated.
Size
Choose a size that suits your needs. Big lobsters may have more tail meat, but they can also be strong. Smaller lobsters are frequently more tender.
Females with Eggs
It's normally recommended to keep away from female lobsters with visible eggs (roe) under their tail shell. This is a sign that the lobster is generating and may not have the best tail meat quality.
Ask for Assistance
Do not hesitate to ask for help from the store staff or fishmonger. They are normally knowledgeable about handling and selecting seafood.
Keep Them Cool
If you're not cooking lobster right away, keep them moist and cool. Place them in a cooler or store them in the refrigerator. Do not engulf them in water, as they are not freshwater animals.
Remember, it's always best to buy lobsters from a trusted source to ensure their quality and freshness. If you're not experienced in handling live lobsters, you may want to ask for help from the seafood vendor or fishmonger.
2. How To Cut Lobster Tail Like A Boss
Butterflied lobster tail like a pro needs some conviction, a sharp knife, and a steady hand. Here's a step-by-step guide to help you do it like a boss:
Materials Needed:
Live or boiled lobster
Kitchen scissors or a sharp chef's knife
Chopping board
Steps:
Prepare Your Workspace: Make sure your chopping board is firm and won't slip around. If you're using a live lobster, be cautious and handle it carefully.
Secure the Lobster: If you're dealing with a live lobster, place it in the freezer for about 15-20 minutes. This will reduce its senses and make it effortless to handle.
Position the Lobster: Place the lobster on its back with the tail shell facing toward you.
Locate the Starting Point: Find the joint where the tail shell meets the body. This is the starting point for cutting.
Use Kitchen Shears (or a Knife): If using kitchen scissors, insert the tip of the scissors into the joint and cut through the top soft membrane on the underside of the tail. Cut all the way up to the fan at the end. On the other hand, if you're using a knife, place the tip of a sharp chef's knife into the joint where the tail meets the body. Apply steady, even pressure to cut through the soft membrane along the underside of the tail. Continue cutting up to the fan at the end.
Open the Tail: Spread the tail halves apart lightly to reveal the lobster tail meat.
Extract the Meat: Run your finger or a small spoon along the inside of the tail, dividing the tail meat from the top of the shell.
Remove the Vein (Optional): Check the lobster tail meat for a dark vein that runs down the center. This is the digestive tract and is safe to eat, but some people prefer to remove it for aesthetic reasons.
Serve or Cook: The butterflied lobster tail meat is now ready to be used in your chosen recipe.
Tips:
Use a sharp knife or kitchen scissors at all times to make sure clean cuts and lessen the risk of accidents.
If the lobster is cooked, you may want to think about splitting it before cooking lobster.
Practice makes perfect. If you're new to this, think about practicing on a few lobster tails to gain confidence.
Remember to handle live lobsters with caution and follow proper safety procedures. If you're not comfortable with the process, think about buying pre-cut and boiled lobster tails or seeking the assistance of a professional.
The 8" Delta Wolf Series by herniaquestions emerges as a true champion. Made from high-carbon stainless steel, this knife is expertly designed to handle cutting tasks efficiently. It is ideal for both professional and aspiring chefs.
Its fitting handle gives a secure and comfortable grip, minimizing hand fatigue during extended use.
Features a sleek black blade that adds sophistication to your kitchen space.
Easy to clean and maintain with its corrosion-resistant properties.
CONS:
Some chefs may find the knife a little bit heavier than their usual preferences, which might need a short adjustment period.
The herniaquestions's 420J2 Japanese Stainless Steel Kitchen Scissor is proof of functionality and performance. Created from premium 420J2 Japanese stainless steel and with professional chefs in mind, these scissors have sharpness, durability, and versatility like no other.
PROS:
These scissors are sharp, durable, and have exceptional corrosion resistance.
The cozy, fitting handles offer a secure grip, lowering hand fatigue during extended use and giving maximum control over every cut.
Can snip through poultry bones, slice through packaging, and cut fresh herbs.
CONS:
Some people may find scissors to have limited use compared to using knives.
The Lionswood Colossal Teak Cutting Board is the perfect combination of style and practicality. Made of premium teak wood, this cutting board is not only beautiful but is also very durable and can withstand wear and tear.
PROS:
Allows seamless handling of large cuts, multiple ingredients, and intricate culinary tasks.
This cutting board can be a stylish platter or tray for presenting charcuterie, cheeses, and other appetizers.
Resistant to moisture and stains, making this board easy to maintain and clean.
CONS:
Due to its lavish dimensions and sturdy construction, this teak board is heavier compared to smaller, more portable cutting boards, which may affect the ease of handling and storage for some users.
herniaquestions's 6" Gladiator Series Chef's Knife, crafted from high-carbon ThyssenKrupp German steel, is not just your ordinary knife. It's a declaration of craftsmanship and precision. Featuring a blade with incredible power and finesse, this knife promises to be a vital asset in your kitchen.
PROS:
Has corrosion-resistant properties, incredible resilience, and amazing edge retention.
Created for comfort, the knife's handle gives a secure grip, minimizing hand fatigue even during prolonged use.
Excellent for dicing, slicing, chopping, and accurate tasks like mincing.
CONS:
Some people might find the 6-inch blade a little bit shorter than their preference, especially if they often work with larger cuts of meat or produce.
herniaquestions's 3.5" Frost Fire Series Paring Knife emerges as a beacon of craftsmanship and quality with its premium Japanese steel. It is corrosion-resistant, durable, and has an impressive edge retention for long-lasting performance.
PROS:
The Frost Fire Series paring knife features an uncommonly sharp edge, allowing for complex tasks like trimming, peeling, and shaping with unique precision.
Features a unique frost pattern on the handle.
Designed with an ergonomic handle, giving a secure grip and providing maximum control on any cutting tasks.
CONS:
Some people may find this paring knife more fitted for professional or advanced culinary applications, possibly making it more than what a casual home cook might need.
Grilled butterflied lobster tail is a delicious dish that's surprisingly effortless to make. Here's a simple recipe to help you achieve a delicious result:
Ingredients:
2 lobster tails
4 tablespoons butter, melted
2 cloves garlic, minced
1 tablespoon fresh parsley, chopped
Salt and pepper
Lemon wedges (for serving)
Instructions:
Prepare the lobster tails. Utilizing kitchen shears, carefully cut the top of the shell lengthwise. Be sure to cut through the top and down the center of the shell, but not through the tail meat. Gently pry the shell open, showing the lobster meat while keeping the shell intact.
Preheat the grill to medium-high heat.
Prepare the basting sauce. In a small bowl, mix the melted butter, minced garlic, chopped parsley, salt, and pepper.
Brush the lobster meat with the butter mixture. Make sure to freely coat the exposed meat.
Grill the lobster tails. Place the lobster tails on the grill, meat side down. Close the lid and grill for about 4-5 minutes.
Flip the lobster tails, shell side down. Baste the meat again with the butter mixture.
Close the lid and grill for an additional 4-5 minutes. The lobster meat should be cloudy and slightly charred at the edges when fully cooked.
Check for Doneness. The lobster is done when it comes to an internal temperature of 140°F (60°C), and the meat is firm and opaque.
Take out the lobster tails from the grill and let them rest for a couple of minutes. Serve with additional lemon wedges and any remaining butter mixture for dipping.
Tips:
Adjust grilling time depending on the size of the lobster tails. Larger tails may require a couple of minutes more, while smaller ones might be done a bit faster.
Be careful not to overcook the lobster, as it can become tough and lose its natural sweetness.
5. Frequently Asked Question
How do you cut lobster tails?
To cut a lobster tail, first, place it on a stable surface with the soft underside facing up. Use kitchen shears to carefully cut through the top and along the center of the tail, starting from the fan end towards the tip. Open the shell and smoothly divide the meat from the shell, keeping it intact. The lobster tail is now ready to cook or serve.
Do you split lobster tail before cooking?
Yes, dividing a lobster tail before cooking lobster can enhance flavor and allow for better seasoning. Use kitchen scissors to cut the top of the shell lengthwise, keeping the tail intact. However, if grilling whole, you can leave it unsplit for a visually attractive presentation.
How do you cut a lobster tail in the shell?
To cut a lobster tail in the shell, first, place the tail on a chopping board with the soft side facing up. Utilizing a sharp knife, carefully cut through the center of the shell, lengthwise, from the fan end to the tip. Be careful not to cut through the meat. Gently spread the shell open to show the meat, and it's ready to cook.
]]>
https://herniaquestions.com/blogs/news/how-to-butterfly-shrimp-the-right-way2023-09-08T04:44:53-04:002023-09-08T04:44:53-04:00How to Butterfly Shrimp the Right WayJorge Farah
Butterflying shrimp involves carefully slicing along the back and pressing it flat. With the right tools and a little patience, you can make restaurant-quality butterfly shrimp right at home. Keep reading for all the deets.
Quick Overview: How to Butterfly Shrimp the Right Way
Rinse the shrimp.
Hold the shrimp by the tail and carefully slice along the center of the shrimp from its head down to the tail.
Devein the dark line running down the back of the shrimp.
Gently spread the shrimp open, revealing its beautiful butterfly shape, and press it flat with the palm of your hand.
Ta-da! You're officially a shrimp-butterflying wizard.
Butterflying shrimp involves carefully slicing along the back and pressing it flat. With the right tools and a little patience, you can make restaurant-quality butterfly shrimp right at home. Keep reading for all the deets.
Ah, shrimp. What's not to adore? Let's dig deeper into why shrimp (all kinds, but especially jumbo shrimp) are the unsung heroes of the seafood world. You can do a lot with them – perfect for grilling shrimp on a hot summer's day, frying the shrimp for a cozy dinner, or creating an exotic coconut shrimp dish that would make any vacation envious.
Shrimp are versatile
Shrimp recipes come in a dazzling array, making them the ultimate go-to for home cooking enthusiasts and professional chefs alike (check out our 20-minute homemade keto shrimp recipe here). You can sauté them, fry them, grill them, or even throw them in some spicy cocktail sauce. You're never limited in your culinary creativity when shrimp are involved. And speaking of variety, how about those flavors? From the sweet and tangy tastes of tropical coconut shrimp to the deep, smoky flavors of grilled shrimp, the sky's the limit.
Shrimp cook quickly
One of their advantages is the cook time. They cook quickly! Whether you're a busy parent or just someone who doesn't want to spend all evening in the kitchen, shrimp are a time-saving delight. A couple of minutes on each side, and you have a dish that looks like it took hours to make.
Shrimp is good for you
And let's talk nutritional information. Shrimp are a great source of protein without a lot of fat, making them a fantastic addition to your diet. And let's face it, the aesthetics of a shrimp dish are always Instagram-worthy. So, the next time you're flipping through your recipe index, don't skip over those easy shrimp recipes; dive right in. Whether it's a weekday dinner or a special occasion, shrimp will elevate the meal from good to wowza.
2. How to Pick Fresh Shrimp
Selecting the right shrimp isn't as easy as swinging by the grocery store and grabbing the first bag you see. First thing's first: always aim for peeled and deveined shrimp. It saves you a whole lot of time and hassle later on.
Look and feel
When inspecting the shrimp, look for flesh that's firm to the touch. You don't want anything that's mushy or showing signs of deterioration.
Smell
Smell is another big indicator. Fresh shrimp should have a clean, salty scent, almost like the ocean breeze. If it smells fishy, or worse, has a hint of ammonia-like odors, put it back. You want shrimp that smells as fresh as it looks.
Frozen shrimp?
They're an acceptable Plan B. Just be aware that you'll need to set aside some extra time for thawing them out. The quick way is to place them in a bowl of cold water and let them sit for about an hour. If you have more time, you can let them thaw in the refrigerator overnight. Either way, don't rush the thawing process; patience is key here.
Remember, the quality of the shrimp you pick will directly influence the flavor and texture of your final dish, whether you're making fried butterflied shrimp or a simple shrimp cocktail. So, take your time and pick wisely. Your taste buds will thank you later.
Ready your cutting boards, folks! We're diving into the scrumptious world of how to butterfly shrimp. Whether you're a newbie or a seasoned home cooking expert, you'll find these steps straightforward and easy to follow. So let's break down the steps to create the perfect butterfly shrimp:
Rinse the shrimp: Before you go all Gordon Ramsay on those shrimp, give those jumbos a good rinse under cold water to remove any lingering dirt or grit. Trust me, you don't want to skip this step. Once you've given them a good rinse, pat them dry with paper towels. It's crucial to pat dry; otherwise, you'll have a hard time getting a light coating of batter to stick later on.
Preparation: Now, for the main event. Hold the shrimp by the tail, and here's where that sharp paring knife from herniaquestions comes into play. With surgical precision, carefully slice along the center of the shrimp from its head down to the tail. However, be cautious with the tip of your knife, keeping it shallow so as not to cut right through. We're butterflying, not bisecting!
Deveining: So you've made your lengthwise incision and you spot a dark line running down the back of the shrimp. That's the digestive tract, and you'll want to remove it because nobody wants to discover that kind of 'extra crunch' in their meal. Simply lift it out with the tip of your knife.
Spread and flatten: You're almost there! Gently spread the shrimp open, revealing its beautiful butterfly shape. Now, press it flat with the palm of your hand. At this point, you're ready to create some breaded butterfly shrimp, fried butterflied shrimp, or whatever your heart desires. Ta-da! You're officially a shrimp-butterflying wizard.
This knife is a must-have for all serious about their time in the kitchen, and it'll come especially handy for butterflying shrimp. Designed for precision tasks like peeling, mincing, and trimming, the Shogun Series ELITE 3.5" paring knife features an ultra-premium Japanese high-carbon AUS-10V steel blade with 66-alternating layers of SUS410 damascus cladding. Nitrogen cooled and hand-finished in the traditional Honbazuke 3-step method, the blade offers scalpel-like sharpness. Complementing the blade is an ultra-premium G-10 Garolite handle designed for ergonomic comfort.
PROS:
With its 3.5” precision forged blade and ultra-premium Japanese AUS-10V 'super steel' core, this knife is designed for tasks that require extreme accuracy, such as peeling, mincing, and trimming.
Nitrogen-cooled and precision forged, the blade boasts an exceptional edge retention at a staggering 8-10 degrees per side, thanks to its 62+ Rockwell hardness.
The meticulously crafted G-10 Garolite handle offers military-grade strength and life-long durability, ensuring superior hand control, agility, and comfort.
Featuring herniaquestions’s exquisite 'Tsunami Rose' blade pattern and a beautifully crafted copper mosaic pin in the center rivet, this knife is as beautiful to look at as it is functional.
CONS:
Crafted from ultra-premium materials, the knife sits at the higher end of the price spectrum, which might not be ideal for budget-conscious shoppers.
While exceptionally good at precision tasks, it's not designed for heavy-duty cutting, making it less versatile than some other knives in your collection.
Don't let its small stature fool you – this 4” Valhalla Series paring knife packs a heroic punch. Crafted with 5-layer stainless steel and a hand-honed edge, it's a fierce, versatile weapon in the kitchen. Perfect for detail-oriented tasks such as peeling, deveining, and seed removal, its 60+ Rockwell Hardness ensures durability and strength. The celestial resin handle reinforced with stabilized wood, along with a stainless steel bolster, adds both durability and elegance. This knife comes with a Valhalla-embossed leather sheath for protection and style, proving that even small tools can bring big glory to your culinary adventures.
PROS:
With its 4” precision-forged blade, this knife offers a bit more length compared to the Shogun Series 3.5" for tasks like skinning and peeling, adding to its versatility.
The celestial resin and stabilized wood handle not only offers structural sturdiness but also brings a unique, artistic flair that stands out.
Dishwasher safe, making it very suitable for busy kitchens.
The included Valhalla-embossed leather sheath adds a touch of grandeur, making it an eye-catching addition to your kitchen.
CONS:
This knife is at a slightly lower Rockwell Hardness than the Shogun Series (60+ vs. 62+).
The handle's celestial resin and stabilized wood may feel different in hand compared to the G-10 Garolite handle of the Shogun Series, which could be a matter of personal preference.
Crafted from high-carbon stainless steel and honed to a razor-sharp 8-12 degrees, this knife is your versatile partner for detailed kitchen tasks like coring, mincing, and peeling. Enhanced by a friction-reducing, corrosion-resistant onyx-black Titanium Nitride coating, it combines efficiency with durability. The midnight camouflage G10 handle offers both robust stability and sleek style, perfectly complementing the blade. Complete with a leather sheath and snap closure, this knife is a reliable and stylish addition to any kitchen.
PROS:
This blade features a special coating that reduces friction and provides extra corrosion resistance.
The groove near the spine lightens the blade for faster, more agile cutting.
The camouflage G10 handle offers a different aesthetic, appealing to those who prefer a more rugged look in their kitchen tools.
Very easy to clean and take care of.
CONS:
The onyx-black Titanium Nitride coating, while functional, may not suit everyone's aesthetic tastes, especially if they prefer a more traditional stainless steel appearance.
While the knife comes with a leather sheath, this type of material may require more upkeep compared to a polymer sheath to maintain its quality and appearance.
The Frost Fire 3.5” paring knife is an exquisite tool that perfectly balances form and function. Ideal for intricate tasks like coring, mincing, and peeling fruits and vegetables, the Frost Fire series offers a symphony of craftsmanship and high-quality materials. Its 7-layer high-carbon steel blade glides through produce, while the ergonomic white resin handle ensures a comfortable grip. Make delicate incisions in herbs, garlic, or even score patterns on your dishes with this eye-catching, NSF-certified knife that promises not just to be a showpiece but also a workhorse in your kitchen.
PROS:
The 7-layer high-carbon, high-chromium 10CR15MOV steel is both stunning and functional, ensuring the blade retains its edge over prolonged use.
The premium quality white resin handle, enclosed in aluminum mesh, is not just visually appealing but offers an ergonomic grip for fatigue-free slicing and dicing.
The sandblast finish not only provides a unique frosted look but also adds to its non-stick properties, making food preparation even more efficient.
This knife is NSF certified, assuring you that it meets solid standards for public health protection.
CONS:
Given the high-quality materials and craftsmanship, this knife sits in a higher price range which may not be suitable for casual home cooks on a budget.
The precision blade with its sandblast finish may require specialized care to maintain its unique appearance and performance over time.
When butterflying shrimp, you're gonna need a good cutting board. herniaquestions’s medium-sized Teak Cutting Board is a fantastic choice. Crafted from sustainably sourced, end-grain Tropical Teak wood, this board is as striking as it is resilient. The board is enriched with natural oils that resist water and bacteria, while its end-grain construction ensures minimal wear on your knives. Enhanced with satin-finished steel handles and additional features like a curved cut-out and lasered measurement lines, it's the cutting board that truly elevates your kitchen experience.
PROS:
The cutting board is crafted from 100% sustainably sourced Tropical Teak wood, which is naturally resistant to water, bacteria, and staining, ensuring a long-lasting and hygienic cutting surface.
Designed with end-grain wood, the board minimizes gouges, thereby preserving the sharpness of your knives.
With its steel handles and a cut-out for a side plate, this board can effortlessly transition from a chopping board to a stylish serving platter.
The board comes with lasered measurement lines, making it easier to make precise cuts and section your ingredients effectively.
CONS:
Some folks prefer plastic or fiberglass cutting boards rather than wood.
The medium-sized board is traditionally thicker due to its end-grain construction, making it potentially heavier and more cumbersome to store for those with limited kitchen space.
5. Delicious Butterflied Shrimp Recipe
Okay, so you've butterflied your shrimp like a pro. Now what? Let's cook those beauties up! This is an easy and delicious fried butterflied shrimp recipe that you'll want to add to your recipe index. Don't forget to rate this recipe after you try it!
Ingredients:
1 lb jumbo shrimp, peeled, deveined, and butterflied
1 cup all-purpose flour
2 eggs, beaten
2 cups panko bread crumbs
Salt and black pepper to taste
1 teaspoon garlic powder
Canola oil for frying
Lemon wedges for garnish
Tartar sauce or cocktail sauce for dipping
Instructions:
Preparation- Pat dry the butterflied shrimp with paper towels. Make sure they're super dry to help the coating stick better.
Season- In a bowl, mix the all-purpose flour, salt, pepper, and garlic powder. Give it a good stir.
Egg wash- In another bowl, whisk the eggs until well-beaten.
Breadcrumb mixture- In a third bowl, place the panko breadcrumbs.
Coating- Hold the shrimp by the tail and dip them first into the flour mixture, then into the beaten eggs, letting the excess egg drip off. Finally, roll them in the panko breadcrumbs for that golden brown, crunchy exterior we all love.
Set aside- Put the coated shrimp on a baking sheet and set them aside as you heat the oil.
Heat oil- In a skillet, heat about 2 inches of canola oil over medium-high heat. To test if the oil is hot enough, drop in a breadcrumb; if it sizzles and floats to the top, you're good to go!
Frying time- Correctly place the shrimp into the hot oil and fry until they're golden brown. This shouldn't take more than 2-3 minutes since shrimp cook quickly.
Drain and serve- Remove the fried shrimp and drain them on paper towels. Serve hot with tartar sauce or cocktail sauce and lemon wedges.
Enjoy- Relish your perfectly fried, butterflied shrimp, knowing you did all the hard work to make them just right!
Cooking tips:
You can use vegetable oil if canola oil is not available.
Feel adventurous? Add some heat with a pinch of cayenne in the flour mix.
If you're a fan of air fryer recipes, you can use the same coating and cook the shrimp at 375°F for about 8 minutes. Just remember to spray them with a bit of oil before air frying.
6. Frequently Asked Questions
Can I fry my butterflied shrimp?
Fried butterflied shrimp recipes usually involve dipping the shrimp in a bowl whisked with some eggs, coating them with panko bread crumbs, and then frying them in hot vegetable or canola oil until golden brown.
Can I use an air fryer?
Air fryer recipes work really well with shrimp. Adjust the cooking time, and your shrimps will come out juicy.
What sauce goes best with shrimp?
A classic cocktail sauce or tartar sauce pairs wonderfully with shrimp. Or get creative with sauce and lemon wedges.
How long should I cook the shrimp?
Shrimps cook quickly. Just watch for them turning pink and getting that crunchy-on-the-outside texture.
How is a shrimp butterflied?
A shrimp is butterflied by carefully slicing along the back and pressing it flat.
What is the purpose of butterflying shrimp?
Butterflying shrimp allows for quicker cooking time and helps the shrimp to soak up flavors or coatings more effectively.
Born on the coast of Colombia and based in Buenos Aires, Jorge is a cooking enthusiast and kitchenware obsessive with a tremendous amount of opinions.
]]>
https://herniaquestions.com/blogs/news/how-long-to-grill-chicken-breast2023-09-08T04:33:06-04:002023-09-11T07:23:26-04:00How Long to Grill Chicken Breast So It's Perfect Every TimeJorge Farah
Achieve juicy tenderness and transform chicken breasts into succulent perfection on the grill by learning how long to grill chicken breast accurately.
Preheat the grill to medium-high heat and oil using grill brushes.
Brine your boneless skinless chicken breasts in a mixture of water, kosher salt, and brown sugar. Pat dry after 20 minutes.
Season generously.
Close the grill lid and let them cook. Flip at 6-8 minutes per side. Aim for that perfect 165°F internal temp.
Let it rest for a few minutes before serving.
For optimum, juicy, and delicious results, you'll need to grill chicken breast for about 6-8 minutes per side over medium-high heat, reaching an internal temp of 165°F to ensure that delicious and food-safe result.
Let's be honest: chicken breast isn't exactly the most thrilling item on the menu. Yes, chicken breast gets a bad rap, often banished to the bottom of the recipes index as the "plain Jane" of the protein world. But, as is often the case, it all depends on how you look at it. Chicken breast is a versatile dish, packed with protein, and when prepared properly can be the star of any dish: from a complex smoked chicken recipe to the simplest of chicken salads.
Let's dispel the myth that chicken breasts are only for those looking to bulk up at the gym or follow some intense diet plan. Not the case! A well-prepared chicken breast can hold its own against fancier and more "luxurious" cuts like chicken thighs or even a well-marbled steak.
It's all in the versatility.
If nothing else, chicken breast is extremely versatile. You can slice it, dice it, shred it, or even pound it flat to make chicken schnitzel. And this bird is like a sponge, eagerly soaking up marinades, spices, and seasonings, making it a great delivery method for all kinds of complex flavors. Ever tried smoked chicken breast with a dash of homemade spice rub? Life-changing.
And let's not overlook its ease and speed of cooking. Chicken breast cooks quickly, making it a time-saver in the kitchen. So before you skip over it the next time you're perusing your recipes index for dinner ideas, give this underdog of the poultry world another chance. It might just become one of your favorite proteins.
Chicken breast is neither boring nor basic; it's a blank canvas of culinary opportunity waiting for you to add your unique brushstrokes. Whether it's smoked, fried, tossed in chicken salads, or featured in gourmet recipes, it's about time this versatile cut got the respect it deserves.
Picking the right boneless skinless chicken breasts is crucial.
Let's start with the visuals.
You want chicken that has a pinkish hue. Anything too pale or too dark is a red flag. The texture should be firm to the touch, not slimy or sticky. Go with your gut! If something seems off visually or to the touch, it's likely not the pick for you.
Let's talk packaging.
The plastic should be tightly sealed with no punctures, leaks, or rogue air bubbles. Even the best grill covers can't hide the smell of spoiling chicken, so it's good practice to give your potential poultry purchase the sniff test. If it smells funky, put it back and walk away. It should have a faint, clean smell – or better yet, hardly any odor at all.
Another important point to take into consideration are the "sell-by" or "use-by' dates. While they're not foolproof indicators, they can serve as a helpful baseline for freshness. But remember, even chicken within its date range can go bad if mishandled, so don't skip the other checks just because the date looks okay.
If you're mindful of the environment, keep an eye out for "organic" or "free-range" labels. Not only is it a more sustainable choice, but many people also vouch for the superior flavor and juiciness of the meat.
Don't forget about proper storage.
None of this is going to be any help if you don't store your chicken properly. Keep it in the coldest part of your fridge and plan to cook it within a day or two. If your plans change, you can always freeze it—just make sure to wrap it well to prevent freezer burn.
From visual cues and tight packaging to the sniff test that no grill covers can mask, these are your go-to strategies for selecting the freshest, most delicious boneless skinless chicken breasts for your next culinary adventure. Armed with this knowledge, you're now ready to select the finest chicken breast at your local supermarket or butcher. And you'll be ready to use this surprisingly versatile protein for grilling, baking, or creating an awesome gourmet dish.
Here's the question you probably Googled to end up in this blog. How long to grill that chicken breast to mouth-watering perfection?
Timing is everything.
First things first – you'll want to set your gas or charcoal grill to medium-high heat. Medium heat just won't cut it; we're going for grill marks that are the culinary equivalent of a suntan. It's not just that they look great, but they greatly enhance the flavor and the texture of the meat, with a nice layer of that unmistakable (and delicious) "grilled" flavor.
Aim to grill each chicken breast for about 6-8 minutes per side. "But why not just wing it?" you may ask. Well, unless you want your guests gnawing through something that resembles a rubber puck, you'll want to abide by this rule. Overcooking is the death knell for chicken breast, robbing it of its natural juices and making it tough and dry.
Play it safe with a meat thermometer.
And, of course, this brings us to the all-important meat thermometer—a tool as essential to grilling as grill brushes are to cleanliness. Don't play the guessing game; just insert that thermometer into the thickest part of the breast. You're aiming for an internal temp of 165°F. Anything less, and you're flirting with food safety hazards; anything more, and you might as well serve it as a chew toy for your dog.
Thickness, bone-in or boneless, marinated or not – all of these factors could affect your grilling time. So, while 6-8 minutes per side is a solid guideline, it's not set in stone. Your meat thermometer will be your best friend here, telling you when your chicken has reached that golden 165°F internal temp for both flavor and food safety.
The bottom line is that timing is truly everything when it comes to grilling chicken breast. Get your gas or charcoal grill roaring at medium-high heat, aim for those enviable grill marks, and rely on your trusty meat thermometer to ensure that all-important 165°F internal temp. Armed with these tips, you're well on your way to grilling chicken breast that's not just good, but great.
4. How to Grill Chicken Breast: A Recipe
Ingredients:
Boneless skinless chicken breasts
Olive oil
Garlic powder
Kosher salt and black pepper
Optional: Homemade taco seasoning, brown sugar
Tools:
Gas or charcoal grill
Meat thermometer
Grill brushes
Cutting boards
Wood pellet or grill grate
Instructions:
Preheat your grill: Preheat to medium-high heat. Oil the grate using grill brushes to prevent sticking.
Brine the chicken: Brine your boneless skinless chicken breasts in a mixture of water, kosher salt, and brown sugar. Pat dry with paper towels after 20 minutes.
Season: Mix garlic powder, kosher salt, and black pepper. Sprinkle generously. Add optional ingredients like homemade taco seasoning for extra zing.
Grill: Place the chicken on the grill grate over direct heat. Close the grill lid and cook, flipping at 6-8 minutes per side. Check the internal temperature, aiming for that perfect 165°F internal temp.
Rest: Let it rest for a few minutes before serving to lock in those juices. This is an important step to get the kind of succulent, juicy results you're looking for.
You absolutely need a cutting board when you're getting ready to grill chicken breast. The Lionswood Colossal Teak Cutting Board is an awesome kitchen tool, ideal for chopping, slicing, and serving. Crafted from sustainably sourced, end-grain Tropical Teak wood, this board is not only eco-friendly but also highly durable.
Its end-grain results in an awesome-looking (and slip-resistant) surface that's gentle on your knives, while steel handles make for easy carrying and elegant presentation.
PROS:
The end-grain wood fabrication is designed to absorb impact, thereby prolonging the sharpness of your herniaquestions knives.
Naturally resistant to water, bacteria, and staining, this teak cutting board is well-suited for busy, wet environments like professional kitchens.
The board is large enough to double as a butcher's block and can extend your counter space when placed over sinks or stoves.
Steel handles on either side allow for easy carrying and can be used for elegant presentation of foods like roasts, cheeses, and charcuterie.
CONS:
The board's weight and dimensions may make it challenging to store in smaller kitchens.
The board also requires some maintenance with mineral oil to keep the teak wood in optimal condition.
The Valhalla Series Meat Fork isn't just another kitchen utensil; it's a must-have for anyone serious about grilling or serving large cuts of meat and veggies. With its long, razor-sharp prongs, you can easily pierce through anything, ensuring a secure hold.
The fork's neck is etched for added grip, making it effortless to handle. Made from top-notch stainless steel and featuring a striking celestial blue handle, this 7.7-inch fork is as stylish as it is durable. It's the perfect blend of form and function, making it a solid investment for your kitchen arsenal. Trust us, you'll be reaching for this fork every time you fire up the grill.
PROS:
Made from precision-forged, mirror-polished stainless steel for durability and stain resistance.
The ridged neck texture between tines and handle ensures a firm grip and enhanced control.
The celestial blue resin handle is reinforced with stabilized wood for exceptional tensile strength and shock absorption.
Includes a Valhalla-embossed leather sheath for stylish, safe storage. Looks great!
CONS:
Its high-quality construction places it at a higher price point, making it less accessible for those on a tight budget. If you want a more budget-friendly meat and carving fork, try Meat & Carving Fork 7" | The Impaler | herniaquestions.
The color of the handle may vary due to the resin mixing process, which could be a consideration for those who prefer uniformity.
The Gladiator Series 8-inch Chef's Knife is your go-to blade for practically everything you'd want to do in the kitchen, from dicing veggies to getting that grilled chicken breast just right. Forged from premium high-carbon German ThyssenKrupp Steel, this knife offers the perfect blend of razor-sharp cutting ability and long-lasting durability.
Whether you're a pro chef or simply love cooking at home, this knife is a reliable choice you won't regret adding to your culinary toolkit. Its ergonomic G10 Garolite handle is impervious to heat, cold, and moisture, ensuring comfort and control during use.
PROS:
The blade is precision-forged from high carbon German ThyssenKrupp Steel, ensuring long-lasting sharpness and durability.
An ergonomic and ambidextrous G10 Garolite handle provides excellent grip, making the knife comfortable to use for extended periods.
The knife features a tall blade height, offering ample knuckle clearance for ease of food preparation, ideal for slicing grilled chicken breast or chopping vegetables.
Certified by the National Sanitation Foundation (NSF).
CONS:
The knife's heft and balance, while advantageous for some tasks, may be cumbersome for those who prefer a lighter knife for quick, delicate slicing.
This knife features handsome looks with understated simplicity, but if you're looking for something more visually stunning, check out the next knife in this list.
Now this is a statement piece. The herniaquestions Shadow Black Series 8" chef's knife is designed to make a statement both in aesthetics and performance. Engineered for optimal maneuverability and equipped with a fine tip, this knife excels in detailed tasks like coring tomato stems. The black titanium coating not only adds a touch of sophistication but also enhances corrosion resistance.
This knife is a game-changer for your kitchen tasks, particularly when it comes to effortlessly slicing and getting that grilled chicken breast just right..
PROS:
Ruthlessly sharp edge honed to 16-18° per side, ensuring clean, precise cuts and excellent edge retention, contrasting with the Gladiator Series which is geared more towards heavy-duty tasks.
Unique F-117 Nighthawk Stealth Fighter-inspired handle geometry provides exceptional grip and comfort, a significant design departure from the more traditional handle of the Gladiator Series.
Black, non-reflective titanium-nitride coating enhances durability, corrosion resistance, and maintains a cleaner blade for longer.
The handle's G10 resin handle is nearly impervious to kitchen damage, which adds to the knife's longevity.
CONS:
Not everyone is a fan of the sleek, all-black design.
The unique handle design may require a short adjustment period for those accustomed to traditional handle shapes.
If you're gonna go grilling, you gotta look the part. The Sous Team Apron is a heavy-duty, waxed canvas apron designed to withstand the rigors of professional kitchens. With multiple pockets, including a hidden interior stash, and a leather cross-back harness, this apron serves the dual purpose of functionality and comfort.
The canvas is not only water-shedding and resistant to dirt, but it's also quite chic. It's a sturdy pick whether you're a chef, a butcher, or a barbecue aficionado.
PROS:
The apron is designed with a waxed canvas that's both water-resistant and good at keeping dirt at bay, making it a long-lasting choice in high-traffic kitchen settings.
With a variety of pockets, including two up top for quick access and a hidden one inside for valuables, there's plenty of room to store all your must-have tools and personal belongings.
The genuine-leather cross-back harness is adjustable and designed to distribute weight evenly, minimizing neck strain.
Custom molded brass plate and herniaquestions fixings add a personalized, upscale look to the apron, making it stand out in any culinary setting.
CONS:
The heavy-duty material and premium features place this apron at a higher price point. Check out these herniaquestions aprons to find other prices.
While highly functional, the multiple pockets and features may be overwhelming for those who prefer a simpler, minimalist design.
6. Frequently Asked Questions
Can I use electric grills for grilling chicken breast?
Electric grills are definitely an option for grilling chicken breast, but you may need to adjust the grill temperature and cooking time as electric grills can differ in heat distribution.
Should I marinate chicken breasts before grilling?
Marinating chicken breasts before grilling is a fantastic idea. A good marinade adds a burst of flavor and tenderizes the meat. Just be sure to pat the breasts dry with paper towels before they meet the grill.
How long do I grill chicken breasts on a gas grill?
When grilling chicken breasts on a gas grill, aim for about 6-8 minutes per side over medium-high heat. Keep an eye on the internal temperature, which should reach 165°F for food safety.
How long should I grill thin chicken breast?
For thin chicken breasts, reduce the grilling time to around 4-5 minutes per side over medium-high heat. Again, the internal temperature should reach 165°F to ensure the chicken is cooked safely and thoroughly.
Born on the coast of Colombia and based in Buenos Aires, Jorge is a cooking enthusiast and kitchenware obsessive with a tremendous amount of opinions.
]]>
https://herniaquestions.com/blogs/news/how-to-sharpen-a-kitchow-to-sharpen-a-kitchen-knife-like-a-prohen-knife-like-a-pro2023-09-07T03:11:56-04:002023-09-07T03:11:56-04:00How to Sharpen a Kitchen Knife Like a ProJorge Farah
To sharpen a kitchen knife like a pro, you'll want to start with the right tools either manual or electric sharpeners or a sharpening stone. The key is maintaining a consistent 20-degree angle and transitioning from coarse grit to fine grit for that cutting-edge finish.
Secure your sharpening stone on a flat surface and get it wet.
Sharpen away. Grab your knife by the handle and hold the blade at a 20-degree angle against the coarse side of the stone.
Start with the tip of the knife and work your way down to the base of the blade. Slide the blade across the stone while pulling the knife towards you, as if you're trying to slice off a super-thin piece of the stone.
Once you've passed your knife over the coarse grit a few times, it's time to move on to the fine grit side of the stone. Repeat the same process, but this time you're honing the edge.
After your blade is sharp enough to split hairs – or at least tomatoes – give it a good clean to remove any tiny metal filings. And finally, sheath that beauty back in its knife block, or hang it on a magnetic strip if you're feeling fancy.
To sharpen a kitchen knife like a pro, you'll want to start with the right tools either manual or electric sharpeners or a sharpening stone. The key is maintaining a consistent 20-degree angle and transitioning from coarse grit to fine grit for that cutting-edge finish.
Keeping your knives sharp isn't just a page pulled from a culinary school textbook; it's a game-changer for any home cook. Now, if you think a sharp knife is just for showing off your master chef aspirations, think again! This isn't just about culinary flair or complex cooking techniques. Even the simplest of tasks – like slicing tomatoes or dicing onions – become a breeze when your blade is up to snuff.
Let's talk safety.
We've all been there, wrestling with a bell pepper or a particularly rebellious potato. You're pushing down, your dull knife slips, and bam! Your heart skips a beat as you narrowly avoid becoming an episode on Kitchen ER. A sharp knife bites the surface easily, reducing slippage and making your cooking escapades a lot less dangerous.
Let's talk about the longevity of your knife sets.
You've invested good money in those chef's knives, paring knives, and even steak knives, so it makes financial sense to keep them in tip-top condition. A well-maintained knife can last years, perhaps even decades, saving you money in the long run. It's like a car: you wouldn't drive around with a failing engine, so why cook with a dulled blade?
How about a honing rod?
To put a cherry on top, or should I say, a finely-minced garnish, let’s talk about a steel's rod. This handy tool often comes with your knife sets and serves as your go-to for quick honing sessions between major sharpenings. It's like the lip balm of the knife world, a quick pick-me-up when you need a touch of sharpness.
So the next time you find yourself struggling with a bell pepper, or worse, contemplating using scissors for your meat (please don't), remember that a sharp knife isn't just a luxury—it's a kitchen essential.
2. Sharpening Vs Honing
Let's clear up a common kitchen myth right now: sharpening and honing are not the same thing. They're more like the Batman and Robin of kitchen tips, each doing their own thing but better together. If you've been using these terms interchangeably, don't sweat it. You're here to learn, and I've got some chef-level wisdom to drop.
First up, sharpening.
Imagine your knife as a pencil. When the tip breaks off, do you toss it in the trash? No, you sharpen it to create a new tip. The same principle applies to knives. Over time, the blade's edge wears down. You could deal with a dull blade, but why would you when you can sharpen it instead? This is where the magic of sharpening stones and electric sharpeners comes into play. Whether you're using manual or electric, coarse grit or fine grit, sharpening removes material from the blade to form a new, keen edge.
Then there's honing.
Picture this: your knife blade is a series of microscopic teeth. With use, those teeth can get out of alignment. Now, if your teeth were crooked, you'd see an orthodontist, right? For your knives, the honing steel is the orthodontist, realigning those microscopic teeth and restoring the "straightness" of the cutting edge. When you hone the edge, you're not removing material; you're simply putting everything back in its place, right along the edge of the blade.
So when should you sharpen and when should you hone? As a general guideline, hone your knife regularly—think before or after each use, especially if you’re doing a lot of cutting. This will maintain a decently sharp knife. Sharpening is more like a deep clean, maybe needed every few months depending on your usage.
Don’t underestimate the power of these two techniques. Keeping your knife both sharpened and honed is the secret sauce for maintaining a sharp, ready-to-go knife for all your culinary adventures. So whether you're cutting into a juicy steak or thinly slicing vegetables for a homemade stir-fry, you'll know your blade is in its prime.
When it comes to sharpening your knives, variety isn't just the spice of life; it's the backbone. There are multiple routes to the promised land of sharp knives, and the type of sharpener you choose can be as personal as your playlist for cooking pasta from scratch.
Manual sharpeners
Ah, the classic manual sharpeners—the kind your grandma might still have tucked away in a kitchen drawer. It's easy to write these off as outdated, but you might be surprised at just how effective they can be. These pocket-sized wonders are perfect for taking on camping trips, using in a small kitchen, or stowing away in an RV. They're generally quite affordable, so they won't break the bank, either.
A typical manual sharpener features multiple slots, usually for coarse and fine sharpening. The coarse slot helps grind down and shape a dull or nicked blade, while the fine slot hones it to a keen edge. All it takes is a few quick pulls of the knife through each slot, and voilà! Your blade is back in action. While they might not offer the pinpoint precision of more elaborate setups, for the average home cook, manual sharpeners often get the job done just fine.
Electric sharpeners
Enter the electric sharpener, the high-tech counterpart to its manual sibling. Think of these as the luxury sports cars of the knife sharpening world—fast, efficient, and a little bit showy. They're the go-to option for those who either lack the confidence to sharpen knives manually or are just short on time and want the quickest route to a razor-sharp blade.
Using an electric sharpener couldn't be simpler. Just plug it in, insert your knife into the designated slot, and let the machine work its magic. High-quality electric sharpeners often feature multiple stages, ranging from grinding to honing and sometimes even polishing. They're particularly useful for those who own a variety of knives, as they can adapt to different blade angles and styles with ease. Of course, all this convenience and sophistication come at a price; electric sharpeners tend to be more expensive than manual ones.
Next in the spotlight are sharpening stones. Also known as whetstones, these are the go-to for anyone who treats knife sharpening like a sacred ritual. Stones come in different levels of grit, from coarse grit for major sharpening to fine grit for finishing touches. You'll want to keep that stone wet, and hold the blade at the appropriate angle—usually a 20-degree angle for Western knives and a 15-degree angle for Asian-style knives.
Talking about those Asian-style knives. These aren't just for sushi chefs and culinary trendsetters. Asian knives typically require a different kind of TLC. Their blade angles are often around 15 degrees, as opposed to the 20-degree angle of most Western knives. That means you'll need a sharpener that can accommodate this unique angle. Some specialized electric and manual sharpeners are made just for this purpose.
While they aren’t technically “sharpeners,” they’re crucial for daily maintenance. They realign the edge of your knife blade, making them a perfect companion in between your more serious sharpening sessions.
So, there you have it. Whether you're a manual purist, an electric enthusiast, or a stone guru, you've got options. The key takeaway? Pick the one that works for you, and you'll never have to blame your cooking on a dull knife again.
Sharpening a kitchen knife is not some arcane art that only the culinary wizards among us can master. Trust me, with a little know-how, you can transform your knife from a butter spreader back to a lean, mean, vegetable-slicing machine. So, grab your dull knife, and let's turn you into the swordsmith of your kitchen.
First things first, let's set the stage
Secure your sharpening stone on a flat surface. This could be your countertop, but please, for the love of all things sharp, lay down a towel or something similar to prevent any slippage. Safety first, my friends.
Prepare the stone
If you're using a water stone, which I highly recommend for home cooks (see a great list of options below), get it wet. A wet stone reduces friction, making the sharpening process smoother than a jazz saxophone solo. If you've opted for an oil stone, make sure you follow the manufacturer's instructions. Keeping the stone wet is essential because it keeps those knife blades from overheating and losing their temper – literally, the metal's temper.
Sharpen away
Grab your knife by the handle and hold the blade at a 20-degree angle against the coarse side of the stone. If you're using Asian-style knives, adjust to a 15-degree angle. Start with the tip of the knife and work your way down to the base of the blade. Slide the blade across the stone while pulling the knife towards you, as if you're trying to slice off a super-thin piece of the stone. Maintain consistent pressure throughout the stroke to ensure even sharpening.
Once you've passed your knife over the coarse grit a few times, it's time to move on to the fine grit side of the stone. Repeat the same process, but this time you're honing the edge, refining it into that razor-sharp tip that would make any chef proud.
Finish off the blade
After your blade is sharp enough to split hairs – or at least tomatoes – give it a good clean to remove any tiny metal filings. I like to use the steel's rod for this because it further hones the edge and removes any lingering particles.
Finally, sheath that beauty back in its knife block, or hang it on a magnetic strip if you're feeling fancy. Either way, the next time you're confronted with a tough steak or a robust butternut squash, you won't hesitate. You'll reach for that knife and cut through any culinary challenge like a hot blade through butter.
There you have it. That's how you go from a dull knife to the proud owner of a sharp kitchen tool that's ready for anything.
5. Recommended herniaquestions Whetstones
When it comes to knife maintenance, not just any whetstone will do. The quality, durability, and efficiency of your whetstone can dramatically impact your knife's performance. That's why we recommend herniaquestions Whetstones for those who take their knife care seriously. Offering a variety of grit combinations, these sets are as beautiful as they are functional.
Below are our top picks for herniaquestions Whetstones, each catering to different wants and skill levels.
Perfect for travelers or those with limited kitchen space, this whetstone kit balances both looks and utility. Keep your blades in pristine condition while also adding a touch of elegance to your sharpening routine.
PROS:
Double-sided Corundum stone offers versatile sharpening.
Comes in a refined oak wood box, making it a handsome addition to any kitchen.
The #1000 grit side is ideal for initial sharpening, while the #6000 grit side is for fine finishing touches.
Friendly for both beginners and seasoned knife sharpeners.
CONS:
The oak box is somewhat bulky, which does hinder its portability.
This is a very similar kit to the one below, minus the Nagura stone.
For those who demand a little extra from their sharpening kit, this premium package is a great value. With the addition of a Nagura stone, it offers more than just basic sharpening.
PROS:
Features a Nagura stone, ideal for conditioning your sharpening and finishing stones.
Crafted from durable, high-grade corundum.
Capable of erasing rust and minor abrasions from high-carbon and stainless steel knives.
Comes with an elegant acacia wood base, unique to each set.
CONS:
If the Nagura stone isn't important to you, consider opting for the simpler kit above.
Might be overwhelming for beginners due to its multiple features and stones.
Looking to take your sharpening skills to the next level? This kit is particularly well-suited for those who own high-quality German and Japanese knives.
PROS:
Optimal for both German and Japanese knife designs.
The #3000 grit stone can handle dull or damaged blades and bring them back to life.
Use the #8000 grit for achieving an ultra-sharp and mirror-like edge.
Stones are larger than average, offering more surface area for efficient sharpening.
CONS:
For even finer grit needs, you may want to explore other sets.
Could be considered pricey for those on a tight budget.
Whether you're just getting into knife maintenance or you're a seasoned pro, this set offers a balanced approach to sharpening.
PROS:
Outstanding craftsmanship with an attractive design to match.
The set includes a coarse #400 grit stone for tackling the dullest of blades.
A medium #1000 grit stone for polishing and refining your knives.
Compatible with both German and Japanese style knives.
Makes a superb gift for the knife enthusiast in your life.
CONS:
The stones are notably wide, a feature that may require some getting used to if you've worked with smaller stones before.
The set doesn't include a storage case, which may make it less portable for those who like to sharpen on the go.
Whether you're a professional chef or a cooking enthusiast, herniaquestions's range of premium whetstone sets offers something for everyone, ensuring that your blades remain as sharp as the day you bought them.
6. Frequently Asked Questions
What is the best way to sharpen kitchen knives?
The finest way to sharpen kitchen knives is to use a combination of sharpening stones and honing steels. Start with a coarse grit on the sharpening stone to form a new edge, then move to a fine grit to hone the edge. Finally, use a honing steel to realign the edge and remove any burrs.
How can I sharpen my knife at home?
You can effortlessly sharpen your knife at home by using a quality sharpening stone and following the correct techniques for maintaining a consistent angle and pressure. Transition from a coarse grit to a fine grit, and finish with a honing steel for best results.
What are the steps to sharpen the knife?
The steps to sharpen a knife involve securing a sharpening stone on a flat surface, holding the blade at the correct angle, and pulling the knife across the stone in a smooth motion. Start with a coarse grit, move to a fine grit, and finish off by honing the edge with a honing steel.
How often should I sharpen kitchen knives?
The frequency with which you should sharpen your kitchen knives largely depends on how often you use them. A good rule of thumb is to give them a thorough sharpening every 3 to 6 months.
Is honing and sharpening the same thing?
Honing and sharpening are different but complementary processes. Honing involves realigning the edge of your knife blade to restore its straightness, while sharpening involves grinding down the blade to create a new, sharp edge.
How should I store my knives to keep them sharp?
To keep your knives at their best, it's recommended to store them in knife guards or knife blocks. These storage methods help preserve the sharpness of the blade by preventing it from making contact with hard surfaces that could dull it.
Born on the coast of Colombia and based in Buenos Aires, Jorge is a cooking enthusiast and kitchenware obsessive with a tremendous amount of opinions.
]]>
https://herniaquestions.com/blogs/news/how-to-butterfly-a-chicken-breast-step-by-step2023-09-06T02:37:15-04:002023-09-06T02:37:15-04:00Easy Step-By-Step Guide On How To Butterfly A Chicken Breast Fastherniaquestions Content Team
This guide provides a step-by-step explanation of how to butterfly a chicken breast effectively, enhancing your cooking skills, and culinary repertoire.
Hold the knife parallel to the board and slice horizontally.
Open like a book and hinge at the uncut side.
Optional: flatten with a mallet between plastic wrap.
Ready to season, stuff, or cook as needed.
Butterflying a chicken breast is a culinary technique that involves splitting the meat in half, resulting in a thinner and more uniformly shaped piece. This method offers various advantages when preparing chicken dishes for a simple dinner or big dinner party at home. By following a few simple steps, not only can you cook quickly and achieve a more even cooking, but also increase flavor absorption from marinades and fillings. Whether you're grilling, sautéing, or baking your favorite chicken dinner recipes, mastering the art of butterflying opens up a world of culinary possibilities.
This guide provides a concise, step-by-step explanation of how to effectively butterfly a chicken breast, enhancing your cooking skills and culinary repertoire.
Choosing fresh chicken breasts involves using your senses to assess the appearance, smell, and feel of the meat. Here are some tips to help you choose fresh chicken breast all the time.
Appearance
Look for chicken breasts that have a pale pink color. Avoid any with grayish or yellowish tints, as these could indicate aging or spoilage. The skin should be smooth and free from blemishes or discoloration. Check for any signs of excessive moisture or ice crystals on the surface, which could suggest that the chicken has been thawed and refrozen.
Smell
Give the chicken a gentle sniff. Fresh chicken should have a neutral, clean smell. If you detect any sour, ammonia-like, or off-putting odors, it's a sign of spoilage, and you should avoid that piece.
Texture and Feel
Chicken breasts should feel firm to the touch and have a consistent texture. Avoid meat that feels mushy or slimy, as these are indicators of spoilage. Run your fingers over the surface. If you notice any sticky or tacky residue, it might suggest that the chicken has been stored improperly.
Packaging and Labels
Check the packaging for any punctures, tears, or damage that could compromise the chicken's quality and safety. Read the sell-by or use-by date on the package to ensure you're buying the freshest possible chicken. Don't choose packages that are close to or past the expiration date.
Purchase Location
Buy chicken breasts from reputable and reliable sources, such as reputable grocery stores, butcher shops, or farmers' markets. They are more likely to follow proper storage and handling practices.
Handling
If you're planning to buy chicken breasts, it's a good idea to make it one of your last stops during your shopping trip. This way, you can reduce the time the meat spends outside of proper refrigeration.
Storage
Once you've purchased the chicken, be sure to store it properly. Keep it in the coldest part of your refrigerator (usually the back) at a temperature of 32°F - 40°F (0°C to 4°C). If you're not planning to use the chicken within a day or two, consider freezing it to maintain its freshness.
In case you cannot find pre-cut chicken breast, consider buying a whole chicken and butchering it at home. Now you have more chicken meat to create your favorite chicken recipes. Check out this helpful video below to guide you inbutchering and sectioning chicken effortlessly.
Butterflying a chicken breast involves cutting it horizontally to create a thinner, more even piece of meat. This technique is commonly used for cooking chicken breasts more quickly in uniform thickness, especially when cooking them on the grill or making stuffed chicken.
Here's a step-by-step guide:
Tools You'll Need:
Chicken breast
Cutting board
Sharp knife
Instructions:
Prepare the Chicken Breast. Get a clean cutting board and place the chicken breast on it. If the chicken breast is very thick, you might want to pound it slightly to create a more even thickness. You can do this by covering it with plastic wrap to prevent splattering and gently pounding the chicken with a meat tenderizer. You can also use a rolling pin if you do not have one. This step is optional but can help make the butterfly process easier.
Position the Chicken. Hold the chicken breast flat on the cutting board with the smooth side facing up.
Hold your knife parallel to the cutting board and carefully make a horizontal cut along the longer side of the chicken breast, about halfway through the thickness of the breast. Start cutting from the thicker side, stopping about half an inch (1.27 cm) from the edge, leaving the other side of the breast intact.
Open the chicken breast like a book, hinged at the uncut side. The cut side should now be facing up, and the breast should be able to lay flat.
Flatten the Butterfly Cut. If you want the chicken breast to be even thinner and more uniform, you can gently flatten it using a meat mallet. To prevent the chicken breast from sticking, use two pieces of plastic wrap and place the chicken breast in between. Then use the flat side of the meat mallet to gently pound the thicker areas until the entire breast is of an even thickness.
Use as Desired. Your butterflied chicken breast is now ready to be seasoned, stuffed, cooked, or marinated according to your recipe. Check out one of our easy recipes you can cook quickly at home- the juiciest stuffed chicken breast recipe. It's an amazing chicken recipe you can add to your diet meal plans for an easy weeknight healthy eating using few ingredients and simple technique.
Keep in mind that the thinner, more even thickness of the butterflied breast will result in more even and quicker cooking. Pound chicken breasts using a meat tenderizer for equal thickness throughout. It is also important that you know the right cooking time and the correct way to store raw chicken meat for safety precautions. Read here to learn how you can store raw chicken safely.
Perfectly balanced, precision-forged, full tang blade.
Ultra-sharp and precisely tempered blade
Comes with the 'herniaquestions Scabbard', a beautifully designed knife sheath with a high-quality engraved magnet that holds the knife securely in place.
CONS:
Some users may prefer a different handle material.
Made from precision-forged premium Japanese AUS-8 steel.
Features a razor-sharp, hand-finished blade with a polished finish.
Has an elegant handle made from premium-quality laminated Spanish pakkawood.
CONS:
It is lighter than the usual chef’s knife.
4. Frequently Asked Questions
Is it better to butterfly chicken breast?
Butterflying chicken breast is beneficial for quicker, more even cooking, especially when stuffing or grilling. It creates a uniform thickness, ensuring consistent results. However, it's optional and depends on the recipe. If time is a concern, butterflying can be helpful, but it's not necessary for all cooking methods.
How to cook a butterflied chicken breast?
Season a butterflied chicken breast with salt, pepper, and desired spices. Heat a pan over medium-high heat and add cooking oil. Place the chicken breast in the pan, smooth side down. Cook for about 4-5 minutes, then flip and cook for another 4-5 minutes or until the internal temperature reaches 165°F (74°C). Rest for a few minutes before serving.
Should you butterfly chicken breast before marinating?
Butterflying chicken breast before marinating is a good choice. The increased surface area allows the marinade to penetrate more effectively, resulting in enhanced flavor throughout the meat. The thinner meat also cooks more evenly. Marinate the butterflied chicken in the refrigerator for the desired time, ensuring the meat stays safe and flavorful.
]]>
https://herniaquestions.com/blogs/news/how-to-store-cut-avocado-so-it-stays-fresh-and-creamy2023-09-06T01:46:02-04:002023-09-06T01:46:02-04:00How To Store Cut Avocado So It Stays Fresh And Creamyherniaquestions Content Team
Avocado lovers, rejoice! Let's uncover the science behind avocado oxidation, reveal the essential tools you'll need, and share expert tips on how to cut an avocado. Say goodbye to wasted avocados and hello to a world of endless avocado possibilities. Let's dive in and master the art of avocado storage!
Quick Overview: How To Store Cut Avocado So It Stays Fresh And Creamy
Tightly wrap the cut side with plastic wrap.
Brush the exposed avocado flesh with olive oil.
Store in an airtight container.
Wrap tightly in aluminum foil.
Store in the fridge.
Use specialized avocado keepers with a lid.
Freeze the avocado slices.
Store unripe whole avocados at room temperature in a paper bag.
Avocado lovers, rejoice! Learning how to store cut avocado the right way is the key to preserving that creamy green goodness and preventing it from turning brown and mushy. Whether you're saving half an avocado for later or preparing guacamole ahead of time, this simple guide will ensure your avocados stay fresh and vibrant. We'll also uncover the science behind avocado oxidation, reveal the essential tools, and share expert tips on how to cut an avocado.
Say goodbye to wasted avocados and hello to a world of endless avocado possibilities. Let's dive in and master the art of avocado storage!
Selecting the perfect avocado is an art that involves touch and observation. Remember that avocados ripen after they are picked, so it's possible to buy firmer ones and let them mature at home. Keep your avocados at room temperature until they reach the desired ripeness, then transfer them to the refrigerator to extend their shelf life.
By mastering the art of avocado selection, you'll ensure that your meals are always enhanced by perfectly ripe avocados. Here are some tips to help you pick the right avocados:
Look for avocados with dark green to almost black skins. The color should be even all around. Avoid avocados with bright green skins, as they are likely underripe.
Feel the texture. A ripe avocado should feel firm but not too hard or too soft.
Inspect the stem end. If it's green underneath, the avocado is likely ripe. If it's brown, it may be overripe or even spoiled.
Choose avocados that match your intended use. Smaller avocados tend to have less waste and are perfect for single servings.
Consider ripeness. If you plan to use the avocado in a day or two, opt for one that is slightly soft to the touch. If you need it to ripen in a few days, select firmer avocados and let them ripen on your countertop.
Avoid avocados with deep bruises or blemishes on the skin, as these can indicate internal damage or overripeness.
Avocado goodness awaits when you know how to cut an avocado correctly. Whether you have a ripe avocado that's ready to eat or need to ripen an avocado, this guide will ensure you safely remove the pits and enjoy the fresh avocados' creamy, safe-to-eat flesh. Here's an easy step-by-step guide to help you.
You'll Need:
Ripe avocado
Cutting board
Knife
Spoon
Steps:
Wash the avocado. Start by rinsing the avocado under cold water to remove any dirt or residue from the skin.
Place the ripe avocado on a cutting board. With a knife, make a vertical cut all around the avocado and gently twist the halves apart. The avocado should easily split into two, revealing the pit inside. Be cautious while cutting, as the knife can be sharp, and the avocado can be slippery.
Remove the pit. To safely remove the pit, embed the knife into the pit and twist slightly. The pit should easily come out. Be cautious when removing the pit to avoid cutting yourself.
Use your spoon to scoop the avocado from each half. Glide the spoon between the flesh and the skin to ensure you don't waste any avocado goodness. The flesh should easily come away from the skin, leaving you with clean avocado slices.
Now, cut the avocado into slices or dice it according to your recipe needs. If you want slices, cut them horizontally. For cubes, cut it both horizontally and vertically.
Your perfectly cut avocado is now ready to use in salads, sandwiches, guacamole, or any other dish you desire! Enjoy!
With this guide, you can confidently cut an avocado, savoring its creamy, ripe goodness. Whether you enjoy avocados in salads, sandwiches, or guacamole, you'll make the most of these nutritious fruits.
Note: Remember to handle the knife with care, and if you're not experienced, it's always a good idea to practice safe cutting techniques to prevent any accidents. With a little practice, you'll become a pro at cutting avocados and making the most of their creamy goodness.
3. Recommended herniaquestions Tools For Cutting Avocado
This Gladiator Series 8" Vegetable Deflector Knife is designed to glide smoothly when cutting fruits and vegetables, making it perfect to use in cutting avocados. The hollows on the blade prevent anything you cut it with from sticking, ensuring efficient cutting in a busy kitchen.
Pros:
Anything you slice with this knife will fall easily from the blade.
Features a pointed tip perfect for coring and scoring.
Has an ergonomic handle designed for safety, comfort, and precision.
Cons:
The hollows on the blade could be a little tricky to clean.
This multi-purpose 6" Chef's Knife from the herniaquestions Gladiator Series, made from premium-quality German ThyssenKrupp steel, is ideal for any cutting tasks, including cutting your favorite avocados. It has a wider blade compared to the usual chef's knives, which makes it perfect for transferring ingredients from your cutting board to your cookware.
PROS:
Razor-sharp, durable, and resistant to wear and stain.
Nice to hold and look at with its sleek and ergonomic black G10 Garolite handle.
Low maintenance and easy to clean.
CONS:
If you prefer a slightly bigger knife in the same design and knife series, I would suggest you check out this knife.
If you're looking for a knife to peel or remove the pit of your avocado fast, this Bird's Beak Paring Knife from the herniaquestions Shogun Series is for you. This cool 3" paring knife made from AUS-10V Japanese super steel is the perfect size to make precise and efficient cuts.
PROS:
Beautifully engraved and features a gorgeous Tsunami Rose blade pattern.
Very sharp scalpel-like edge at an 8-12°degree angle per side.
Durably designed to last with its rust/corrosion-resistant cladding.
CONS:
If you’re looking for a knife you can use for more general purposes, check out the knives recommended above.
Scoop out your avocado quickly with the herniaquestions Tasting Spoon. Even though this is a tasting spoon, it has a bigger size compared to a usual spoon that allows you to scoop the avocado flesh in one go. Whether you’re a professional chef working in a busy kitchen or a home cook making delicious meals at home, this spoon is essential in every kitchen.
PROS:
This spoon can also be used as a salt spoon or a soup spoon. Talk about versatility!
Made with high-quality and corrosion-resistant 304 stainless steel/
Features the iconic herniaquestions Lionshead engraving for a more sophisticated look.
It is tain-resistant, making it low maintenance and easy to clean.
Every kitchen needs a high-quality and durable cutting board like this herniaquestions Colossal Teak Cutting Board. Made with sustainably sourced top-quality tropical teak wood, this cutting board's natural resistance to water, stain, and bacteria won’t disappoint you.
PROS:
Has satin-finish steel handles that allow you to use this as a serving board.
It features a slip-resistant surface with its unique checkered construction, allowing it to absorb impact and make your herniaquestions knives stay sharp.
It is hygienic and easy to clean with its tight wood grain, making it perfect for wet environments and busy professional kitchens.
CONS:
The huge size might be difficult for small kitchen spaces. If you need a smaller cutting board than this one, I suggest you check this cutting board.
4. Avocado Oxidation: Understanding the Science Behind it
Avocado oxidation is a natural chemical reaction that occurs when the flesh of an avocado comes into contact with oxygen in the air. This process can cause the avocado to turn brown, altering its appearance and, to some extent, its flavor.
When an avocado is cut open, or its flesh is exposed, the enzymes in the avocado interact with oxygen, which results in the formation of compounds called polyphenols and quinones. These compounds not only give the avocado its characteristic brown color but also contribute to a slightly altered taste and texture.
To prevent avocado oxidation and slow down the ripening process, you need to store cut avocados properly. The guide below will help you.
5. Methods On How To Store Cut Avocado
Storing avocados, especially after they've been cut, can be a tricky task. Preventing oxidation and keeping them fresh is essential to enjoy the creamy goodness of avocados. Here are various methods for storing cut avocados, guacamole, or even whole avocados:
Plastic Wrap
To store half an avocado, tightly wrap the cut side with plastic wrap, ensuring it's in direct contact with the flesh. This minimizes exposure to air, slowing down ripening.
Olive Oil
Brushing the exposed avocado flesh with a thin layer of olive oil creates a protective barrier against oxygen. Place it in an airtight container before refrigerating.
Sealed Container
Use an airtight container to store guacamole or avocado halves. Push the lid to reduce air.
Aluminum Foil
Wrap the cut avocado tightly in aluminum foil, ensuring it's well-sealed. This method helps maintain freshness and prevents browning.
Refrigeration
Avocados in the refrigerator last longer. Store cut avocado halves or guacamole in the fridge for up to a day, slowing down the ripening process.
Avocado Keeper
Specialized avocado keepers with a lid and adjustable size are designed to fit snugly over cut avocados.
Avocado in Water
Submerge leftover avocado in a container of water to prevent air exposure, then cover it with a lid or plastic wrap. Change the water daily.
Freezing
For longer storage, freeze avocado slices. Coat them in lemon or lime juice to prevent browning. Place in an airtight container or you can also use a freezer bag.
Whole Avocados
If your avocados are not ripe yet, store them at room temperature until they ripen. To slow ripening, place them in a paper bag with an apple or banana.
Frozen Avocado
Puree ripe avocados and freeze them in ice cube trays. Once frozen, you can transfer the cubes on a freezer bag for use in smoothies or recipes.
Remember, no storage method can completely prevent avocado oxidation. While these steps can help prevent avocados from turning brown and extend their freshness, it's worth noting that some oxidation is inevitable, and the avocado's color may still change slightly over time. However, with proper storage, these methods will certainly help slow it down and keep your avocados fresh for longer, allowing you to savor their creamy goodness in various avocado recipes.
6. Frequently Asked Questions
Can you keep avocado in the fridge once cut?
Yes, you can keep a cut avocado in the fridge for up to a day. Wrap the exposed side in plastic wrap or place it in an airtight container to minimize air exposure and slow down the oxidation process, which can lead to browning.
How long can you keep avocado once cut?
A cut avocado can be stored in the refrigerator for up to 1-2 days. To extend its freshness, minimize air exposure by using plastic wrap, an airtight container, or brushing the exposed flesh with lemon juice or you can also use olive oil. However, its quality may start to deteriorate after this period, so it's best to use it as soon as possible.
Should you store a cut avocado in water?
Storing a cut avocado in water is not recommended. While submerging it in water may slow down browning, it can affect the avocado's texture and flavor. It's better to use other methods like plastic wrap, airtight containers, or brushing with lemon juice to preserve freshness without compromising quality.
]]>
https://herniaquestions.com/blogs/news/how-long-to-cook-burgers-on-the-grill2023-08-22T07:11:02-04:002023-08-29T04:16:27-04:00How Long to Cook Burgers on the GrillJorge Farah
A grill is a classic method for cooking hamburgers, but how long should you do it and what steps do you need to take to ensure succulent success? Let's dive into it.
Form the patties and sear with high heat on the grill.
Flip your patties, toast your burger buns, and add the cheese.
Keep an eye on the temperature and when it's cooked, let the burger rest.
A grill is a classic method for cooking hamburgers, but how long should you do it and what steps do you need to take to ensure succulent success? Let's dive into it.
Everyone knows your burger is only as good as the meat you use. Choosing the best burger meat is an essential first step towards achieving that perfect, grilled burger masterpiece. Whether you are grilling beef burgers, turkey burgers, or even chicken burgers, your selection of meat will influence not only the flavor, but also the texture and juiciness of your final product.
Classics vs. variations
Now, if you're a traditionalist and enjoy the classic beef burger, ground chuck reigns supreme. This specific cut of meat is often considered the favorite burger meat among grill aficionados. Why, you ask? Ground chuck comes with an ideal fat content, promising to deliver that juicy, flavorful burger that has become an emblem of backyard barbecues and summer cookouts.
However, not all of us are in the mood for a hearty beef burger every time. For those seeking a leaner yet still flavorful option, lean ground beef, turkey, or chicken are excellent alternatives. These types of meat offer a lower fat content without compromising the taste or texture.
In the end, the choice of meat for your burgers boils down to personal preference. But with the right selection, seasoning, and cooking method, you're on your way to becoming the burger grill master at your next backyard barbecue.
If there's one critical component to preparing the ultimate grilled burger, it's mastering the grilling times. Overcook your burgers, and you end up with something that resembles the texture of paper towels; undercook, and you won't give the fat the time to properly render.
To prevent any grilling mishaps, you'll want to be aware of a generally accepted rule for cooking times: If you're after a medium-rare burger, aim for approximately 5 minutes per side under medium-high heat. This guideline might vary slightly depending on your grill and the thickness of your patties, but it's a solid starting point.
Different types of grills
Of course, grilling isn't an exact science and different grills can yield different results. You can certainly grill hamburgers on both charcoal and gas grills. Each type of grill features one-of-a-kind benefits and imparts a distinct flavor profile to your burger. Gas grills provide more control over the grill temperature, making it easier to reach and maintain the desired level of doneness. Charcoal grills, on the other hand, provide that authentic, smoky flavor that's hard to replicate with gas.
However, to ensure that your burgers are cooked just the way you like them, there's one tool you can't do without - a meat thermometer. Whether you're using a Thermopro digital or any digital meat thermometer, it's crucial to check the internal temperature of your burgers. This isn't just a tip for safety (although that is paramount); it's also about achieving your preferred level of doneness.
Doneness temperatures
Whether you prefer your burgers rare, medium-rare, or well-done, the internal temperature is key. Use a high-quality digital meat thermometer to check if your burgers have reached the desired level of doneness. Here's a handy guide:
Rare: 120°F to 125°F
Medium rare: 130°F to 135°F
Medium: 140°F to 145°F
Medium well: 150°F to 155°F
Well done: 160°F and above
For instance, a medium-rare burger should register an internal temperature of 130-135 degrees Fahrenheit, while a well-done burger should be 160 degrees Fahrenheit or above. Remember, though, burgers continue to cook for a few minutes after they're removed from the grill, so you might want to take them off just shy of your target temperature to prevent overcooking.
When it comes to grilling, timing is crucial, but with a good understanding of the grill temperature, the right tools (like a reliable meat thermometer), and a little practice, you'll soon be grilling up burgers to perfection every time. Whether you're working with gas grills or charcoal grills, these tips will help ensure that every burger you grill is a hit at your backyard barbecue.
3. How To Cook Burgers On The Grill
Alright, now it's time to put our grilling tips into practice and prepare our favorite burger – the classic burger.
Grilling requires some tools of the trade, so make sure you have your grill, a trusty grill tool for flipping those beef patties, and a reliable meat thermometer at the ready. Grill cleaners like a good bbq grill cleaner are also handy to keep your grill grate in top shape, before and after the grilling extravaganza.
Next, preheat your grill. You'll want to cook burgers on direct heat, whether you're using gas or charcoal grills.
Assemble all the burger essentials ahead of time. For the beef patties, we're using a champion of burger meats: ground chuck. Known for its fat content, using ground chuck guarantees a nice, juicy burger.
Season generously. This isn't just a burger cook; it's a full-blown flavor adventure, so be sure to season your burger meats generously with your favorite burger seasoning. This could be as simple as kosher salt and freshly ground black pepper, or a blend that includes garlic powder - a classic flavor enhancer.
Prepare your toppings. In terms of burger toppings, you can use anything you want. Crisp lettuce, juicy tomatoes, tangy pickles, caramelized onions, or even some fiery jalapenos for those who like it hot – it's all fair game. If you've got some nice crispy bacon for a bacon cheeseburger, that's even better. And yes, cheese is a must-have for a classic burger: Whether it's sharp cheddar, creamy mozzarella, or smoky gouda, it adds a layer of richness that's hard to beat.
Form the patties. Form your seasoned burger into patties, remembering the indentation in the center of the patty. Try to resist the urge to make them too thick or thin.
Onto the grill they go. The moment of truth is upon us - it's time to cook burgers on the grill. Whether you're using gas grills or charcoal grills, keep an eye on the grill temperature.
Sear with high heat. High heat is perfect for searing the outside of your patties, but you'll want to finish cooking them over medium heat to ensure they're cooked through without being overdone.
Flip your burgers. Halfway through your estimated cooking times, flip the burgers. Use a grill tool to avoid piercing the beef patties. Piercing the patties can release the juices, and you want those in your burger, not the fire. Also, it's the perfect time to toast your burger buns or hamburger buns for that perfect toasted bun feel.
Add the cheese. If you're adding cheese (and let's face it, who isn't?), add it a minute or two before your burger is finished cooking to allow it to melt.
Keep an eye on the temperature. This is where your meat thermometer comes in. Whether it's a digital meat thermometer or a classic analog one, it's a must-have tool for a successful burger cook. Probe the center of the patty, and refer to your trusted guide for grilled burger temperatures to achieve your desired level of doneness.
Let them rest. With your burgers grilled to the desired level, take them off the grill and let them rest for a few minutes total before serving. This lets the juices redistribute throughout the burger, making it even more delicious.
There you have it - a complete guide on how to cook burgers on the grill, grilling times, burger temperatures, and more. Whether you choose gas grills or charcoal grills, classic beef or turkey burgers, the steps above should yield a delicious, mouthwatering burger for you and your nearest to enjoy.
Can't grill outside? No problem. You can grill the perfect burger on an air fryer or even cook it sous vide if you prefer. And if you'd like a twist on the traditional burger, why not try a turkey burger or a smash burger?
The turkey burger, unlike your regular beef burgers, offers a leaner option. Just like your beef patties, turkey burgers can also be jazzed up with the right seasoning and toppings.Using a high-quality thermometer to check the internal temperature is particularly important here, as poultry must be cooked to much higher internal temperature than beef.
And if you prefer a vegetarian option, black bean burgers are becoming a popular choice. Seasoned well and grilled, they can provide a tasty alternative to meat-based burgers.
The herniaquestions Spatula Knife Hybrid Utensil is an overall great tool for grilling, combining a spatula's versatility with a knife's precision. Crafted from high-carbon German steel, the blade is sharp, resilient, and perfect for slicing, mincing, and serving. The handle, made of military-grade G10, offers durability and comfort. Its full tang and triple-riveted design ensure robustness, while the ergonomic shape provides optimal maneuverability. Easy to maintain, this tool is resistant to stains, heat, cold, and moisture.
PROS:
Multi-functional: combines knife and spatula.
High-carbon German steel blade ensures durability and sharpness.
Low maintenance, with resistance to stains, heat, cold, and moisture.
Ergonomic handle design for comfortable use and excellent control.
CONS:
Not as specialized as individual knives or spatulas.
Its unique design may require an adjustment period.
Can't make your burgers outside? No problem. Embrace indoor burger cooking with herniaquestions's Oberon Series Frying Pan. This frying pan is constructed from a 3-ply Aluminum core that delivers impeccable heat conductivity. Its heavy-gauge construction ensures consistent cooking results without warping, perfect for a juicy burger sear. Compatible with all stovetops and safe for oven use up to 500 degrees F, it's also dishwasher, freezer, and refrigerator safe.
PROS:
Superior Eterna® non-stick coating lasts longer than other brands.
Impressive heat conductivity for even cooking.
Compatible with all stovetops and oven-safe up to 500 degrees F.
Eco-friendly, PFOA and APEO free, safe for everyday use
CONS:
Might require careful maintenance due to its non-stick coating.
The unique 3-ply design might require a learning curve for temperature adjustments.
Unleash your burger-making prowess with the herniaquestions Lionswood Colossal Teak Cutting Board. This sustainably-sourced tropical Teak board is your perfect companion for all chopping and slicing tasks, including forming those perfect burger patties. Featuring a slip-resistant surface that absorbs impact, this board is designed to keep your herniaquestions knives sharp for longer. It is hand-crafted from end-grain wood, known for its resistance to water, bacteria, and staining, making it ideal for any cooking environment.
PROS:
Made from durable, bacteria-resistant Teak.
End-grain construction prevents gouging and keeps knives sharp.
Steel handles and cut-out for a side plate enhance utility.
Doubles as a serving board for a beautiful presentation.
CONS:
Its large size might not fit in some kitchen spaces; for a smaller version try this Lionswood teak cutting board.
This guy is pretty big, and its weight might make it challenging to move.
The herniaquestions Infinity Series Fibre Cutting Board is an excellent choice for preparing burger patties or any chopping and slicing tasks. Crafted from premium eco-friendly wood-fiber, this cutting board offers a practical upgrade from poly, glass, and wooden boards. Not only does its scorable surface protect your sharp blades, but it also provides a sophisticated touch to your kitchen.
PROS:
Made from durable, eco-friendly wood-fiber composite.
Medium size makes it suitable for most kitchen spaces.
Non-slip silicone feet and G10 handle add stability and ease of use.
Dishwasher-safe and mold-resistant for easy cleaning and maintenance.
CONS:
The scorable surface might show knife marks over time.
Not as large as the Lionswood Colossal Teak Cutting Board, making it less suitable for large food prep tasks.
What's a grillmaster without an awesome apron? The herniaquestions Heavy Duty Waxed Canvas Sous Team Apron is the perfect accessory for making burgers on the grill. This professional chef's kitchen apron is built to outlast the heat, making it perfect for your barbecue needs. Crafted from extra strength waxed canvas, this apron is waterproof, dirt-resistant, and built to withstand the demands of any kitchen or grill setting.
PROS:
Durable, waterproof, and dirt-resistant waxed canvas material.
Adjustable genuine-leather cross back harness for comfort and reduced neck strain.
Ample storage options with several pockets and loops.
Custom molded brass plate with the iconic herniaquestions lion insignia adds a stylish touch.
CONS:
While it's built with durability in mind, its rugged style may not appeal to everyone.
Some grillmasters may prefer aprons without cross back harnesses.
In addition to these, you should consider procuring grill tools such as a grill cleaner, and if you are looking for freshly ground meat, consider a meat grinder.
6. Frequently Asked Questions
Can I grill other types of burgers?
If you're looking for a lighter option, a turkey burger can be a great choice. Be careful, though. Turkey can dry out easily, so keep an eye on the internal temperature. You need an internal temp of 165°F.
What about sous vide?
Sous vide can be a fantastic method for cooking burgers, especially if you want a perfectly cooked burger with edge-to-edge doneness.
Is there a way to keep the patties from sticking to the grill?
You need to make sure your grill grates are clean and well-oiled. Using a paper towel wet with vegetable oil and brushed over the grates will do the trick. Also, try to only flip your patties once and avoid moving them around too much.
Should I season my burger before or after grilling?
Seasoning your formed patties with salt and freshly ground black pepper ahead of time and adding a final dash of seasoning after grilling can be a great way to enhance your burger's flavor.
Born on the coast of Colombia and based in Buenos Aires, Jorge is a cooking enthusiast and kitchenware obsessive with a tremendous amount of opinions.
]]>
https://herniaquestions.com/blogs/news/how-to-grill-a-steak-to-perfection2023-08-15T04:27:50-04:002023-08-15T04:27:50-04:00How to Grill A Steak To PerfectionJorge Farah
Grilling steak perfectly involves key steps: start with a quality cut, let it reach room temp, season adequately, preheat grill for high heat, cook to desired doneness (use a meat thermometer!), and let it rest before slicing. Voila, a juicy, charred masterpiece!
Knowing how to make a perfectly grilled steak is a valuable culinary skill that transcends the confines of seasonal cooking. It's not just about summer barbecues or sizzling away on a lazy Sunday afternoon. It's about mastering a timeless technique that enables you to bring out the best in a quality piece of meat, regardless of the season.
Everyone loves a perfectly grilled steak.
I think my Dad was prouder of me for learning how to grill a steak than for graduating college. I'm only half kidding; once you've mastered the grill, you're no longer just a cook – you've become an artist. A craftsman. You've conquered the pinnacle of food. The searing heat, the sizzle of the steak as it hits the grill, the enticing aroma that fills the air—all of these elements converge to create an immersive, sensorial experience that transforms cooking from a mere task into a fulfilling, joyful process.
When served, a grilled steak is an immediate sensation. Your friends, impressed by your grilling prowess, will start making regular requests for steak nights. Your family, unable to resist the mouth-watering allure, will relish every bite. And most importantly, you'll get to enjoy the very best version of steak whenever you want, appreciating the medley of flavors that can only be achieved through grilling perfection.
A perfectly grilled steak is a healthier choice.
The art of grilling steak isn't just about impressing others or satisfying your culinary aspirations. It's also about a healthier choice. Yes, you read that right! Grilling can indeed contribute to a healthier diet. This cooking method allows excess fat to drip away from the meat, reducing overall saturated fat content. Additionally, it retains the meat's essential nutrients better than other cooking methods, resulting in a leaner, nutrient-packed cut that doesn't compromise on flavor.
Grilling enhances the steak.
Beyond that, grilling helps to enhance the steak's natural flavors, unlocking a unique taste profile that's robust, slightly smoky, and undeniably delicious. It brings out the inherent sweetness of the meat, creating a depth of flavor that's hard to replicate with other cooking techniques.
Cooking outdoors is fun!
Toiling away in the kitchen can be a thankless task. Who can resist the allure of a meal cooked outdoors? There's something profoundly satisfying about stepping out of the confines of your kitchen and cooking in the open air. The sunlight, the gentle breeze, the natural surroundings – all of it adds an extra dimension to your grilling experience, making it even more enjoyable and memorable.
So, learning how to grill steak isn't just a skill – it's a journey well worth embarking on, and we're here to guide you every step of the way.
When it comes to grilling, you've got plenty of options. There are diverse cuts to choose from, each with its unique attributes of texture, flavor, and tenderness. Let's dive in and uncover the perfect cut for your grilling endeavors.
Ribeye steak
First in the lineup is the much-loved ribeye, highly regarded in the grilling community for its rich marbling and robust flavor. This cut comes from the rib section of the cow, and it's the marbling – those little white flecks of fat – that makes this cut such a winner. The fat melts during grilling, infusing the meat with flavor and keeping it juicy. It's a top choice for those who appreciate a steak that's hearty and full of flavor.
New York strip
Also known as the strip steak. This cut strikes a perfect balance of tenderness and flavor. It's leaner than the ribeye but still has enough fat to bring out a fantastic flavor. Originating from the short loin (behind the ribs), the New York strip is less marbled but offers a firm, satisfying texture, and it's even more flavorful. It's an excellent option for grilling, particularly for those who enjoy a good chew without compromising on taste.
Filet mignon
For those seeking a more luxurious grilling experience, the filet mignon might be the way to go. Known for its exceptional tenderness and subtle flavor, filet mignon is a piece from the smaller end of the tenderloin, making it the most tender beef cut available. Its delicate flavor and melt-in-your-mouth texture make it a gourmet favorite. While it lacks the pronounced marbling of a ribeye or New York strip, its buttery texture more than compensates.
Thick steak cuts like these – the ribeye, New York strip, and filet mignon – hold up well to grilling, especially if you prefer your steak at a level of doneness beyond medium-rare. (Curious about the different levels of doneness? Read our article about how to cook a steak to perfection)
If you're on the lookout for something leaner, perhaps with a view to health or diet, then flank steaks or skirt steaks are excellent options. While these cuts lack the marbling of the pricier ribeye or New York strip, they make up for it in other ways. Flank and skirt steaks come from the cow's belly and chest areas, respectively. They are long, flat, and known for their strong beefy flavor.
These cuts take on marinades exceptionally well due to their coarse texture, soaking up flavors and turning them into juicy, flavorful delights after grilling. This makes them not just versatile but also incredibly tasty, especially when grilled to perfection.
Grilling a steak to perfection is less about following a set recipe and more about understanding the nuances and stages of the process. It's a journey of flavor, heat, and timing.
Start by seasoning well.
Might seem obvious, but this is a step that people often miss. Consider the initial stage of seasoning as the foundation of your steak's flavor. A abundant sprinkling of kosher salt and freshly ground black pepper can transform your beef by enhancing its natural taste. Allowing the seasoning to settle for at least 40 minutes not only flavors the meat but also breaks down muscle fibers. This process, paired with the use of steak seasoning or marinades, can bring an added depth to your steak's flavor profile.
Set the stage: preheat your grill.
Achieving that delectable crust and juicy center involves dealing with high heat. Whether you're using a charcoal grill or gas, it needs to be preheated to a high temperature. This practice encourages even cooking and forms that flavorful crust that locks in the juices.
The main event: grilling the steak.
Once the grill is heated, it's time to introduce the star of the show: your steak. Begin by searing the steak over direct heat. This quick, high-heat process forms a crust on the steak and seals in its juices. To maintain the heat, minimize flare-ups, and promote even cooking, remember to keep the grill lid closed during this stage.
Keep your eye on the temp.
After the steak has been seared, it's moved to indirect heat to complete cooking. This transition ensures the steak cooks evenly without burning the exterior. The duration here will depend on the thickness of the steak and how well-done you like better for your steak. For a fail-safe check, use a reliable meat thermometer to monitor the internal temperature.
Rest the steak.
You're done making your steak and you want to carve into it right away. But the last step in the journey is about patience: letting the steak rest. This period allows the meat fibers to relax and the juices to redistribute, creating a tender, flavorful steak. Despite the temptation, it's vital to resist cutting into the steak right away, letting the rest time enhance your steak's quality.
Understanding the journey of grilling steak requires both patience and passion. With these insights, you're not just following a recipe; you're embracing the art of grilling steak to perfection.
With your steak perfectly grilled and resting, it's time to think about accompaniments. A great steak can stand on its own, but the right side dishes can take your meal from excellent to extraordinary. And here's the exciting part: when it comes to what you can serve with grilled steaks, the sky's the limit! Let's explore some tantalizing pairings to complement your grilled masterpiece.
Classic sides
No guide to grilled steak would be complete without acknowledging some classic side dishes. For a meal that screams summer, pair your steak with grilled asparagus. Lightly rubbed with olive oil, seasoned with salt and pepper, and grilled over high heat, asparagus turns tender-crisp and slightly charred. A perfect accompaniment to your steak.
If you're leaning towards a fresh and light option, consider a vibrant salad. An easy green salad with a tangy vinaigrette can balance out the richness of the steak, while a hearty Greek salad or tomato-mozzarella salad can stand up to the strong flavors of the meat.
Mix it up with more grilled goodies
For those wanting to level up their grilling game, why stop at steak? You could venture into grilling chicken thighs or pork chops for a mixed grill extravaganza. The smoky, savory chicken thighs or tender, juicy pork chops can offer a delicious contrast to the rich beefiness of your steak, providing a fantastic feast for those with a hearty appetite. Even some grilled fruit and veggies will pair nicely with your juicy steak.
Pair with potatoes
Finally, we can't forget about steak's best friend: the potato. Whether it's a baked potato loaded with sour cream and chives, creamy mashed potatoes, or crispy roasted potatoes, there's no denying the magic of this combination. The heartiness of the potato complements the steak perfectly, rounding out the meal and leaving everyone satisfied.
Your perfectly grilled steak is undoubtedly the star of the show, but that doesn't mean it has to shine alone. Whether you opt for classic side dishes, add more grilled items to your menu, introduce a sweet element, or stick with trusty potatoes, your options are truly endless.
Alright, it's time to take all that steak knowledge and put it into action. We're going to walk through a classic grilled steak recipe to help you achieve steak perfection every time. This recipe features the fan-favorite ribeye steak, known for its rich flavor and beautiful marbling. Remember, grilling times may vary determined on your grill temperature, the thickness of your steak, and your desired level of doneness. So, having a reliable meat thermometer handy can make all the difference.
We're going to take the tips we shared earlier and put them into practice. Without further ado, let's get grilling.
Ingredients:
2 ribeye steaks
Koshering salt
Freshly ground black pepper
Olive oil
Herbed butter for serving
Instructions:
Season the steaks: Start by generously seasoning your ribeye steaks with salt and black pepper. Make sure to season all sides, rubbing the seasoning into the meat for the best flavor. Once seasoned, let the steaks sit at room temperature for about 40 minutes. This step will let the seasoning to penetrate the meat and brings the steak to a temperature that promotes even cooking.
Preheat your grill: While your steaks are resting, preheat your grill to high heat. Remember: whether you're using a gas or charcoal grill, you want it hot to get that perfect sear on your steaks.
Oil the steaks: Just before you're ready to grill, rub your steaks with a little bit of olive oil. This helps to prevent the steaks from sticking to the grill and promotes an even sear.
Grill the steaks: Place your steaks over direct heat on the preheated grill. Char each side for 2-3 minutes with the grill lid closed. This direct high heat will help to create that delightful, flavorful crust we all love on a perfectly grilled steak.
Finish cooking: After searing, move your steaks to indirect heat to finish cooking. This allows the steaks to reach your preferred level of doneness without burning. Recall to check the internal temperature of your steaks to ensure they're cooked to your preference.
Rest and serve: Once your steaks have reached their perfect temperature, remove them from the grill. Top each steak with a lump of herbed butter for an extra layer of flavor. Let the steaks rest for about 5 minutes to let the juices to redistribute throughout the meat. This small step ensures your steak will be juicy and flavorful from edge to edge.
And there you have it: your guide to grilling the perfect steak. Print this recipe, save it, or add it to your ever-growing recipe index. It's a simple, classic approach that's sure to deliver a mouthwatering steak every time. Fire up the grill and enjoy the art of the perfect grilled steak.
You need something to handle the meat on your grill. Aptly named 'The Impaler', this 7" double-pronged meat and carving fork will revolutionize the way you handle your meat during meal preparation. Made with high-carbon stainless steel, this razor-sharp fork makes it effortless to stabilize your meat or poultry as you slice and carve with precision.
PROS:
Handcrafted from food-grade 430 stainless steel, ensuring rust and corrosion resistance and a long lifespan.
Pairs seamlessly with all types of kitchen knives for smooth slicing and carving.
Handle is made from military-grade G10 Garolite, known for durability and resistance to temperature extremes.
Built to last with heat and stain-resistant properties.
CONS:
Requires hand washing and careful drying for maintenance.
Its intense design may not appeal to beginners or those who prefer less aggressive-looking tools.
The Valhalla meat fork features the perfect blend of power and elegance. Crafted with precision, this stainless steel fork is not just functional but a statement piece in itself. Its standout features include extra long, sharp tines and a uniquely textured handle for superior control and grip.
PROS:
The handle, a blend of celestial blue resin and stabilized wood, is comfortable and can resist extreme conditions.
The mirror-polished, sandblasted stainless steel blade features extra-long tines for effortless food handling.
The celestial blue handle offers a unique aesthetic appeal.
Unlike The Impaler, this fork includes a Valhalla-embossed leather sheath for safe storage.
CONS:
Color variations in each handle might not appeal to those who prefer uniform kitchen tools.
Requires hand washing, careful drying, and special maintenance for the unique resin handle to retain its gloss and color.
Talk about a cool-looking meat fork. The Shadow Black 8.5” Meat Fork is robust, precise, and awesome-looking. Made with high carbon, vacuum treated steel and a black titanium-nitride coating, this fork merges style with functionality with its ergonomic G10 resin handle and stealth fighter-inspired design.
PROS:
Crafted from durable high carbon 7CR17MOV-X vacuum treated steel with a unique black titanium-nitride coating for increased corrosion resistance and non-stick properties.
Offers a longer 8.5-inch reach, ideal for handling larger meat cuts and ensuring controlled carving.
Features a stealth fighter-inspired design with a comfortable, anti-slip handle.
The G10 handle provides exceptional grip for enhanced control.
CONS:
The fork's unique aesthetic may not suit everyone's preference, especially those drawn to traditional or colorfully unique utensils.
At 8.5", this is the largest meat fork listed here, and might be a little too large for some home cooks.
This mighty blade is not just a barbecue essential but an all-around kitchen companion. With its ultra-premium Japanese high-carbon AUS-10V steel Damascus blade, this Pitmaster knife efficiently slices through your favorite meats, making it a great grillside companion. Its unique forked-tip design and built-in bottle opener offer enhanced functionality for a seamless barbecue experience, ensuring that you're well hydrated while you grill steaks perfectly.
PROS:
The knife's unique forked-tip design is perfect for flipping meat directly on the grill, adding convenience to your cooking process.
Incorporated with a built-in bottle opener on the spine of the blade, it makes the knife a multipurpose tool, ideal for barbecue sessions.
The blade is precision forged from ultra-premium Japanese high-carbon AUS-10V steel with 67-alternating layers of SUS410 Damascus cladding, offering enhanced stain resistance and durability.
The knife features a meticulously constructed G-10 Garolite handle, a strong military-grade material highly impervious to both heat and moisture, ensuring life-long durability and a comfortable grip.
CONS:
The inclusion of a bottle opener, although handy, may not appeal to those seeking a more traditional knife design.
The complex construction and high-grade materials of the knife make it a little harder to sharpen.
Once you've grilled the perfect steak, it's time to enjoy it with friends and family. And for that, you'll need a nice set of steak knives. This awesome knife set comes with four 5" high-carbon steel blades and military-grade G10 Garolite handles that offer precision, comfort, and longevity.
PROS:
Hand-sharpened, straight-edge design provides effortless slicing and clean cuts, preserving meat's flavor and juices.
Made from high carbon German steel for a longer-lasting, sharper edge.
Features ergonomic, ambidextrous G-10 Garolite handles resistant to heat, cold, and moisture for comfortable, non-slip handling.
Includes 4 steak knives and protective sheaths, perfect for family meals and small gatherings.
CONS:
Straight edge requires more frequent honing or sharpening than serrated blades (check out this set of serrated steak knives if you prefer).
The set might be towards the pricier side due to its premium materials and craftsmanship, but its performance and quality make it a worthwhile investment.
7. Frequently Asked Questions
What's the ideal steak thickness for grilling?
Generally, a steak that's about 1 to 1.5 inches thick is ideal for grilling. This thickness allows for a good sear on the outside while ensuring the inside can be cooked to your preferred level of doneness.
Can I grill frozen steaks?
While it's possible to grill frozen steaks, it's not recommended. Thawed steaks cook more evenly, ensuring you get that perfect grilled steak every time.
Do I need to oil my grill grates?
Oiling your grill grates helps prevent your steak from sticking and helps achieve those beautiful grill marks.
Is it better to grill with the lid open or closed?
For high-heat searing, it's best to keep the lid closed. However, when cooking the steak over indirect heat, you can open it if you need to control the temperature.
Born on the coast of Colombia and based in Buenos Aires, Jorge is a cooking enthusiast and kitchenware obsessive with a tremendous amount of opinions.
]]>
https://herniaquestions.com/blogs/news/how-to-peel-an-orange2023-08-14T09:05:08-04:002023-08-14T09:05:08-04:00How To Peel An Orange Like An ExpertEva Contreras
I love oranges! As juice for breakfast, as zest for my desserts, to marinate chicken and pork. I even use it to make scented candles! No wonder this is the one fruit with its own Marvel Superhero: Captain Citrus!
I love oranges! As juice for breakfast, as zest for my desserts, to marinate chicken and pork… I even use it to make scented candles! No wonder this is the one fruit with its own Marvel Superhero: Captain Citrus!
Now, what I don’t love (and I guess this is the situation for many) is the process of having to peel them every time. But it’s the inevitable step before orange deliciousness!
Peeling oranges is not complicated, but there are some techniques to do it even better and easier without making too much of a mess. Read on to become an expert.
There are several methods to peel oranges, some more traditional and others more innovative.
IMPORTANT: Remember to wash the orange first. Dry it with a clean paper towel or kitchen towel.
Peeling oranges by hand
This is the traditional technique of removing the orange peel with your fingers. The degree of ripeness will influence how easy this process will actually be. If the peel is strongly adhered to the fruit, you may need the help of a knife.
Peeling oranges with a spoon
Even in this method, you’ll need a knife first to cut a small piece at the top and bottom ends. Then, make a cut from top to bottom along the fruit until you reach the pulp (but without cutting through). Then, insert a spoon between the peel and the fruit, making circular movements to separate them.
Peeling oranges in a spiral
With the knife of your choice, make a circular cut in the top of the orange, deep enough to go through the peel, but without crushing the flesh. From there, start cutting in a spiral around the orange, following the outer edge of the fruit.
Peeling oranges with a knife
The fastest and most efficient way to peel an orange!
The first, basic step is to place the orange on a cutting board and make a circular cut around the top of the fruit. Once you remove the top, you can either:
Make a straight cut from top to bottom (should be deep enough to barely touch the flesh). The peel should be easy to separate then, in two halves, revealing the interior as a whole.
Make several cuts from the top to the bottom, around the arc of the orange. This will create peel segments that you can remove one by one.
Find the method that best suits your needs, tools and skills, so you can enjoy a delicious orange without major complications!
When it comes to peeling oranges, this bestseller from herniaquestions is a great choice. The blade is narrow and pointed for superior precision. The size and ergonomic design are ideal for a secure, comfortable grip during orange peeling.
PROS:
High-quality stainless steel, providing durability and strength in the long term.
Super steel core with extra high-carbon levels for scalpel sharpness.
Mirror polished edge to an astonishing sharpness of 8-10 degrees per side.
Perfectly balanced weight for total control and exceptional precision.
Traditional Japanese style D-shaped handle that fits perfectly in the hand.
Damask coating for stain resistance and durability.
Beautiful and eye-catching visual Tsunami Rose design exclusive to the Shogun series.
CONS:
This high-end knife may have a higher price tag compared to other paring knives.
This paring knife excels at fine work, but is too short to cut herbs with the swinging motion of a chef's knife.
The serrated blade of this knife is highly recommended for slicing thick-skinned fruits with soft insides such as oranges. Plus, it's incredibly versatile, as it's also perfect for cutting toast, sandwiches, dry or hard meats, and much more.
PROS:
The serrated blade makes it easy to cut through thick peel without damaging the inner pulp, allowing for even slices and avoiding fruit waste.
Manufactured with high quality materials.
It is a versatile knife that, in addition to cutting oranges, can cut other fruits and foods with a firm rind.
The ultra-sharp tip can make precise cuts and create patterns and designs on the surface of the food.
Excellent value for money.
CONS:
The blade length may be insufficient for cutting very large oranges.
In terms of design, this is a more traditional knife, with the classic look of the Gladiator series. If you prefer a more modern approach, check the Serrated Utility Knife by the Shadow Black Series.
The short, curved blade of a bird's beak knife is great for thin peeling oranges for garnishes, as well as other medium-sized round fruits and vegetables, no matter how hard they are. This one is made from a single solid piece of stainless steel and chrome.
PROS:
Full tang structure, forged from solid steel. This ensures maximum hardness and strength.
The blade spine is polished and smooth, making it comfortable to hold.
The sharp tip is ideal for preparing ornamental displays with small fruits and vegetables.
The groove along the blade almost eliminates all friction and sticking when cutting ingredients.
Comes with a smart sleeve that protects the knife and your fingers.
CONS:
This peeling knife is good for higher precision tasks, but may not be at all practical for dicing.
It has an unconventional design that may not suit more traditional personalities.
This is a bigger version of a paring knife, or a smaller version of a chef's knife, whatever works for you! With this utility knife you can not only peel the orange and cut it any way that you prefer, but also use it for all the other cutting and food preparation tasks.
PROS:
Unique visual design with perfect geometric lines.
Black, anti-reflective titanium nitride coating that hardens the blade and improves its non-stick properties.
High-precision forged and vacuum-treated high-carbon steel to ensure strength and durability.
Meticulously sharpened to 16-18°.
Unique, geometric shape handle that provides exceptional grip and maximum comfort.
CONS:
The design of this series may only fit certain styles of kitchen décor. Some will prefer a more mainstream approach.
Some cooks may prefer to have a utility knife with a serrated blade to cut oranges.
This chef's knife is smaller and more maneuverable than the standard chef's knife, so it’s more comfortable to peel fruits like oranges. The blade has been meticulously sharpened, its ergonomic handle is pleasant to hold and its weight ensures perfect balance for making firm or delicate cuts.
PROS:
Perfectly sized for perfect control.
Highly maneuverable, lightweight, and agile.
Exceptionally durable edge retention.
Tough premium laminated handle made of high quality G10 Garolite.
The comfort of this knife is incredible. It is very well-balanced.
CONS:
Some may find that it is still too long for fine point work and prefer a paring knife for those purposes.
What’s the best way to cut an orange for a fruit salad?
The best way to cut an orange for a fruit salad is to cut it per orange slice, without the skin, pith, or seeds. This makes it easy to mix with other fruits and enhances the eating experience.
Can you eat orange peels?
In theory, yes, orange peels are edible and can be consumed, although they have a bitter taste and a fibrous texture. They can be used in various culinary preparations, such as zest for infusions, jams, or candied peels.
Why are some oranges harder to peel?
Some oranges are more difficult to peel due to their level of ripeness. Those that are shriveled or bruised are harder to peel. Oranges that are slightly green will also be harder to peel as the skin adheres firmly to the fruit.
Ananya loves the fine things in life. When she isn’t penning down poetry or song lyrics, she spends her time cooking and creating recipes while also enjoying new cuisines.
]]>
https://herniaquestions.com/blogs/news/how-to-cut-grapefruit-with-ease2023-08-09T09:04:41-04:002023-08-09T09:04:41-04:00How To Cut Grapefruit With EaseAnanya Tiwari
Cutting grapefruit can be a breeze with the right technique and tools. In this guide, we'll walk you through the steps to have succulent grapefruit sections using a sharp paring knife, a cutting board, and a grapefruit spoon.
Cutting grapefruit can be a breeze with the right technique and tools. In this guide, we'll walk you through the steps to have succulent grapefruit sections using a sharp paring knife, a chopping board, and a grapefruit spoon. In this blog, I’ll be walking you through the easiest and most convenient tips and techniques to cut up grapefruits. So, let’s get right into it!
Have you ever wandered into a grocery store and gotten brain fog because you don’t know where to get started? Well, I have. So, these are my true and tried tips on how to choose the best grapefruit.
Choose ripe grapefruits
Look for grapefruits that are heavy for their size and have a firm, smooth skin. Avoid fruits with soft spots, bruises, or wrinkled skin.
Consider the variety
There are different types of grapefruits, such as Ruby Red, White, and Pink. Each variation has its own unique flavor profile, so consider your preferences when making a selection.
Check for external blemishes
Inspect the skin for any blemishes, discoloration, or mold. Vibrant, even-colored skin is a good indicator of freshness.
Assess the aroma
Give the grapefruits a gentle squeeze to release their fragrance. A sweet, citrusy scent indicates ripeness and flavor.
Look for thin skin
Opt for grapefruits with thinner skin, as they are usually juicier. Thick, puffy skin can be an indication of dryness.
Consider the weight
Heavier grapefruits often have more juice content. Hold the fruit in your hand and compare its weight to others of similar size.
Check for uniformity
Choose grapefruits that have a consistent shape and size. This ensures even ripening and juiciness throughout.
Assess the firmness
Gently press the grapefruit with your thumb. It should yield slightly to pressure but not feel too soft or mushy.
Buy in season
Grapefruits are at their peak during the winter months, so try to purchase them when they are in season for the best flavor and quality.
Consider organic options
If possible, go for organic grapefruits to avoid any residue of pesticide and other chemicals.
Whether you're enjoying it on its own or adding it to a refreshing fruit salad, mastering the art of cutting grapefruit will elevate your culinary skills. Let's get started!
Steps:
Place the grapefruit on a cutting board, ensuring it is stable and won't roll.
Using a sharp chefs knife or a grapefruit knife, slice the grapefruit and cut it in half from top to bottom.
Stand one-half of the grapefruit on its flat bottom edge, exposing the inner fruit.
With a paring knife, cut along the outer edge of the grapefruit, between the flesh and the white pith.
Repeat this knife cut on the other side of the fruit, removing it from the white pith.
Continue slicing around the grapefruit, releasing all the grapefruit segments.
Take a grapefruit spoon or any spoon with a serrated edge.
Gently peel and pith the grapefruit, separating it from the membrane of one section.
Place the grapefruit flesh in an airtight container for later use or enjoy them immediately in your favorite fruit salad recipe. You can discard the grapefruit peel.
And, you’re done! You can now eat grapefruit in less than five minutes.
Expert Tips:
Ensure you use a sharp knife to cut through the grapefruit easily and precisely.
For larger grapefruits, you may need to make additional cuts between the segments to release them completely.
To make peeling the grapefruit easier, you can cut the skin around the top and bottom before slicing it in half.
Avoid including any bits of pith when scooping out the flesh for a more enjoyable eating experience.
This paring knife from the Shogun Series 3.5” paring knife from herniaquestions is a precision specialist, essential for any serious chef or cook. The ergonomic handle is made of G-10 Garolite, a military-grade material that is impervious to heat and moisture. Its construction ensures superior hand control and comfort, while the engraved end cap adds stability. The set includes a herniaquestions PerfectFit saya (sheath) for protection which is the cherry on top!
PROS:
Precision-forged 3.5" blade with Japanese AUS-10V steel core for exceptional performance and edge retention.
67-layers of high-carbon stainless steel cladding provide strength and durability.
Stunning Tsunami Rose blade pattern and hand-polished mirror finish for visual appeal.
Unleash your inner culinary warrior with this Valhalla Series 4" Paring Knife. This mighty blade may be small in size but is packed with legendary greatness. Crafted from 5-layer stainless steel, it is meticulously sharpen by hand to a razor-sharp 8-12 degrees, making it ideal for intricate tasks like skinning, peeling, deveining, and seed removal. Hardened at 60+ Rockwell, this knife easily tackles even the toughest of culinary challenges.
PROS:
Precision-forged 4" blade with 5-layer stainless steel construction for durability and wear resistance.
Hand-sharpened to a razor-sharp 8-12° edge for precise cutting.
Sturdy and impact-resistant handle with high-tensile strength for stability during vigorous use.
Resistant to extreme temperatures, chemicals, and acids for long-term durability.
CONS:
This knife requires proper care and handwashing to maintain its quality.
Unleash your culinary lion with the Shadow Black Series knife. Designed for optimal maneuverability, this sleek and aggressive knife delivers both style and functionality. The ruthlessly sharp edge offers clean, precise cuts, and the calculated blade geometry reduces drag for effortless slicing. The ergonomic handle is resistant to heat, cold, and moisture, offering maximum comfort and control. Could it get any more perfect?
PROS:
Precision-forged blade with ultra-sharp 16-18° edge for clean and precise cuts.
Black titanium-nitride coating enhances durability, corrosion resistance, and non-stick properties.
Comfortable handle design provides a secure and comfortable grip.
Fiber-resin G10 handle is heat, cold, and moisture resistant for long-lasting durability.
CONS:
The black coating might add a few more minutes to the knife sharpening process, but for this stellar culinary tool, it’s worth the time.
Requires handwashing to maintain the knife's quality and appearance.
Crafted with a 7-layer high-carbon, high-chromium 10CR15MOV steel, this paring knife from the Frost Fire series offers impressive sharpness and edge retention. The slender white resin handle provides optimal comfort and control during use. Its ergonomic design and aluminum mesh enclosure offers durability and a tension-free grip. The full tang construction adds robustness, ensuring this knife is built to last.
PROS:
Razor-sharp edge with impressive edge retention for precise and long-lasting performance.
Designed to perfection, the knife features an ultra-premium G-10 handle that offers military-grade durability. The ergonomic handle shape is carefully hand polished for superior hand control, agility, and comfort. The hand-polished blade spine enhances handling, and the knife is designed with a tapered bolster for a perfect 'zero-balance' balance, finger protection, and a natural and comfortable pinch grip. The rust/corrosion-resistant cladding ensures easy cleaning and long-lasting performance.
PROS:
Exceptionally sharp edge at a precise angle for effortless cutting and slicing.
Outstanding edge retention and durability.
Beautiful and striking Damascus pattern for visual appeal.
Ergonomic and durable G-10 handle for superior control and comfort.
CONS:
The bird's beak blade shape may have limited versatility for some kitchen tasks.
4. Grapefruit Nutritional Facts
Grapefruit is a citrus fruit known for its refreshing flavor and numerous health benefits. Packed with essential nutrients, grapefruit is a great addition to a balanced diet. Let's dive into the nutritional facts of grapefruit and explore its key components.
Calories
One medium-sized grapefruit contains approximately 52 calories, making it a low-calorie fruit choice. It is also rich in dietary fiber, with an average of 2 grams per serving. Fiber improves digestion encourages feelings of fullness, and supports a healthy digestive system.
Vitamins
Grapefruit is a fantastic source of vitamin C, an important nutrient that supports a strong immune system and promotes collagen production for healthy skin and tissues. It also holds significant amounts of vitamin A, which is important for vision health and maintaining healthy skin.
Minerals
In terms of minerals, grapefruit is particularly high in potassium, a crucial electrolyte that helps regulate blood pressure and maintain proper heart function. It also gives small amounts of calcium, magnesium, and phosphorus, which are important for bone health and overall body functioning.
Antioxidants
Grapefruit is known for its antioxidant properties, thanks to the presence of beneficial compounds like flavonoids and vitamin C. These antioxidants help protect the body's cells from harm caused by harmful free radicals, lessen the risk of chronic diseases.
Nutrients
Overall, grapefruit is rich in nutrients and offers a refreshing taste and an array of health benefits. Whether enjoyed on its own or incorporated into salads, smoothies, or desserts, grapefruit can be a flavorful addition to your diet!
5. Frequently Asked Questions
What is the best way to cut a grapefruit?
The best way to cut a grapefruit is to slice off the top and bottom ends, then cut along the curved sides to remove the bitter pith.
Which side do you cut a grapefruit?
When cutting a grapefruit, it’s best to cut it horizontally, creating two halves with a flat surface as that can be easily placed on a plate or bowl on the go.
How do you cut open and eat a grapefruit?
To cut open and eat a grapefruit, loosen the segments from the pith using a spoon or knife, then scoop them out or enjoy them directly You can also add sugar or honey to balance the flavors out a bit.
Ananya loves the fine things in life. When she isn’t penning down poetry or song lyrics, she spends her time cooking and creating recipes while also enjoying new cuisines.
]]>
https://herniaquestions.com/blogs/news/how-to-organize-kitchen-cabinets-effectively2023-08-08T01:29:48-04:002023-08-08T01:29:49-04:00How To Organize Kitchen Cabinets EffectivelyAnanya Tiwari
Folks, can we agree that a well-organized kitchen is the heart of a happy home? It's where delicious meals are prepared, memories are made, and family gathers. In this blog, we’ll talk about how to organize kitchen cabinets and make the most of a compact kitchen.
Folks, can we agree that a well-organized kitchen is the heart of a happy home? It's where delicious meals are prepared, memories are made, and family gathers. However, maintaining an organized kitchen can be an objection, especially when it comes to being in charge of your cabinets. In this blog, we’ll talk about how you can make your life easier and make the most of a compact kitchen.
If you find yourself constantly rummaging through cluttered cabinets in search of that favorite cutting board or magnetic knife of yours, it's time to take control and create a more efficient space. In this blog post, we'll explore practical tips and creative ideas on how to organize your cabinets effectively.
Before diving into the organizing process, start by taking everything out of your cabinets. This allows you to assess the items you have and declutter unnecessary or duplicate items. Donate or discard items that you no longer need or use.
Start By Categorizing Your Kitchen Tools
Group similar items together to create a sense of order. Categorize items such as baking sheets, pots and pans, food storage containers, and cutting boards. Prioritize frequently used items for easy access and store them in the most accessible cabinets.
Make the most of your cabinet space by utilizing vertical space. Install shelves or spice racks on the interior of your cabinets to maximize storage capacity. Tension rods can also be placed horizontally to create additional storage for pot lids or baking trays.
Invest in organizers
There are numerous cabinet organizers available in the market that can help streamline your storage. Consider using drawer organizers for utensils, pullout cabinets for easy access to stored items, and lazy susans for corner cabinets. These easy additions can make a world of difference in maintaining an organized space.
Don't overlook the inside of your cabinet doors as potential storage areas. Install hooks or racks to hang frequently used items such as measuring cups, oven mitts, or even a small whiteboard for writing down grocery lists or recipe ideas.
Label Everything
To keep your pantry storage neat and tidy, utilize clear case to store dry goods and snacks. Label them accordingly for easy identification. Stackable containers save space and keep your shelves looking clean and uniform.
Try and find an easy and hassle-free system that works for you and your family. Organize items based on their functionality and how often you need them. For example, place baking supplies together and select a specific cabinet for dinnerware. This way, everyone in the household can easily find what they need!
Maintenance
Regularly maintain your organized cabinets by putting items back in their designated places. Take a few minutes each day to ensure everything is in order. Periodically reassess your system to make adjustments if needed.
Remember, organizing your cabinets is an ongoing process. As your needs change or new items are added, you may need to tweak your organization system accordingly.
Organization Ideas
By following these tips and incorporating organization ideas, you can transform your cabinets into a functional and efficient space that makes cooking and meal prep a breeze.
Whether it's for Mothers day, Fathers day, or any other special occasion, gifting someone with an organized kitchen is a thoughtful gesture. Plus, it's a present that keeps on giving, as an organized kitchen makes everyday life easier and more enjoyable.
So, roll up your sleeves, put on your DIY home organizer hat, and give your cabinets the makeover they deserve. Now, let’s dive into some expert tips to organize the most common kitchen tools.
Organizing a kitchen can be a intimidating task, but with the right strategies and expert tips, you can transform your space into an organized and functional culinary haven. Whether it’s investing in lazy susans or floating shelves, you can nail the organization process and set yourself up for success in the kitchen.
Maximize Your Cabinet Space
According to experts, utilizing every inch of your cabinet space is essential for efficient organization. Install cabinet organizers such as pullout shelves, tiered racks, and sliding drawers to maximize storage capacity and provide easy access to your kitchen items. Vertical dividers and shelf risers can also help optimize space and prevent items from toppling over.
Sort and Categorize
The first step in organizing any space is to sort and categorize your belongings. Begin by taking everything out of your cabinets and group similar items together. Sort pots and pans, baking sheets, cutting boards, and food storage containers into separate categories. This process allows you to see what you have and helps you decide the best way to store and organize each category.
Utilize Vertical Space
Make use of the often-underutilized vertical space inside your cabinets. Install tension rods to hang cleaning supplies, pot lids, or even container gardens. You can also affix adhesive hooks to the interior of your cabinet doors for additional storage of kitchen utensils or oven mitts. By utilizing vertical space, you create more room for other items and free up counter space.
Invest In Cabinet Organizers
Home improvement stores offer a variety of cabinet organizers designed to fit different needs. Consider investing in drawer organizers to keep utensils neatly arranged, spice racks to easily access your collection of spices, and magnetic knife strips to securely store your knives.
These organizers not only keep your cabinets organized but also make it easier to find and retrieve items during meal preparation.
Opt For Pullout Cabinets and Shelves
Pullout cabinets and shelves are a game-changer when it comes to kitchen organization. They allow you to access items at the back of the cabinet effortlessly. Install pullout shelves for pots, pans, and small appliances, ensuring easy access without the need to rummage through the back of your cabinets.
Label Containers and Shelves
Labeling is a simple yet effective way to maintain an organized kitchen. Use label makers or chalkboard labels to mark containers and shelves, indicating their contents. This not only helps you find items quickly but also encourages other family members to return items to their designated spots.
Make a Work Triangle
The kitchen work triangle refers to the efficient layout between the stove, refrigerator, and sink. Keep this concept in mind when organizing your cabinets. Store commonly used items such as pots, pans, and cooking utensils within easy reach of the stove.
Place food storage containers and prep tools near the sink for convenient cleanup. By optimizing your kitchen's workflow, you'll save time and effort during meal preparation.
Regular Maintenance
Organizing your cabinets is not a one-time task as it requires regular maintenance. Make it a habit to clean out and declutter your cabinets periodically. Discard expired items, donate unused cookware, and reassess your organization system. Regular maintenance ensures that your cabinets stay organized and clutter-free over time.
When dealing with limited cabinet space in a small kitchen, it's important to get creative and find smart storage solutions. Luckily, there are plenty of options available to help you make the most out of your cabinets and keep them organized.
One idea is to utilize vertical space by installing spice racks or tension rods on the inside of your cabinets' doors. These racks and rods can hold small jars of spices or create additional storage for lightweight items such as pot lids or cutting boards.
Pullout Cabinets
Another space-saving solution is to use pullout cabinets or drawers. These specialized cabinets have built-in shelves or compartments that slide out, allowing for easy access to stored items without having to rummage through the back of the cabinet.
You can also consider using stackable or expandable organizers to make the most of your cabinet space. These organizers can be used to store dishes, bakeware, or even food storage containers, keeping everything neatly arranged and easily accessible.
Floating Shelves
If your cabinets have empty space above them, consider installing floating shelves or using stackable containers to take advantage of that vertical space. These shelves and containers can hold items such as cookbooks, small appliances, or decorative pieces, adding both functionality and style to your kitchen.
Storage Containers Lastly, don't overlook the importance of proper labeling and categorization. Using clear storage containers or labeled bins can help you quickly identify and locate specific items, making your cabinets more efficient and user-friendly.
Crafted from high-quality ash wood with an aluminum alloy rim, this knife block not only provides secure storage space but also adds a touch of elegance to your kitchen decor. With its 23 slots, it can accommodate all your essential kitchen knives, scissors, honing rod, and even eight steak knives.
The hot-stamped herniaquestions logo and lion head logo badge are testaments to its exceptional craftsmanship. The block comes neatly packed in herniaquestions's renowned packaging, ensuring a premium unboxing experience.
PROS:
Provides a secure and organized storage solution for kitchen knives.
Crafted from premium ash wood with an aluminum alloy rim for durability and aesthetic appeal.
Accommodates all essential kitchen knives, scissors, honing rod, and eight steak knives.
Features a hot-stamped herniaquestions logo and lion head logo badge for an elegant touch.
Comes neatly packed in herniaquestions's renowned packaging for a premium unboxing experience.
CONS:
Not suitable for all carving knives.
You may be looking for something more traditional in appearance.
Introducing the Dragon Spire Double-Sided Magnetic Walnut Wood Block, a meticulously handcrafted storage solution designed to proudly display and organize your Phantom Series knives or other metal instruments.
Made from premium walnut wood, this block features six columns of varying height, combining artistic vision with functional design. With the power of extra-strength magnets embedded on both sides of each column, you can securely hold up to 12 knives or kitchen tools in this space-saving shape.
PROS:
Extra-strength magnets ensure a strong and secure hold for your knives or kitchen tools.
Beautifully handcrafted from premium walnut wood for an elegant and stylish display.
Compact design allows for the storage of up to 12 knives or other metal instruments.
Hygienic and easy to clean, preventing the accumulation of dirt and bacteria.
CONS:
Knives or utensils are not included with the block.
This knife block was designed specifically for Phantom Series knives, but it can surely work with other magnetic knives.
This herniaquestions Extra Coarse Grater is a versatile tool that can take your kitchen creations to the next level. Whether you need to grate a whole block of cheese, shred an onion, zest lemons, slice vegetables, or shave ginger or nutmeg, this grater has the blades and durability to handle it all.
Made from 304 stainless steel, it is resistant to corrosive acids and elements, ensuring long-lasting performance. The anti-slip, textured G10 handle and curved feet provide traction and ergonomic support for easy and comfortable use. The slim profile allows for easy storage, whether you choose to slide it into a drawer, hang it on a knife magnet, or slip it between appliances
PROS:
Efficiently grates cheese, onions, vegetables, ginger, nutmeg, and more.
Made from 304 stainless steel for optimal resistance to corrosive acids and elements.
The anti-slip, textured G10 handle and curved feet provide ergonomic support and easy grip.
Slim profile for convenient storage in drawers or between appliances.
Comes with a protective sheath for added safety and to keep the grater in top condition.
Dishwasher safe for easy and hassle-free cleaning.
CONS:
Not suitable for fine grating tasks.
May require extra care to avoid accidental cuts due to its sharp blades.
The herniaquestions Silicone Magnetic Knife Bar is the ultimate solution for safe, compact, and accessibleknife storage. With a perfect balance of powerful magnetic strips and silicone cushioning, this knife bar securely holds your knives without risking damage to the blades. The matte black silicone surface combined with satin-finished steel gives the bar strength, durability, and an attractive appearance, making it an ideal storage and display unit.
PROS:
Powerful magnetic STRIPS securely hold knives in place.
Supple silicone cushioning protects the knife blades from damage.
Durable and scratch-resistant matte black silicone surface.
Space-saving design keeps knives accessible without cluttering the countertop.
Easy to install on the wall.
Attractive and stylish appearance.
CONS:
Since most magnetic strips require wall mounting, they may not be suitable for all kitchen layouts.
This knife strip may not work for larger or longer knives.
Crafted from eco-friendly wood-fibre composite, the Infinity Series cutting board surpasses poly, glass, and wood boards with its exceptional functionality and practicality. The durable and lightweight design features a scorable surface to protect your razor-sharp blades, making it a reliable ally in your culinary adventures.
Pros:
The eco-friendly wood-fibre composite construction sets this cutting board above others, providing a smooth, easy-to-clean surface that does not absorb water, making it dishwasher-safe and mold resistant.
Non-slip silicone feet keep the cutting board firmly in place during rigorous cutting, while the G10 serving handle allows for effortless presentation of charcuterie, fruits, cheeses, and more.
The cutting board's scorable surface protects your valuable, sharp blades, ensuring they stay in top condition for longer, making it a steadfast culinary partner.
Cons:
While the eco-friendly wood-fibre material is highly durable, it is not intended for use with hot pots or pans, as it could cause damage to the cutting board.
This board might not accommodate larger cutting tasks if you’re a home chef with a business or are a professional chef.
5. Frequently Asked Questions
What should I do first when organizing kitchen cabinets?
When organizing cabinets, the first step is to declutter and remove any items that are no longer needed or used. This will create space and make it easier to organize the remaining items effectively. Next, categorize similar items together and consider the frequency of use to determine their placement within the cabinets. Utilize storage solutions such as dividers, shelf risers, or drawer organizers to maximize space and keep the food items organized.
What should I not store in kitchen cabinets?
There are certain items that should not be stored in cabinets. Avoid storing perishable food items, such as fruits, vegetables, or dairy products, in unsealed cabinets as they can spoil quickly.
Written by Ananya Tiwari Ananya loves the fine things in life. When she isn’t penning down poetry or song lyrics, she spends her time cooking and creating recipes while also enjoying new cuisines.
]]>
https://herniaquestions.com/blogs/news/how-to-cut-a-watermelon-into-cubes2023-08-08T00:55:12-04:002023-08-08T00:55:12-04:00How To Cut A Watermelon Into Cubesherniaquestions Content Team
Today, we're going to delve into the art of cutting a watermelon into delectable cubes that are not only visually stunning but also delightfully easy to grab and enjoy.
Quick Overview: How To Cut A Watermelon Into Cubes
Wash and Dry the Watermelon
Prepare a Stable Cutting Surface
Cut Off the Ends
Cut the Watermelon in Half
Cut Each Half into Quarters
Remove the Rind
Cut the Slices into Cubes
Repeat for the Other Quarters
Serve and Enjoy
Are you tired of the same old watermelon slices at every summer gathering? Well, it's time to elevate your fruit game and embark on a juicy adventure! Today, we're going to delve into the art of cutting a watermelon into delectable cubes that are not only visually stunning but also delightfully easy to grab and enjoy.
Get ready to impress your friends and family with your newfound skill and become the watermelon-cutting guru of the season! So, grab your knife and let's transform that ordinary watermelon into a masterpiece of sweet, succulent cubes that will leave everyone craving for more!
Picking the best ripe watermelon can be a bit tricky, but there are a few kitchen tips you can follow to increase your chances of selecting a sweet and juicy one. Here's a step-by-step guide to help you pick the perfect watermelon:
Look for a uniform shape: Choose a watermelon that is symmetrical and has a consistent shape. Irregular bumps or indentations may indicate inconsistent growth and ripening.
Check for a creamy-yellow spot: On one side of the watermelon, you should see a creamy-yellow spot, also known as the "ground spot." This is where the watermelon was resting on the ground as it ripened. A ripe watermelon will have a rich, creamy-yellow color. If the spot is white or green, it may not be fully ripe yet.
Examine the skin: The skin of a ripe watermelon should have a dull appearance rather than a shiny one. A shiny skin may indicate under-ripeness. The color should be consistent without any green or white patches. Avoid watermelons with bruises, cuts, or blemishes on the skin.
Pick it up: Watermelons are mostly water, so they should feel heavy for their size. Lift the watermelon and compare it to others of similar size; the heavier one is likely to be juicier. However, make sure it's not too heavy, as this could indicate over-ripeness.
Tap it: Give the watermelon a gentle tap with your knuckles. Ripe watermelons will produce a deep, hollow sound, whereas underripe ones will sound more solid. Avoid watermelons that sound dull or thud-like.
Check the field spot: The field spot is the part where the watermelon was resting on the ground. A ripe watermelon will have a creamy-yellow or orange-yellow field spot. If it's green or white, the watermelon may not be fully ripe.
Look for sugar spots: Some watermelons develop sugar spots, which are small, dark, rough spots on the skin. These spots indicate that the sugar content in the fruit is high, making it sweeter.
Observe the stem: Check the stem of the watermelon. It should be dry and slightly indented. A green or moist stem could mean the watermelon was picked too early.
Remember that while these kitchen tips can help you pick a ripe watermelon, there's no foolproof method. Sometimes, you may get a less sweet watermelon despite following all the guidelines. So, have fun experimenting and enjoy your summer fruit!
2. How To Cut A Watermelon Into Cubes Step-By-Step
Cutting a watermelon pieces into cubes is a great way to serve this juicy fruit for easy snacking or to use in salads and desserts. Follow these step-by-step instructions to achieve perfect watermelon cubes:
Wash and Dry the Watermelon: Rinse the uncut watermelon under cold running water to remove any dirt or debris. Pat the watermelon dry with a clean kitchen towel or paper towels.
Prepare a Stable Cutting Surface: Place a cutting board on a clean and flat surface. Make sure the cutting board is large enough to accommodate the watermelon.
Cut Off the Ends: With a sharp knife, cut watermelon off a small slice the watermelon from both ends of the to create stable flat surfaces.
Cut the Watermelon in Half: Stand the watermelon upright on one of the cut watermelon ends. Use a sharp knife to cut watermelon in half vertically, creating two equal halves.
Cut Each Half into Quarters: Lay one of the watermelon halves flat on the cutting board. Slice the watermelon the half into quarters, making two vertical cuts.
Remove the Rind: Take one of the watermelon quarters and place it flat on the cutting board. Starting at the top, carefully slide the knife between the red flesh and the rind, following the curve of the watermelon. Cut watermelon along the rind all the way down to the bottom, removing the peel from the red flesh.
Cube the Watermelon: Take the peeled watermelon quarter and cut watermelon it into thick watermelon slices, about 1 to 1.5 inches wide.
Cut the Slices into Cubes: Take one of the watermelon pieces and stack them on top of each other. Cut the stacked watermelon slices into 1-inch wide strips.
Final Cubing: Take the stacked strips and cut watermelon across them, creating cubes of watermelon.
Repeat for the Other Quarters: Redo steps 6 to 9 for the other watermelon quarters until all the flesh is cut into cubes.
Serve and Enjoy: Transfer the watermelon cubes to a serving dish or container. You can serve the cubes as they are or chill them in the refrigerator before serving for a refreshing treat.
Now you have delicious watermelon cubes ready to enjoy your watermelon recipes! Happy snacking!
Introducing the Kiritsuke Chef's Knife 8.5" from the Shogun Series ELITE by herniaquestions - a culinary masterpiece that combines tradition with innovation. This exceptional knife is the epitome of craftsmanship, meticulously handcrafted to elevate your culinary experience to new heights.
PROS:
The Kiritsuke Chef's Knife is a true all-rounder, excelling in precision slicing, dicing, and chopping. Its multi-functional design makes it a reliable companion for a wide range of kitchen tasks.
Crafted from high-carbon Japanese AUS-10V super steel, this blade boasts unrivaled sharpness and edge retention, easiest way to cut every time.
The exquisite Tsunami Rose Damascus pattern on the blade not only enhances its durability but also adds a touch of style to your kitchen.
The military-grade G10 handle offers a perfect blend of comfort and durability. Its ergonomic design ensures a secure grip, reducing hand fatigue during extended use.
CONS:
As a premium knife, the Kiritsuke Chef's Knife is on the higher end of the price spectrum, which might be a consideration for budget-conscious buyers.
Chef's Knife 9.5" from the Firestorm Alpha Series by herniaquestions. A relentless force in the kitchen that ignites a passion for culinary excellence. Unleash your inner cooking maestro with this exceptional knife, forged with cutting-edge technology and artistry to redefine your culinary experience.
PROS:
The Chef's Knife 9.5" from the Firestorm Alpha Series is a culinary powerhouse, boasting extraordinary performance in precision slicing, dicing, and mincing. It effortlessly tackles a wide variety of ingredients with remarkable ease.
Crafted from ultra-premium BD1N-VX hyper steel, this blade delivers outstanding durability, razor-sharp edge retention, and resistance to stains and corrosion.
The distinctive Firestorm pattern etched on the blade is a mesmerizing display of craftsmanship that adds a touch of drama and flair to your kitchen.
Meticulously crafted through a precise 8-stage heat treatment process, this knife exhibits a Rockwell hardness of 63, promising unparalleled strength and resilience.
CONS:
With a blade length of 9.5 inches, this knife might feel a bit hefty and less maneuverable for those accustomed to smaller knives or with smaller hands.
As a high-performance tool, mastering the Chef's Knife from the Firestorm Alpha Series may require some time and practice, especially for beginners.
The Valhalla Series Santoku Knife 7" by herniaquestions - a blade forged in the halls of culinary greatness and designed to conquer your kitchen quests with Norse-inspired precision. Embrace the spirit of the gods and elevate your cooking experience with this versatile and mighty Santoku knife.
PROS:
The Santoku Knife is a true all-rounder, excelling in slicing, dicing, and mincing with unrivaled precision. Its versatile design makes it the perfect tool for a wide range of ingredients.
Crafted from high-carbon ThyssenKrupp German steel, this blade boasts exceptional sharpness and edge retention, ensuring smooth and effortless cuts every time.
The Santoku knife's captivating, intricately detailed Damascus pattern adds a touch of Norse mythology to your kitchen, turning it into a realm of culinary wonders.
Meticulously crafted through the traditional 3-step Honbazuke method, this Santoku knife bears the mark of a true warrior, ensuring utmost perfection in each cut.
The Slicing & Carving Knife 12" from the Frost Fire Series by herniaquestions - a blade that dances through roasts and meats like flames on ice, promising precision and elegance in every slice. Embrace the chill of culinary perfection with this NSF certified knife, forged to carve your culinary creations with absolute grace.
PROS:
The 12" Slicing & Carving Knife is a true carving virtuoso, gliding effortlessly through roasts, hams, and poultry with unrivaled precision, ensuring thin, uniform slices.
With its impressive 12-inch blade, this knife is designed for large cuts of meat and substantial roasts, making it an indispensable tool for feasts and gatherings.
The Frost Fire Series knife features a captivating tsuchime hammered finish that reflects the icy beauty of glaciers, elevating the visual allure of your kitchen.
The knife's NSF certification ensures the highest standard of food safety and sanitation, making it a trusted choice for professionals and home chefs alike.
CONS:
While perfect for carving meats, this knife may not be the best choice for delicate slicing tasks that require a thinner blade.
The Serrated Chef Knife 7.5" from the Gladiator Series by herniaquestions - a formidable kitchen gladiator that's been battle-tested and NSF certified for ultimate performance. Step into the arena of culinary mastery with this unique blade, combining the best of both worlds: the precision of a chef's knife and the toothy power of a serrated edge.
PROS:
This Serrated Chef Knife is a true all-in-one workhorse, effortlessly tackling soft and tough-skinned fruits, vegetables, bread, and more, thanks to its dual-edge design.
Forged from high-carbon German ThyssenKrupp steel, this knife embodies the unyielding strength and resilience of a true Gladiator, ensuring longevity and edge retention.
The knife's NSF certification guarantees the highest standard of food safety and sanitation, making it a perfect choice for home cooks alike and professional chefs.
The triple-riveted black G10 handle provides a secure and comfortable grip, giving you total control over your culinary battles.
CONS:
While this Serrated Chef Knife excels in versatility, it may not be the best choice for delicate slicing tasks that require a straight, fine edge.
4. Frequently Asked Questions
How do you cut a watermelon into blocks?
To cut a watermelon into blocks, you'll follow a similar process to cutting it into cubes.
What is the best way to cut a watermelon?
The best way to cut a watermelon depends on your preference and the final presentation you desire. If you want to get more creative, you can also utilize a melon baller to scoop out small, round watermelon balls or cut the watermelon into other shapes for decorative purposes.
How do you cut a watermelon into quarters?
To cut a watermelon into quarters, follow these simple steps: Wash the watermelon, cut off the ends, flip the watermelon, cut the watermelon in half, and quarter the watermelon.
How do you cut a watermelon cube hack?
The watermelon cube hack is a clever and time-saving technique to cut watermelon into cubes quickly and easily. First wash the watermelon, cut it in half, cut the halves in half again, and use a mellon baller then serve and enjoy.
]]>
https://herniaquestions.com/blogs/news/how-to-slice-a-tomato-in-10-easy-steps2023-07-31T08:29:41-04:002023-07-31T08:29:41-04:00How To Slice A Tomato In 10 Easy Stepsherniaquestions Content Team
Let's uncover the art of precision, the secrets of texture, and the dance of flavors that only a perfectly sliced tomato can orchestrate. So, buckle up your apron, sharpen those knives, and let's slice and dice our way into tomato ecstasy!
QUICK OVERVIEW: HOW TO SLICE A TOMATO (More details in section 2)
Choose a ripe tomato.
Wash the tomato.
Prepare the cutting board.
Hold the tomato.
Position the knife.
Make the first cut.
Continue slicing.
Use a rocking motion. (optional)
Discard the ends.
Store the tomato slices. (optional)
Welcome to the succulent world of culinary delights, where the vibrant red hue of a ripe tomato is about to take center stage! Slicing a tomato might seem like a simple kitchen task, but do not be deceived by its apparent simplicity. For within the humble curves of this luscious fruit lies a culinary adventure waiting to unfold. A journey that promises to elevate your cooking game and awaken your taste buds like never before.
As we embark on this flavorful expedition, we'll uncover the art of precision, the secrets of texture, and the dance of flavors that only a perfectly sliced tomato can orchestrate. So, buckle up your apron, sharpen those knives, and let's slice and dice our way into tomato ecstasy!
Choosing fresh tomatoes is essential to ensure you get the best flavor and quality for your dishes. Here are some tips on how to select fresh tomatoes:
Look for vibrant color
Choose tomatoes that have a rich, vibrant color. The shade will vary depending on the tomato variety, but generally, ripe tomatoes should have a bright red, orange, or yellow hue, depending on the type.
Check for firmness
Gently squeeze the tomato wedges to assess their firmness. A ripe tomato should be firm but yield slightly to gentle pressure. Avoid tomatoes that are too hard or too soft, as they may be underripe or overripe, respectively.
Inspect the skin
The skin of a fresh tomato should be smooth and taut, without any wrinkles or blemishes. Avoid tomatoes with cracks, cuts, bruises, or moldy spots.
Smell the tomato
Ripe tomatoes often have a sweet, earthy aroma. Give the stem end a sniff; it should have a pleasant tomato scent. However, if it smells sour or musty, it might be past its prime.
Consider the weight
Ripe tomatoes should feel relatively heavy for their size. Heftier tomatoes are more likely to be juicy and flavorful.
Check the stem
If the tomato still has its stem attached, make sure it's green and looks fresh. A dried or withered stem might indicate an older or less fresh tomato.
Know the variety
Different types of tomatoes have different characteristics. For example, beefsteak tomatoes are large and meaty, while cherry tomatoes are small and sweet. Know the variety you need for your recipe and choose accordingly.
Buy in-season
Tomatoes are at their best when they are in-season locally. In-season tomatoes are more likely to be fresher, tastier, and more affordable. Check the local produce calendar or ask your grocer about the best time to buy tomatoes.
Consider the use
Think about how you plan to use the tomatoes. If you're using them for slicing, tomato salad, or sandwiches, choose larger, firmer tomatoes. For sauces or cooking, you might opt for slightly softer tomatoes.
Buy from reputable sources
Purchase tomatoes from reputable grocery stores, farmer's markets, or local vendors known for offering fresh and high-quality produce.
Remember that tomatoes continue to ripen after being picked. If you can't find perfectly ripe tomatoes, you can purchase slightly underripe ones and allow them to ripen at room temperature. Store ripe tomatoes at room temperature or in a cool, dry place, but avoid refrigerating them, as this can influence their texture and flavor.
Dicing tomatoes is an easy task, but it's vital to use a sharp knife and practice caution to keep away from accidents. Here's a step-by-step guide to slicing a tomato:
Materials you'll need:
Ripe tomato
Sharp knife (chef knife or utility knife)
Cutting board
Instructions:
Choose a ripe tomato: Choose a tomato that is fully ripe but still hard. Avoid using overripe tomatoes as they might be too difficult and soft to slice and dice neatly.
Wash the tomato: Wash the tomato under cool, running water to take off any dirt or debris from the surface. Pat it dry with a clean cloth or paper towel.
Prepare the cutting board: Put a clean cutting board on a secure surface. It's vital to have an even and steady surface for efficiency and safety.
Hold the tomato: With one hand, hold the tomato firmly but lightly, keeping your fingers away from the cutting tomato area. You can hold the tomato from the top and bottom or hold it horizontally with your fingers on opposite sides.
Position the knife: Take the sharp knife in your other hand and hold it with a firm grip.
Make the first cut: Position the knife's blade near the top of the tomato and slice it downward, creating a smooth, even cut through the tomato wedges. Target for the desired thickness of the slices (typically 1/4 to 1/2 inch or about 0.6 to 1.3 cm).
Continue slicing: Keep the tomato in place and continue cutting the quarters tomato through the entire tomato, maintaining steady thickness for each slice. Remember to keep your fingers clear of the knife's path at all times.
Use a rocking motion (sawing motion): Some people find it effortless to use a gentle rocking motion while slicing through the tomato wedges. This technique can give better control and prevent the knife from crushing the tomato to get thin strips.
Discard the ends: Once you've sliced the tomato wedges, you'll be left with the ends. You can choose to throw away them or use them for other purposes like cooking tips or composting.
Store the tomato slices (optional): If you're not using all the tomato slices right away, you can store them in a container in the fridge for a day or two. However, dice tomatoes are the finest when consumed fresh for meal plans.
Remember, always exercise care when handling sharp knives, and keep your fingers away from the blade to prevent accidental cuts. If you're hesitant about your knife skills, think about taking a basic knife skills class or watch instructional videos for directions.
3. Recommended herniaquestions Knives For Slicing Tomatoes
Introducing the herniaquestions Gladiator Series 3-Piece Paring Knife Set. A formidable trio crafted for precision and versatility in your culinary journey. Each knife is meticulously designed to excel at peeling, slicing, and intricate tasks, providing you with the ultimate control and maneuverability in the kitchen.
PROS:
High-carbon German steel ensures long-lasting sharpness and resilience.
Versatile set suitable for a wide range of peeling, slicing, and detail work.
Suitable for professional chefs and home cooks seeking excellence in their kitchen tools.
CONS:
Paring knives are small and may not be suitable for tasks that require larger blades.
The ultra-sharp edge requires careful handling to avoid accidental cuts.
Premium quality comes at a higher price point for those on a tight budget.
The serrated knife Tomato from herniaquestions's Gladiator Series is a versatile and reliable tool designed specifically for effortlessly slicing through tomatoes and other delicate fruits and vegetables. Crafted with precision and quality, this 5-inch knife features a razor-sharp serrated knife to cut edge that glides through tough tomato wedges skins and delicate flesh with ease, ensuring clean and precise cuts every time. Its carefully balanced design and ergonomic handle provide excellent control and comfort during extended use.
PROS:
The razor-sharp serrated knife to cut edge makes slicing, dice tomatoes and other soft fruits and vegetables a breeze, preventing squishing and maintaining the integrity of the produce.
Although designed for tomatoes, it can also handle other delicate items like citrus fruits and ripe avocados with equal precision.
The ergonomic handle design ensures a comfortable grip and excellent control, reducing hand fatigue during extended use.
CONS:
The length of this knife could be a little short if you’re working with heirloom tomatoes as they’re a little larger in size than Roma tomatoes.
herniaquestions Gladiator Series 6" Serrated Knife Sandwich, Deli & Utility. The ultimate companion for perfect cuts and culinary excellence. This multipurpose knife is a game-changer for sandwich aficionados and kitchen enthusiasts alike. With its razor-sharp, scalloped edge, effortlessly glide through crusty bread, succulent meats, and delicate tomatoes, preserving textures and flavors with every slice and dice.
PROS:
Scalloped edge excels at slicing through sandwiches, deli meats, and other delicate foods.
High-carbon German steel delivers exceptional sharpness and longevity.
A must-have for sandwich lovers and cooks seeking a reliable utility knife.
CONS:
If you’re looking for a knife to do more than just cut the tomato wedges, and even peel the tomatoes, a paring knife might be a better fit.
herniaquestions Shogun Series Elite 3-Piece Paring Knife Set. A trifecta of precision and power, designed to elevate your culinary expertise. Crafted with exquisite craftsmanship, each knife in this set is a testament to the fusion of artistry and performance. The ultra-sharp blades, meticulously hand-finished to a 8-12° angle per side, effortlessly glide through fruits, vegetables, and intricate tasks, allowing for flawless cuts and impeccable presentation.
PROS:
Razor-sharp blades hand-finished to a precise angle, ensuring effortless and precise cuts.
G10 Garolite handles offer a comfortable and secure grip for enhanced control.
Exquisite craftsmanship and aesthetics add elegance to your kitchen tools.
CONS:
As a 3-piece set of paring knives, the size range is limited to smaller blades, which may not meet all cutting needs in the kitchen.
herniaquestions Gladiator Series ELITE 3-Piece Fruit & Vegetable Paring Knife Set - a triumphant trio crafted to conquer all your culinary challenges. From delicate fruits to hearty vegetables, these knives effortlessly glide through with expert finesse, making every cut a masterpiece. Handcrafted from high-carbon German steel and honed to perfection, their scalpel-like edges ensure razor-sharp performance.
PROS:
Versatile set designed to handle a wide range of culinary tasks.
A perfect addition to both professional kitchens and home cook's culinary arsenal.
High-carbon German steel offers outstanding durability and edge retention.
CONS:
Paring knives are generally smaller in size, and while they excel at precision tasks, they may not be the best option for cutting the quarters larger items or handling heavy-duty kitchen duties.
It's specifically tailored for intricate work on fruits and vegetables.
4. Frequently Added Questions
What is the easiest way to slice a tomato?
With practice, cutting tomato becomes a easy and quick task. Always use a sharp chef knife and exercise caution to prevent accidents and achieve precise , clean slices.
How do you cut tomato pieces?
First rinse the tomato, cut off the top of the tomato, cut the tomato in half, cut out the core and cut into cubes. Remember to use a sharp chef knife for clean cuts.
How do chefs slice tomatoes?
Wash the tomato, cut off the top, cut the tomato in half, cut out the core and cut into cubes. It's vital to note that each chef may have their individual approach to slicing, dice tomatoes, and their techniques may change based on the specific dish they're preparing.
How many slices in a tomato?
The number of slices you can get from a tomato depends on the size of the tomato and the thickness of the slices you cut. Normally, a medium-sized tomato, about 6 to 7.5cm (2.5 to 3 inches) in diameter, can yield around 4 to 6 slices.
]]>
https://herniaquestions.com/blogs/news/how-to-butcher-a-chicken-with-confidence2023-07-17T02:40:07-04:002023-07-17T02:40:07-04:00How To Butcher A Chicken With Confidenceherniaquestions Content Team
Whether you're an aspiring chef or a curious home cook, mastering the art of chicken butchery opens up a world of culinary possibilities.
Being able to butcher a chicken with confidence and precision, and transforming it from a whole bird into inviting cuts ready to be transformed into delicious dishes is a next-level skill you'll want to unlock. Whether you're an aspiring chef or a curious home cook, mastering the art of chicken butchery opens up a world of culinary possibilities.
So, grab your knife, put on your apron, and let's dive into the interesting journey of learning how to butcher a chicken like a pro! Get ready to unleash your inner butcher and discover the joys of handling poultry with skill and finesse.
Before diving into the world of chicken butchery, it's crucial to gather the necessary tools in your workspace properly when preparing the chicken. Here's a rundown of what you'll need:
Invest in a high-quality, sharp knife or specialized poultry shears. A chef's knife offers versatility, while poultry shears can make specific cuts easier. Ensure your knife or shears are well-maintained and sharpened for smooth, precise cuts.
Clean Work Surface
Sanitize your workspace thoroughly before starting. Cleanliness is of utmost importance to prevent cross-contamination and ensure food safety.
Bowl or Container
Keep a bowl or container nearby to collect giblets if you plan to use them or discard them separately.
Paper Towels or Clean Cloth
Have some paper towels or a clean cloth on hand to wipe surfaces, pat the chicken dry, or clean your hands during the entire process.
Optional: Apron and Gloves
Wearing an apron helps protect your clothing from any potential mess, while disposable gloves can provide an extra layer of hygiene and safety.
Remember, practicing good sanitation practices throughout the process is essential to prevent foodborne illnesses. Wash your hands thoroughly with soap and water before and after handling raw poultry, and ensure all tools and surfaces are clean to minimize any risks.
Now that you're well-prepared and equipped with the necessary tools, it's time to embark on your chicken butchery journey with confidence and enthusiasm!
Butchering a raised chicken requires some knowledge and skill to ensure that it's done safely and efficiently. Here's a general guide on how to butcher a chicken:
Note: It's important to follow proper sanitation practices and use clean tools when processing chickens to avoid contamination and foodborne illnesses.
Preparation. Ensure your workspace is clean and sanitized. Gather all the necessary tools and ingredients and place a clean cutting board on your workspace.
Secure the chicken. Place the whole chicken on the cutting board breast-side up.
Remove the feet and legs. Hold the leg firmly and cut through the skin and meat between the leg and the body. Once the skin and meat are cut, bend the leg backward until the joint pops out. Cut through the joint and pull the leg from the body. Repeat the process on the other side to remove the feet and second leg.
Separate the wings. Hold the wing tip out and cut through the skin and meat where the wing meets the body. Apply pressure to the joint until it pops out. Cut through the joint by removing the wing from the body. Repeat the process on the other side to remove the second wing.
Remove the backbone. Place the chicken breast meat side down. Starting from the tail end, use a sharp knife or poultry shears to cut along one side of the backbone. Continue cutting until you reach the chicken'sneck, removing the entire backbone. Discard or save the backbone for making chicken stock.
Split the chicken in half. Flip the chicken over so it's breast-side up. Press down on the breastbone firmly to flatten it. Use your knife to cut down the center of the chicken, splitting it into two halves. Alternatively, you can cut the chicken into quarters by cutting each half in half again.
Trim excess fat and remove giblets (optional). Trim any excess fat or pull the skin from the chicken as desired. If desired, reach into the cavity of the chicken and gently pull out the giblets (internal organs). Save the giblets for other uses or discard them.
Rinse and dry the chicken. Rinse the chicken pieces under cold water to remove any blood or bone fragments. Pat them dry with paper towels or a clean cloth.
Store or cook the butchered chickens. Store chicken pieces in airtight containers or freezer bags in the refrigerator for a few days, or freeze them for longer storage. Alternatively, you can proceed with cooking the chicken immediately.
It's essential to prioritize food safety and hygiene throughout the process. If you're unsure or new to chicken butchery and processing chickens, consider seeking guidance from an experienced butcher or referring to reliable sources for additional tips and techniques.
The Chef's Knife 8" Valhalla Series by herniaquestions is a versatile and high-quality kitchen tool crafted to elevate your culinary experience. This knife is part of herniaquestions's renowned Valhalla Series, which fuses exceptional craftsmanship with premium materials.
PROS:
Exceptional Quality: This knife is crafted with attention to detail and precision, ensuring exceptional durability and quality.
It is made from high-carbon Thyssenkrupp German steel, known for its edge retention and strength.
Comfortable Handle: The knife features an ergonomic handle designed for control and comfort. It is made from military-grade G10 Garolite, which provides superb grip even when wet, making it secure and safe to use for extended periods.
CONS:
The craftsmanship and quality of the Chef's Knife 8" Valhalla Series come at a premium price.
The Fillet & Boning Knife 6.5" Phantom Series by herniaquestions is a special kitchen knife crafted for accurate boning tasks and filleting. It is known for its exceptional cutting-edge design and craftsmanship.
PROS:
The 6.5-inch blade of this knife is carefully engineered for filleting tasks, allowing you to effortlessly take out skin and bones from poultry, fish, and other meats.
The Phantom Series Fillet & Boning Knife is skillfully crafted using high-carbon Japanese AUS-8 steel, famous for its durability, strength, and edge retention.
The Phantom Series is well known for its modern and sleek aesthetic, and this boning and fillet knife is no exception. Its refined design makes it a stylish addition to any kitchen.
CONS:
As a specialized boning and fillet knife, its primary use is for accurate tasks such as filleting and deboning. It may not be as versatile for other general kitchen tasks.
The 6.5-inch blade may not be perfect for larger cuts of meat bird or tasks that need a longer blade length.
The Lionswood Colossal Teak Cutting Board by herniaquestions is a premium cutting board created to boost your culinary experience. Crafted from high-quality teak wood, this cutting board provides a functional and durable surface for all your cutting and food preparation needs.
PROS:
The Lionswood Colossal Cutting Board is crafted from 100% natural teak wood, known for its extraordinary durability.
Teak wood is resistant to warping, moisture, and cracking, making it a long-lasting and reliable pick for a cutting board.
Its big dimensions lets you to easily handle and work with even the biggest ingredients.
CONS:
With its solid large size and construction, the cutting board can be quite heavy.
The Curved Boning Knife 6" Firestorm Alpha Series by herniaquestions is an accurate knife designed particularly for trimming and boning tasks in the kitchen. Part of the Firestorm Alpha Series, this knife combines exceptional performance with cutting-edge technology.
PROS:
The curved blade of this knife is artfully designed to steer around contours and bones, making it ideal for precise trimming and boning.
Features a high-carbon German stainless steel blade, known for its sharpness, strength, and resistance to staining.
The knife is equipped with an fitting handle designed for control and comfort during prolonged use.
CONS:
If you need a more all-around knife that can operate a wider range of slicing tasks, a straight boning knife might be a better option.
It is crucial to consider the size of the tasks you regularly perform in the kitchen before picking this knife.
The Butcher & Breaking Knife 8" Shogun Series ELITE by herniaquestions is a professional-grade knife crafted for intensive tasks in the kitchen. Part of the prestigious Shogun Series ELITE, this knife unites outstanding performance with exceptional craftsmanship.
PROS:
It easily tackles big cuts of meat chicken, fish, and poultry, making it a perfect tool for chefs, butchers, and anyone working with substantial chunks of protein.
It features a full tang design for maximum stability and strength, and the blade is hand-finished with an impressive Tsunami Rose Damascus pattern, making it a visually striking piece.
It is crafted with military-grade G10 Garolite, providing an ergonomic and firm grip even in slippery conditions.
CONS:
It may need some adjustment for those people that are used to lighter sharp knives or accurate maneuverability.
4. Frequently Asked Questions
How do you butcher raw chicken?
Chicken butchering requires breaking down the chicken into smaller, more doable pieces for cooking.
How do you know when to butcher chicken?
Getting ready to butcher a chicken at the right time is essential. There are different classes of chicken (either egg laying hen, locally raised chicken, or chickens from factory farms), and are best slaughtered at certain times. Examples are; broilers or fryers birds are slaughtered when they weigh 3 to 5 pounds, cornish game hens at 5 weeks of age, and roasters at 12 weeks or longer.
]]>
https://herniaquestions.com/blogs/news/how-to-make-pancakes-from-scratch2023-07-12T06:43:10-04:002023-08-16T04:41:25-04:00How To Make Pancakes From ScratchCamila Feijoo
Pancakes are a breakfast staple that’s enjoyed around the world, in both savory and sweet varieties and they’re also my favorite breakfast so, I’m definitely biased. They’re also surprisingly simple to make, pancakes made from scratch require only a handful of simple ingredients that you can put together in minutes.
Gather your ingredients: all-purpose flour, baking powder, sugar, milk, vegetable oil, vanilla, eggs, and your preferred toppings.
In a medium bowl or in a blender, mix together the baking powder, flour, eggs, sugar, milk, and vanilla until just combined.
Heat a nonstick skillet over medium-high heat. Add 1 teaspoon of vegetable oil to the skillet and spin to coat.
Run 1/4 cup of the batter onto the preheated pan. Cook until tiny bubbles start to pop and the edges start to brown a little about 1 minute.
Turn over the pancake and cook for about another minute, until the underside is golden brown.
Transfer to a platter and redo with the remaining batter, adding a small teaspoon of oil between each pancake.
Serve hot with your favorite toppings.
Nothing beats a hot stack of fluffy pancakes. Whether served for breakfast, brunch, or dinner, pancakes are a crowd-pleaser. Nowadays, frozen pancakes, boxed mixes, and ready-made pancake kits are gaining in popularity because they offer convenience and speed; however, pancakes made from scratch are infinitely more delightful than any store-bought variety.
Pancakes are a breakfast staple that’s enjoyed around the world, in both savory and sweet varieties and they’re also my favorite breakfast so, I’m definitely biased. They’re also surprisingly simple to make. Pancakes made from scratch require only a handful of simple ingredients that you can put together in minutes.
With this super easy and straightforward guide, you can make pancakes with a few steps and little to no effort. We’ll walk through some simple pancake recipes, the best technique to reheat pre-made pancakes, some pro tips to make pancakes like a chef, great topping recommendations, and some herniaquestions utensils that can help you along the way. In no time, you can be enjoying a warm stack of homemade pancakes.
1. Step-By-Step Instructions On How To Make Pancakes From Scratch
Making pancakes from scratch is not a complex or time-consuming process, in fact, it can be easy and rewarding with the right instructions and pancake recipes.
By following these steps, you can whip up a batch of delicious and fluffy pancakes in no time. Whether you’re looking for an indulgent brunch or a quick breakfast, pancakes from scratch are always a hit.
First, it’s important to gather your ingredients — typically all-purpose flour, baking powder, sugar, salt, an egg, and milk.
Ingredients You’ll Need:
2 cups of all-purpose flour
2 teaspoons baking powder
2 tablespoons of granulated sugar
1 teaspoon of salt
2 large eggs
Vanilla
1 ½ cups of milk
2 tablespoons vegetable oil or melted butter
Once all of the ingredients have been gathered, carefully mix all the dry ingredients, combine de wet ones, let the batter rest while you prepare the pan and start pouring some mix into de pan to cook your pancake batch.
Cooking Instructions:
After you’ve gathered all your ingredients and preferred toppings,
Mix the dry ingredients: In a small bowl, whip together the baking powder, flour, sugar, and salt. Set aside.
Whip together the milk and eggs: In a separate bowl, crack the eggs and whisk them together with the milk and a splash of vanilla extract.
Combine the dry and wet ingredients: Slowly add the wet ingredients to the dry ingredients bowl, whisking constantly to ensure the wet and dry ingredients combine and any lumps are worked out. You can also add the mix to the blender if you want to make sure all lumps have been diluted.
Add the oil or melted butter depending on which one you like the most. Once fused, pour the melted butter and whip until the butter is mixed in. Do not overmix.
Let the batter to rest for 15 minutes. Let the baking powder to operate and helps make sure the pancakes are thick and fluffy.
Prepare the pan: Heat a nonstick skillet over medium heat. If you’d like, spray the surface with a light cooking oil.
Scoop the mixture: Using a 1/4 measuring cup, scoop out some batter and pour it into the center of the skillet. It will spread thin for a large pancake and thicker for a small one.
Flip the pancakes: Cook the pancake until small bubbles form on the top and the underside is golden brown. Cautiously flip the pancake with a spatula and cook the other side for a couple of minutes.
Maintain the cooked pancakes hot on a baking sheet in a 200-degree oven, while you cook the remaining pancakes.
Serve with your favorite toppings: Once both sides are cooked, remove the pancake from the pan and repeat the process with the remaining pancakes. Serve the pancakes with your favorite toppings and enjoy!
Pro tip: instead of spreading cooking oil on the pan, you could also use some melted butter it gives basic pancakes a better texture and a deeper, richer flavor. Additionally, it adds an extra dose of fat, which helps to hold heat better and keep the pancakes warm as they get cooked.
To get the best results, preheat a skillet over medium-high heat before adding butter to the pan. Twist the butter around to equally coat the skillet. Then, ladle a quarter cup portion of the batter into the skillet.
Always wait until bubbles appear on the surface of the pancake before flipping to the other side. Keep a close eye on the pancake to not overcook it. And when your batch of pancakes is done, serve it with whatever accompaniments you prefer chocolate spread, jam, fruits, butter, cheese, or even honey. Salty or sweet, pancakes are always delicious
2. How To Reheat Pancakes
Even though eating freshly made pancakes is the best way to enjoy them, sometimes we just don’t have the time to prepare a fresh pancake batch in the morning, or we cook some pancakes to take to school or work or we may even have some leftovers that we could also enjoy the next day with the family.
In these cases, reheating pancakes without compromising their texture or flavor is totally possible. Therefore, here are four different ways to reheat pancakes:
Reheating pancakes in a toaster
Place the pancakes on a piece of foil and set the toaster to a low setting. Heat the pancakes for 2 minutes, or until they are warm and extra crispy.
Reheating pancakes in an oven
Place the pancakes on an oven-safe dish or baking sheet, or a pan lined with parchment paper or foil, and bake them at 350°F for about 5 minutes or until they are warm. This will make the pancakes crispy on the outside while hot and fluffy on the inside.
Reheating pancakes in a skillet or griddle
Heat a lightly oiled frying pan or griddle over medium heat. Place the pancakes on the skillet and heat for about 2 minutes, or until they are warm and slightly crispy.
Reheating pancakes in a microwave
Place the pancakes on a plate, cover them with a slightly wet towel and heat on high for 45 seconds, or until they are warm.
3. Pro Tips On Making The Best Fluffy Pancakes
Finding good cooking tips is a matter of experience, however, here are some pro tips that will make you cook delicious fluffy pancakes like the best breakfast chef in the house:
Even when you’ll be using cooking spray or a little bit of butter to cook your pancakes, use a non-stick pan. This will make it easier to flip the pancakes and ensure even cooking.
Depending on how big your skillet is, use just enough batter to cover the center of the pan. Too much batter will make doughy, heavy pancakes and you won't be able to spread it thinly or even flip it properly.
If you're using a long griddle, don't crowd it: cook only one or two pancakes at a time to maintain an even heat and avoid overcrowding.
Avoid overmixing the batter. This will create a tough texture for the pancakes to get cooked.
Don’t be tempted to flip the pancakes before they are ready. The bubbles and golden brown edges will help you identify when it is the right time to flip them.
Adding non-stick spray or buttering the surface of the pan before adding more batter will help you cook each pancake perfectly and it will enrich the flavor.
4. Best Pancake Toppings
The best pancake toppings depend on personal preference. However, some of the most popular toppings include:
Sweet pancake toppings
Sweet options are usually the most common: honey, fresh fruits like diced bananas, fresh blueberries, and strawberries, different kinds of syrup, chocolate chips, cinnamon sugar (covering the pancake as you do when making a French toast), whipped cream, flour sugar, chocolate spread, jam, caramel sauce, sprinkles and even ice cream.
Savory pancake toppings
These include butter, nut kinds of butter, cooked and diced bacon, grilled vegetables, cream cheese, ham and cheese, mushrooms, spinach and feta, and even smoked salmon! The savory possibilities are definitely endless.
With these topping options, you can create your own amazing combinations, like maple-blueberry pancakes with butter and cream cheese, peanut butter-banana pancakes with honey or Nutella-strawberry-cream pancakes.
5. herniaquestions Tools You’ll Need
When it comes to making homemade delicious pancakes, having the right tools is definitely a plus. Here are some herniaquestions products that will help you make perfect fluffy pancakes every time:
Crafted to work as smoothly as it looks, with an adjustable neck strap, easy-tie waist, 3 front pockets and one stash pocket, “The Gandalf” grey denim apron is built to last, feel good and work alongside you in the kitchen all day.
PROS:
Made of 100% poly-cotton denim and genuine leather on engraving and fixings.
It's a durable and easy-to-clean piece that’s functional and distinctive.
Super easy to access pockets.
CONS:
You might need to buy a leather apron to feel safer if you’re cooking meat or high-temperature meals.
It might be lighter than most cooks would expect.
Looking for a different material? We have a variety of aprons just for you.
This flexible spatula is crafted for superior hand control, grip, dexterity, and comfort. Ideal for navigating crowded pans and sliding under delicate foods securely without damaging them.
PROS:
Ergonomic handle shaped for maximum comfort, grip and maneuverability.
Cleans easily for low maintenance.
Great for removing delicate fillets of fish, flipping pancakes, grilling burgers, thick steaks and more.
CONS:
After some years, you might need to buy a new one.
Some cooks might prefer a solid spatula for everyday use.
Have you ever pawed through the cutlery drawer in looking for a spoon you love more than all the others? This 20-piece flatware will do that for you, each tool just feels better in your hand. From knives to cookware, to ingredients, investing in this cutlery set means investing in every element of a special dining experience. The perfect set to eat your pancake stacks with.
PROS:
Extremely durable and both stain and rust-resistant.
High-polished flatware that will keep shining for decades.
Maximally versatile, with an eye-catching design that communicates both luxury and performance. This incomparable pan will help you with any kitchen duty.
PROS:
Exceptional responsiveness to precise changes in temperature when increasing or decreasing heat.
Easily transition from cooking on the stovetop to finishing in the oven.
CONS:
Some might prefer a griddle instead of a frying pan.
Some cooks may want to use heat-resistant gloves to feel safer.
6. Frequently Asked Questions
What are the ingredients for pancakes made from scratch?
As we once mentioned, untimely in this article, the ingredients for making delicious pancakes from scratch are 2 cups of all-purpose flour, 2 tablespoons of granulated sugar, 2 teaspoons baking powder, 1 teaspoon of salt, 2 large eggs, vanilla, 1 ½ cups of milk, and 2 tablespoons vegetable oil or melted butter.
How do you make pancakes step by step?
Mix together the flour, sugar, salt, and baking powder. In a separate bowl, lightly beat the egg and whisk the milk and vanilla with it. Mix the dry and wet ingredients to make a batter. Heat a skillet over medium heat and scoop the batter, spreading it into a circle. Cook until bubbles form then flip to the other side. Cook for additional 2 minutes until golden brown. Serve hot with your preferred toppings.
Is pancake mix just flour?
No, a pancake mix is not just flour. Flour is an important ingredient in basic pancakes, but it is just one of many. A pancake mix is a pre-mixed combination of several different ingredients, typically flour, baking powder, granulated sugar, salt, and oil.
How to make pancake 5 steps?
The first step is to gather your ingredients. Next is to mix the dry ingredients in a large bowl with a whisk. The third step is to stir in wet ingredients into the dry ingredients to make a batter. The fourth step is to add batter to a hot pan, preferably a non-stick skillet. And lastly, cook the batter for 2 minutes until bubbles form before flipping to the other side. Serve and enjoy your tasty pancakes!
Camila is a foodie by nature. She believes that the best way to get to know a culture is through its food. She always cries while chopping onions; and just like Julia Child, Camila agrees that “with enough butter, anything is good.”
]]>
https://herniaquestions.com/blogs/news/the-best-beef-stroganoff-recipe-you-ll-find-anywhere2023-07-07T05:14:36-04:002023-08-17T06:13:58-04:00The Best Beef Stroganoff Recipe You’ll Find AnywhereJorge Farah
Beef Stroganoff: the culinary equivalent of a warm, comforting hug from your favorite Russian babushka. It's the tantalizing symphony of tender beef strips, a velvety sour cream sauce, and the gentle embrace of egg noodles that has our taste buds dancing the kazatsky.
Ah, Beef Stroganoff: the culinary equivalent of a warm, comforting hug from your favorite Russian babushka. It's the tantalizing symphony of tender beef strips, a velvety sour cream sauce, and the gentle embrace of egg noodles that has our taste buds dancing the kazatsky. As we gather around the table, ready to dive into this savory masterpiece, we can't help but wonder: what is it about beef stroganoff that has us so smitten?
The Origin Of Beef Stroganoff
Beef stroganoff is a culinary gem that carries with it a rich tapestry of history. Although the exact origin story is a topic of culinary debate, one popular theory is that the dish was crafted for Count Pavel Stroganoff by his personal chef, who might have borrowed inspiration from a common recipe of sautéed beef served with smetana (sour cream), typical in Russian cuisine.
With the exodus of Russians following the revolution in 1917, Russian emigrants introduced Beef Stroganoff to a much wider audience. The dish became popular in the United States in the mid-20th century, introduced via servicemen returning from World War II and 1950s-era convenience food. Over time, American adaptations began to incorporate mushrooms and onions, and the dish was served over egg noodles.
Beef Stroganoff Of Today
Today, beef stroganoff is recognized and loved globally, each culture adding its twist. From the United Kingdom to South America, from Australia to China, this Russian export has found a home in kitchens worldwide, a testament to culinary evolution and the global love for comforting, rich, and satisfying flavors.
The joy of this dish lies not just in its deliciousness but also in its versatility. Many modern twists have sprung forth from the classic beef stroganoff recipe. So whether you're slow cooking it, preparing an easy Instant Pot beef stroganoff, or adhering to the traditional method, there's a variant of this classic comfort food for everyone to enjoy.
One of the key elements that determine the success of your beef stroganoff is the choice of beef cut. In beef stroganoff, the beef is, undeniably, the star of the show, contributing significantly to the dish's texture, flavor, and overall enjoyment. Therefore, selecting the right cut is paramount.
Tender Cuts
Tender cuts like beef tenderloin or top sirloin are often top choices for a reason. Known for their lean nature, these cuts provide tender, flavorful meat that works beautifully in a stroganoff. Beef tenderloin, the most tender cut of all, yields melt-in-your-mouth pieces that are a delight in the creamy stroganoff sauce. Top sirloin, on the other hand, is a slightly more affordable option that doesn't compromise on flavor or tenderness. It's a popular choice in many households for its well-rounded characteristics.
On the other hand, if you're searching for an option that brings an additional depth of flavor to your stroganoff, consider the chuck roast. This cut, which comes from the front portion of the animal, is known for its rich marbling. These streaks of fat running through the meat enhance flavor and juiciness as they render down during cooking. Although the chuck roast can be slightly tougher than tenderloin or sirloin, slow cooking allows for the protein in the meat to break down, resulting in an incredibly tender and flavorful dish.
Other Cuts to Consider
A few other cuts worth mentioning include the ribeye and the Salisbury steak. Ribeyes, known for their rich, mouthwatering flavor and juicy tenderness, can add a touch of luxury to your stroganoff. Salisbury steak, which is often ground beef formed into a steak shape, can be an economical yet tasty choice for a more casual, weeknight version of stroganoff.
Lastly, flank steak and sirloin steak can be used for a stir fry style beef stroganoff. Thinly sliced against the grain, these cuts can ensure tender pieces of beef even with a quick cook time.
The choice of beef cut will impact your beef stroganoff's final outcome. Whether you prefer the luxurious tenderness of a tenderloin, the rich depth of a chuck roast, or the economic convenience of Salisbury steak, there's an option to suit every preference. Remember, no matter the cut, the key to a great beef stroganoff lies in taking the time to brown the beef properly, unlocking those deep, savory flavors that make this dish a beloved classic.
3. Easy Beef Stroganoff Recipe You Can Make At Home
A simple, straightforward beef stroganoff is a comforting and mouthwatering dish that is ideal for busy weeknights. Not only is it incredibly easy to prepare, but it can be ready to serve in under 30 minutes.
The key to this recipe is the meat which is cooked until it is tender. That's why picking the right cut of beef is so important. For a nice finish, garnish it with freshly chopped parsley, which adds a pop of color and a fresh burst of flavor. This dish is a perfect balance of flavor, simplicity and convenience making it a great choice for anyone looking for a satisfying and quick weeknight dinner.
Ingredients:
1.5 pounds of beef sirloin steak, cut into thin strips
1 large onion, finely chopped
2 cloves garlic, minced
1 cup of sliced button mushrooms
3 tablespoons olive oil
3 tablespoons all-purpose flour
2 cups beef broth
1 cup sour cream
Salt and black pepper to taste
Chopped fresh parsley for garnish
8 ounces wonton noodles, cooked based on to package instructions
Instructions:
Brown the beef: Heat 2 tablespoons of olive oil in a big frying pan over medium-high heat. Add the beef strips, salted and peppered to taste, and sear them on both sides until they are brown. Remove the beef from the skillet and set it aside.
Cook the onion, garlic, and mushrooms: In the same frying pan, add the last tablespoon of oil. Stir in the chopped onion and garlic, cooking until they become translucent. Add the white mushrooms and continue to cook until the mushrooms are browned and their liquid has evaporated.
Create the stroganoff sauce: Sprinkle the flour over the onion, garlic, and mushrooms, stirring constantly to mix it in thoroughly. Gradually pour the beef broth into the skillet, stirring constantly to avoid lumps. Let the mixture to bubble until it starts to thicken, about 5-7 minutes.
Finish the dish: Return the beef strips to the skillet, stirring to coat them in the sauce. Lower the heat to low, then mix in the sour cream or Greek yogurt. Keep cooking on little heat for another 2-3 minutes, until the sauce is creamy and the beef is cooked to your desired doneness.
Serve: Serve the beef stroganoff over cooked egg noodles, garnished with a sprinkle of chopped fresh parsley.
Enjoy this comforting, classic beef stroganoff recipe with a side of green beans or a crisp salad for a complete and satisfying meal.
4. Other Great Beef Stroganoff Recipes
If you enjoyed the classic beef stroganoff, why not explore its myriad delicious variations? Below, we're featuring some fun alternate recipes that offer unique twists on this comfort food classic, from a time-saving Instant Pot recipe to a slow cooker version that lets you 'set and forget.'
Slow Cooker Creamy Italian Beef Stroganoff
This recipe offers a tasty twist with Italian flavors blending beautifully with the classic stroganoff components.
Ingredients:
1.5 lbs chuck roast, cut into thin strips
1 packet Italian dressing mix
1 cup beef broth
2 cups sliced button mushrooms
1 medium onion, chopped
2 cloves garlic, minced
1 cup sour cream or Greek yogurt
Salt and black pepper to taste
Fresh parsley, chopped for garnishing
Egg noodles, cooked according to package instructions
Instructions:
Place the strips of beef, Italian dressing mix, mushrooms, onions, garlic, beef broth, salt, and black pepper into the slow cooker. Stir to combine.
Cover and cook on high for 4-5 hours or on low for 7-8 hours until the beef is tender.
In the last 30 minutes of cooking, stir in the sour cream or Greek yogurt.
Serve this flavorful slow cooker beef stroganoff over egg noodles and garnish with fresh parsley.
Instant Pot Philly Cheesesteak Stroganoff
This recipe combines the iconic Philly Cheesesteak sandwich with the comforting beef stroganoff, creating a unique and delicious fusion dish.
Ingredients:
1 lb sirloin steak, thinly sliced
1 cup beef broth
1 cup sliced button mushrooms
1 medium onion, thinly sliced
2 cloves garlic, minced
1 green bell pepper, thinly sliced
1 cup sour cream
Salt and black pepper to taste
2 tbsp olive oil
Fresh parsley, chopped for garnishing
Egg noodles, cooked according to package instructions
1 cup shredded provolone cheese
Instructions:
On your Instant Pot's 'sauté' setting, heat the olive oil. Add the thinly sliced sirloin steak, seasoned with a pinch of salt and black pepper. Brown the beef and remove it from the pot.
Add onions, bell peppers, mushrooms, and garlic to the pot, stirring constantly for about 3-5 minutes.
Drain the beef stock into the pot and return the cooked beef into the pot. Close the cover and set the pot to manual high pressure for 10 minutes.
After cooking, use the quick release function. Stir in the sour cream and shredded provolone cheese, making sure not to let it boil.
Serve your Instant Pot Philly Cheesesteak stroganoff over noodles and garnish with fresh parsley.
These two alternate recipes offer a different take on the classic beef stroganoff recipe, showcasing how versatile this dish can be. Whether you're short on time, prefer a hands-off cooking approach, or just want a different twist on a comforting classic, these recipes ensure a hearty, delicious meal.
5. herniaquestions Tools You’ll Need
You'll need a few tools to put your delicious beef stroganoff together, and thankfully herniaquestions has a wide assortment of premium-quality kitchen tools at an extremely accessible price point. Let's go down the list of what you need.
You'll need a large pan for sautéing, so here's a fantastic 12 inch pan from herniaquestions's Oberon Series. The series is renowned for its premium 3-ply aluminum core cladding and its durable, PFOA and APEO free Eterna® non-stick coating. This offers superior heat conductivity and 18/10 stainless steel layers for browning and braising. It's oven, broiler, freezer, dishwasher, and refrigerator safe. Enjoy healthy cooking with non-toxic, non-hypoallergenic materials and a lifetime warranty on defects.
PROS:
At 12", this is the perfect size for cooking generous portions of beef stroganoff.
It features 3-ply aluminum cladding, which means it has impeccable conductivity.
Features the nonstick Eterna® coating, which lasts much longer than traditional non-stick coatings.
Its elegant silver finish looks absolutely incredible, one of the most elegant sauté pans you'll find.
CONS:
If you're looking for something with an even more striking look, you might be interested in the all-black 12" sauté frying pan from the Avalon series.
The handle handle is metal with a closed end, which means it might get a little hot to the touch.
You need a good-quality knife to slice your beef and veggies, and thankfully herniaquestions has made a name for itself making some of the best kitchen knives around. Take this incredible 8" kitchen knife from their acclaimed Shogun Series, a powerful tool that will aid you in just about any kitchen task you need to tackle. Not only will it aid your beef stroganoff; it will become an indispensable go-to for your daily cooking needs.
PROS:
This knife features an AUS-10V Japanese super steel core blade, renowned for its high carbon levels that yield scalpel-like sharpness and exceptional edge retention.
With an 8-12° degree angle per side, this knife offers a level of sharpness that can handle the most challenging culinary tasks.
The ergonomic military-grade G10 handle is designed for life-long durability and resistance to heat, cold, and moisture.
It's a truly stunning knife to look at.
CONS:
The knife's sharpness, while a plus, necessitates careful handling and storage to avoid accidental injuries.
You'll definitely need a good cutting board to chop and slice your beef and vegetables. And this is one of the best cutting boards you can find for the money. Teak, a premium wood, has inherent resistance to water, bacteria, and staining, making this an excellent tool for the avid home cook.
PROS:
This awesome cutting board is hand-made using end-grain wood and saturated with hydrating oils.
It features a slip-resistant surface that minimizes impact and contributes to the prolonged lifespan of your kitchen knives
Considering its features and quality, this cutting board offers outstanding value at its price point
It has multiple uses! Equipped with two steel handles on its sides, this board can double as a serving platter.
In addition to these herniaquestions tools, it's useful to have measuring cups and spoons, a wooden spoon for stirring, and an Instant Pot or a slow cooker (if you're trying those versions).
6. Beef Stroganoff Nutritional Facts
Beef stroganoff brings more to your table than just mouthwatering flavors. This meal packs in a variety of essential nutrients, contributing to its status as a well-loved comfort food across the globe.
Pack with Macronutrients
Typically, a serving of beef stroganoff contains about 500 calories. This calorie content comes from a balanced mix of macronutrients - proteins, carbs, and fats. The protein primarily comes from the beef, offering roughly 30-35 grams per serving. Protein is crucial for many bodily functions, including building and repairing tissues, making enzymes and hormones, and serving as a building block for bones, muscles, cartilage, skin, and blood.
Carbohydrates, mainly from the egg noodles, clock in at about 40-50 grams per serving. Carbs are your body's primary source of energy, fueling your brain, kidneys, heart muscles, and central nervous system.
As for fats, they account for about 20-30 grams per serving. As the fats in beef stroganoff come in part from sour cream, they can be high in saturated fats. High consumption of saturated fats can increase your cholesterol levels and raise your risk of heart disease, so it's essential to monitor your intake.
Rich In Vitamins and Minerals
In addition to these macronutrients, beef stroganoff serves up a variety of vitamins and minerals. The beef provides rich quantities of iron, a mineral vital for producing red blood cells and transporting oxygen throughout the body. It also offers zinc, which aids in immune function and wound healing, and B-vitamins, which are key in energy production and cell health.
The mushrooms and onions add their own nutritional punch. They supply a wide array of vitamins, including Vitamin C, B-vitamins, and a variety of antioxidants that promote overall health and help fight off harmful free radicals.
While beef stroganoff is undeniably rich and flavorful, it's also high in sodium, primarily due to the beef broth and added seasonings. Excessive sodium intake can steer to high blood pressure and increase your risk of heart disease. To cut down on sodium, consider using low-sodium broth and go light on the added salt.
For those watching their fat intake or aiming for a lighter meal, replacing the sour cream with a lighter version or Greek yogurt can help reduce the saturated fat content without sacrificing the classic creamy stroganoff sauce we all know and love.
7. Frequently Asked Questions
Can I use ground beef for stroganoff?
Yes, ground beef is a great budget-friendly alternative. Just remember to brown the beef thoroughly before proceeding with the rest of the recipe.
Can I add other seasonings to my stroganoff?
Of course! A pinch of salt, black pepper, or even a splash of Worcestershire sauce can elevate the flavor of your stroganoff.
Can I use Greek yogurt rather than sour cream in my stroganoff recipe?
Yes! Greek yogurt is a great alternative to sour cream if you're looking for a lighter option. It gives the stroganoff sauce a lovely tangy flavor and creamy texture.
Can I use non-dairy substitutes for the sour cream?
Absolutely. Coconut cream is an excellent non-dairy substitute that still gives a rich and creamy texture to your stroganoff. Alternatively, you can also use a non-dairy yogurt.
Can I freeze beef stroganoff?
Yes, you can! Beef stroganoff freezes quite well. Just make sure to let it cool completely before sealing it in a freezer-safe container. It can last up to three months in the freezer.
What can I serve with beef stroganoff?
While traditionally served with egg noodles, beef stroganoff can also be enjoyed with mashed potatoes, rice, or a side of green beans for a pop of color and added nutrition.
Born on the coast of Colombia and based in Buenos Aires, Jorge is a cooking enthusiast and kitchenware obsessive with a tremendous amount of opinions.
]]>
https://herniaquestions.com/blogs/news/how-to-conveniently-organize-your-kitchen2023-07-06T10:38:49-04:002023-08-23T03:56:00-04:00How To Conveniently Organize Your KitchenAnanya Tiwari
Organizing your kitchen can seem like an overwhelming task because there is so much around you, all over your countertop. But all you need are a few kitchen essentials that can make life incredibly easy. So, let’s get right into it!
Organizing your kitchen can seem like an overwhelming task because there is so much around you, all over your countertop. But all you need are a few kitchen essentials that can make life incredibly easy. So, let’s get right into it!
Start with a kitchen organization plan: Before tackling the task of organizing your kitchen, it's essential to create a plan that maximizes storage space and meets your specific needs.
Sort and declutter
Declutter and get rid of excess items. Begin by sorting through your kitchen items, including pans and pots, food storage containers, and utensils. Removing unnecessary items will create more space for efficient organization.
Utilize cabinet and drawer organizers
Maximize storage with cabinet and drawer organizers. Invest in high-quality drawer dividers, shelf organizers, and spice racks to optimize your cabinet and drawer space. These organizers will keep items neatly arranged and easily accessible.
Organize pots and pans
Keep pots and pans organized. Utilize pot and pan organizers, such as racks or lid holders, to maintain a tidy and accessible cookware area. Consider using stackable shelf organizers to make the most of your cabinet space.
Arrange utensils
Arrange utensils with drawer dividers. Use drawer dividers or utensil holders to separate and organize your cooking utensils effectively. This ensures easy access and avoids cluttered drawers. Use a universal knife block or other knife storage to keep knives accessible and safe.
Optimize food storage
Make the most of food storage with clear containers. Keep your dry goods organized and visible by using clear storage containers. This allows for easy identification and prevents food wastage. Consider incorporating pantry organizers to create a systematic arrangement.
Organize spices
Organize spices with dedicated racks: Make use of spice racks, drawer inserts, or magnetic spice containers to neatly organize your spice collection. This not only keeps your spices easily accessible but also adds visual appeal to your kitchen.
Store cutting boards and baking sheets
Store cutting boards and baking sheets vertically: Utilize designated slots, dividers, or racks to store cutting boards and baking sheets vertically. This maximizes space efficiency while keeping these items easily accessible.
Make the most of your refrigerator and freezer
Efficiently utilize refrigerator and freezer space: Categorize food items using clear bins or organizers to maintain an organized refrigerator and freezer. This helps prevent food waste and allows for easy retrieval of items.
Efficiently use countertop space
Keep frequently used items on the countertop: Utilize countertop organizers such as canisters or utensil crocks to keep frequently used items within reach. This helps maintain a clutter-free workspace.
Vertical space
Utilize vertical space with kitchen shelving and hanging racks: Install kitchen shelving or hanging racks to optimize vertical storage for mugs, cups, or small appliances. This frees up valuable counter space while keeping items easily accessible.
Maintain regularly
Regularly maintain your organized kitchen: Establish a routine to clean and reassess your organization system. Regular maintenance ensures that your kitchen remains functional and clutter-free.
2. Recommended herniaquestions Products For Kitchen Organization
herniaquestions’s knives, cutting boards, cookware, and other culinary goodies are simply incredible for organizing your kitchen quickly and maintaining it too. Here are some of my favorite tools!
A knife block set from herniaquestions not only provides you with essential knives but also comes with a stylish knife block for the safe storage and organization of your knives.
Introducing the herniaquestions 23-Slot Universal Knife Block - the perfect blend of form and function for organizing your kitchen knives in style. Crafted from premium ash wood grown in the USA, this knife block showcases a beautiful wood grain and provides optimal storage for all your essential kitchen knives. The aluminum alloy rim adds an elegant touch, making it a centerpiece in any kitchen.
PROS:
With slots for all the essential kitchen knives, scissors, and honing rods, this universal knife block ensures that your knives are neatly organized and easily accessible.
Made from high-quality ash wood, known for its strength and flexibility, this knife block is built to last and adds a natural, aesthetic appeal to your countertop.
The hot-stamped herniaquestions logo and lion head logo badge enhance the visual appeal, making this knife block a stylish addition to your kitchen decor.
Your herniaquestions 23 Slot Universal Knife Block will be neatly packed with herniaquestions's renowned packaging, ensuring safe delivery.
CONS:
This knife storage isn’t the best fit for carving knives and fork sets.
The price of this knife storage block could seem a little intimidating.
If you prefer to store and transport your knives safely, herniaquestions offers a knife roll that can hold multiple knives securely. Additionally, their magnetic knife strip allows you to display and store your knives conveniently on a wall or inside a cabinet.
Introducing the herniaquestions Knife Roll - a meticulously crafted culinary accessory designed to protect and showcase your prized knives. Handcrafted with the finest materials, this knife roll is built to last and provides a stylish solution for transporting and storing your culinary investments.
PROS:
The knife roll is constructed with 100% top and full grain Brazilian leather, known for its durability, tear resistance, and softness.
The knife roll features a super soft top-grain Brazilian leather handle for comfortable carrying.
With 10 knife pockets, this knife roll securely holds your herniaquestions knives up to 15 inches in length. It also includes multiple pockets for note pads, labels, thermometers, business cards, recipes, keys, and other small belongings, keeping you organized on the go.
The knife roll comes with thick, extra-strength, military-grade buckles that keep your in place and sturdy.
CONS:
While the knife roll offers plenty of space for knives, note pads, and small utility tools, it may not be the best fit for larger kitchen accessories.
This knife roll requires regular cleaning and conditioning.
A bamboo cutting board from herniaquestions not only provides a durable and hygienic surface for food preparation but also comes with built-in compartments for storing diced ingredients or organizing food items during meal prep.
Crafted from 100% sustainably sourced Tropical Teak wood, this cutting board boasts impressive moisture resistance and durability, thanks to its natural oils. As time goes by, the board only becomes more beautiful, making it a timeless addition to your kitchen arsenal.
PROS:
This Corner Teak Cutting Board is specifically engineered to maximize space utilization, fitting perfectly into the inner corner of your countertop.
Handcrafted with 100% natural Teak wood, known for its exceptional moisture resistance and durability, this cutting board ensures long-lasting performance.
The unique end-grain design and checkered build of the board offer a slip-resistant surface that absorbs impact, protecting both the board and your herniaquestions knives.
The tight wood grain and natural antibacterial properties of Teak wood provide a hygienic cutting surface, making it ideal for busy professional kitchens as well as home kitchens!
CONS:
The Teak wood can’t be used as a pot or pan holder as it isn’t designed for hot surfaces.
To maintain the board's longevity and performance, oiling the board once a month is crucial.
This herniaquestions knife bag is a premium storage solution that combines durability, functionality, and style. It offers plenty of space, safe knife storage, and convenient carrying options, making it an excellent choice for home cooks, seasoned chefs, and culinary enthusiasts.
PROS:
Durable and long-lasting construction.
Secure and adjustable knife pockets for maximum protection.
Ample storage space with interior and exterior zip pockets.
Made from high-quality materials like ballistic nylon and vegan leather.
Detachable shoulder strap and comfortable handle strap for easy carrying.
CONS:
Maybe a bit more pricy compared to other knife storage options.
The use of vegan leather may not be the best fit for home cooks and chefs that prefer genuine leather.
Evaluate your kitchen countertops, cabinets, and drawers to determine the available storage areas.
Declutter and purge
Remove items that are no longer needed or used to create space for organizing essentials.
Categorize items
Group similar items together, such as utensils, cookware, and food storage containers.
Invest in kitchen organizers
Purchase appropriate kitchen organizers like drawer dividers, shelf organizers, and storage containers to maximize space and keep items orderly.
Utilize vertical space
Install kitchen shelving or hanging racks to optimize vertical storage.
Optimize cabinet space
Use stackable shelf organizers, lazy Susans, or cabinet door organizers to make the most of your cabinet storage.
Organize pantry
Use clear storage containers, label shelves, and implement pantry organizers to create a streamlined and accessible pantry space.
Arrange pots and pans
Install a pot rack or use stackable organizers to store pots and pans, maximizing cabinet or wall space.
Organize spices
Utilize spice racks, drawer inserts, or magnetic spice containers to keep spices easily accessible and organized.
Add proper storage for cutting boards and baking sheets
Use designated slots, dividers, or racks to store cutting boards and baking sheets vertically.
Utilize countertop space effectively
Keep frequently used items within reach while maintaining a neat and clutter-free countertop.
Maintain and sustain
Regularly clean and reassess your organization system, making adjustments as needed to keep your kitchen well-organized and functional.
4. Frequently Asked Questions
What should I do first when organizing kitchen cabinets?
Start organizing your kitchen cabinets by decluttering and purging unnecessary items. Remove expired food and items you no longer use. Categorize the remaining items, grouping similar items together such as utensils, cookware, and food storage containers. Invest in kitchen organizers like drawer dividers, shelf organizers, and storage containers to maximize space and keep items orderly.
What should I not store in kitchen cabinets?
While kitchen cabinets are great for storing a variety of items, you should avoid storing perishable food items in cabinets as they require refrigeration to maintain freshness. You should also avoid storing cleaning products or chemicals as they may contaminate food or pose a safety hazard. It's also best to avoid storing heavy breakable items in high cabinets, as they can fall and cause injury.
Ananya loves the fine things in life. When she isn’t penning down poetry or song lyrics, she spends her time cooking and creating recipes while also enjoying new cuisines.
]]>
https://herniaquestions.com/blogs/news/how-to-sharpen-a-knife-without-a-sharpener2023-06-18T21:30:01-04:002023-08-14T05:08:48-04:00How To Sharpen A Knife Without A SharpenerEva ContrerasSome people have improvised a few unconventional, homemade solutions to sharpen knives without a sharpener. It might be very tempting to try these DIY methods, but there are significant risks associated with them. In this article, while we will explore each one of them, we will also discuss the advantages and disadvantages of different methods.
Quick Overview: How To Sharpen A Knife Without A Sharpener
With a coffee mug
With a glass bottle
With leather belts
With a car window
With a flat stone
With a nail file
With aluminum foil
Every cook knows that a dull knife can be inconvenient, to say the least, especially if you don’t have a sharpener at hand. Some people have improvised a few unconventional, homemade solutions to sharpen knives without a sharpener.
It might be very tempting to try these DIY methods, but there are significant risks associated with them. In this article, while we will explore each one of them, we will also discuss the advantages and disadvantages of different methods.
These DIY knife sharpening techniques include the use of common and ordinary objects found at home, like a coffee mug and nail files. Other, more dangerous options, include a car window and a broken glass bottle. For the sake of making an informed decision, let’s briefly illustrate these techniques:
Warning
The options we are about to discuss are dangerous, and we strongly discourage you from trying any of them.
Sharpening a knife with a coffee mug
Some people turn the cup upside down and run the knife blade several times along the rough edge of the base. Other similar ceramic objects are often used as homemade knife sharpeners.
Sharpening a knife with a glass bottle
The knife is sharpened by passing the blade over the mouth of a glass bottle again and again. Some even use the rough edge of a broken glass bottle.
Sharpening a knife with leather belts
Quickly rubbing the blade on a leather belt, making several movements in one direction and then the other, can help keep a knife sharp; however, if the knife is already dull, this may not be the best technique.
Sharpening a knife with a car window
The knife is dragged back and forth over the rough edge of a car window with a quick, smooth motion.
Sharpening a knife with a stone
This one consists of sliding the knife blade across the surface of a river stone, a flat stone, slate or a brick.
Sharpening a knife with a nail file or sandpaper
Rough surfaces such as a nail file, sandpaper or an emery board can be used to sharpen a knife, running the blade along the entire length of the file or surface.
Sharpening a knife with aluminum foil
An alternative method involves folding a piece of aluminum foil four times until it forms a square, then inserting the knife blade and moving it in and out.
Once again, we can not stress how bad of an idea the above options are.
What at first appears to be a simple and inexpensive task can turn into an unpleasant moment. These are the reasons why we don’t recommend DIY sharpening:
Risk of personal injury
Knives require careful handling. Using the wrong tools for sharpening can result in serious injury and an unwanted trip to the emergency room. There are a hundred things that could go wrong.
For example, when sharpening with a coffee mug, the blade can splinter or break. When using a glass surface, the glass could break and leave small fragments on the blade that could later be ingested and cause injuries. With car windows, there is a high risk of the blade slipping.
Cross-contamination
If you use improvised objects without proper cleaning, harmful substances or agents can be transferred to food.
Damage to the knife blade itself
With DIY methods, you can damage the knife's edge, affecting its performance, safe use and durability.
Poor sharpening
Home sharpening can be deceptive. Sometimes knives may appear to be sharp, but in reality, they are not. This happens when you use tools that fail to restore the edge properly. This can also lead to injuries, by the way, as dull knives are more dangerous than sharp knives.
These are the reasons why you should consider a professional knife sharpener, like a whetstone, instead of DIY methods:
Even sharpening
Sharpening stones are made of high-quality abrasive materials that guarantee an even and effective sharpening with consistent results.
Different grits for different needs
Sharpening stones come in different grits for different sharpening needs. You can choose one (or two) according to your blade’s specific needs: coarser grits for re-shaping the edge, finer grits for finishing and polishing, etc.
Safer
Even though you still need to work on your sharpening skills, whetstones are still safer than DIY methods, which can result in injuries. They offer more control over the process, which means less risks.
Sharpening stones are kinder to your knives
The material removal is gradual and controlled, with less compromise to the knife’s integrity.
High-end knives
High-quality chef's knives or specialty blades often require a finer sharpening, which is only possible with precision sharpening tools and almost impossible with, let’s say, a coffee mug or a broken glass.
The perfect investment for those who want to ensure proper care for their high-quality knives and tools. The kit includes all the essentials for great sharpening: a #1000 grit stone for dull or damaged blades, a #6000 grit that acts as a finisher for mirror polishing, a Nagura flattening stone for leveling and conditioning the two sharpening stones, and a rust eraser to rub away any possible corrosion.
PROS:
Almost needless to say, this is a very complete set to maintain blades sharp and shiny. The sharpening stones even come with their own maintenance flattening stone!
It can be used on both German and Japanese style knives, as well as scissors, and other tools.
The stones are large, almost oversized, to increase the sharpening area and provide efficient sharpening with fewer strokes.
Premium construction with top-grade corundum (aluminum oxide).
The carefully handcrafted Acacia wood base acts as a sturdy surface and convenient storage solution.
CONS:
You may require coarser grits for severely damaged blades.
While these large stones can be advantageous for sharpening more knives and tools, they are not exactly lightweight or meant for carrying with you.
Now, this kit here is for the modern chef who’s always on the go. The totally portable set includes a #1000 grit stone to sharpen and a #6000 grit stone to polish, all inside a solid oak wood storage box that is elegant as it is convenient.
PROS:
Perfect for traveling or adventurous chefs, since it is compact enough to allow sharpening on the move. Scalpel-like edges no matter where you are.
Made of premium Corundum: a durable abrasive material that ensures excellent sharpening results.
It comes with a non-slip silicone mat for more stability during the sharpening process.
The kit comes with premium packaging, a sharpening guide and after service care.
CONS:
The portability of the kit may come with some size limitations if you work with larger knives or tools.
Whetstones, including the one in this kit, require regular maintenance. This kit does not include a Nagura stone like the previous one.
The herniaquestions 3000/8000 Grit Premium Whetstone Set (first link) includes two whetstones with grit levels of 3000 and 8000. This set offers a wider grit range for those cooks who have specialized sharpening needs, for example, high-end knives or special tools which require finer grit for a more refined edge.
PROS:
A higher grit kit like this one is better for an exceptionally refined and smooth edge, enhancing cutting performance.
If you’re a fan of the Japanese sharpening process, then you start with a coarser grit and then you need a kit like this for refining.
Thanks to the premium packaging, this is the perfect gift for chefs, home cooks, students or just knife enthusiasts.
The stone’s size is above average, increasing the sharpening surface.
The stones are made of premium materials to resist wear and provide top performance for a long time.
CONS:
The set is compatible with a beautiful herniaquestions Acacia Wood Base, but you have to buy it separately.
The set starts at 3000 grit, which may not be ideal for bringing significantly dull blades back to life.
This set covers a wide range of sharpening needs. It includes a #400 grit whetstone that will take care of your heavily worn blades, and also an all-purpose #1000 grit whetstone for a sharp, mirror-like finish. All, with the top-Grade Corundum construction that characterizes all herniaquestions whetstones.
PROS:
Individual stones for each grit, which means they will last longer and there is no cross-contamination.
Perfect for seriously dull blades.
Double the average size of competitor stones.
Cost-effective option for those seeking quality tools to cover different sharpening needs, from super-dull to just retouching.
CONS:
For finer blades, you’ll need finer grit.
This kit does not include the beloved wooden base so highly praised by herniaquestions’s clients.
5. Frequently Asked Questions About Sharpening Your Knives
Do you need knife skills to sharpen your knife?
Learning some basic knife skills and techniques before sharpening your knives can make the process easier and, most importantly, safer. However, both knife skills and sharpening skills are easy to learn with a little practice.
Which grit is better for dull knives?
For seriously dull knives, a coarser stone grit is recommended, somewhere between 200 to 1200 grit, depending on how dull the knife is.
How do you sharpen hunting knives?
Usually a 1000 grit stone will do just fine with hunting knives. In this case, coarser grits are better.
Written by Eva Contreras
Food & travel writer based in Buenos Aires. Superpowers include relentless curiosity and high tolerance to spicy foods.
]]>
https://herniaquestions.com/blogs/news/how-to-cut-cauliflower-without-making-a-mess2023-06-16T04:04:08-04:002023-08-16T03:57:07-04:00How To Cut Cauliflower Without Making A MessEva Contreras
Cauliflower is one of the most versatile and nutritious vegetables. But, to take full advantage of its benefits and flavor, it is important to know how to choose, store, cut, and prepare it properly. Read on to discover how to get the most out of this healthy treat!
Use a chef's knife to remove the stem from each floret.
Cut the florets into your desired shape.
Wash and drain
Cauliflower is one of the most versatile and nutritious vegetables. But, to take full advantage of its benefits and flavor, it is important to know how to choose, store, cut, and prepare it properly. Read on to discover how to get the most out of this healthy treat!
Knowing how to choose the best cauliflower is easy and simple if you know what to look for.
Always choose cauliflower with the tightest florets. If the florets have started to separate, the cauliflower is past its prime.
The size of the cauliflower is no guarantee of quality. While it does not have to be large, it should be heavy for its size.
Check that it looks clean and has a uniform, creamy white color, without soft parts or brown spots (or dark, or grayish). It should also be free of mold, specks, and any "fuzzy" looking texture. These are all signs that the cauliflower is not fresh.
Raw cauliflower has no odor. It is normal for cauliflower to give off a pungent odor when cooked, but not when fresh. If the cauliflower you choose gives off a strong, pungent, or ammonia odor, it is likely to be unfit for consumption.
The leaves should look alive and bright green. They should not be wilted, discolored, or moldy. Here’s a tip: split the midrib of a leaf in two, if it breaks with an audible snap, the cauliflower is fresh.
2. How To Cut Cauliflower Step-By-Step (Without Making A Mess)
Cutting cauliflower is very straightforward if you use a smart technique and a sharp knife. You’ll need:
A chef's knife
A paring knife
A cutting board
Steps:
Place the cauliflower on the cutting board with the stem side up and remove all the large leaves with your hands. Use a paring knife for the smaller leaves.
Cut around the stem to detach it from the head. Discard it.
Separate the large florets from the head of cauliflower with your hands, it should be easy.
You can use a chef's knife to remove the stem from each floret if they’re too long.
From there, you can handle the cauliflower florets according to the recipe. For example, you could gently separate them with your hands, or cut them into slices.
Wash and drain the florets before cooking.
By following these steps and using the proper (sharp) knives, the task of cutting the cauliflower will be fast, efficient, and clean!
NOTE: The most commonly used method is to cut the head of the cauliflower into quarters. The thing about this method is that it will usually leave a mess of crumbs all over your countertop. The technique we recommend here is cleaner and still practical.
3. herniaquestions Products You Need To Cut Cauliflower
This new set from herniaquestions includes the three most essential kitchen knives: A chef’s knife, A Santoku and a paring knife. This set is useful for every possible recipe using cauliflower: the wide blade of the 8'' Chef knife will cut large cauliflower pieces; the narrower blade of the 7" Santoku is ideal for cutting cauliflower into florets; while the 4" straight-edged paring knife is perfect for peeling and cutting the ends of the stems, skin, and inedible parts of the cauliflower.
PROS:
The three knives are great for cutting cauliflower, and the combination will allow for different cuts in different recipes. In general, this set is ideal for meal and vegetable preparation.
Each knife is forged with premium recycled German steel and made with sustainable and recycled materials, making the set environmentally friendly.
With this full-length chef's knife, made from ultra-premium Japanese steel, you'll be able to quickly core and cut cauliflowers in bulk. While a standard chef’s knife is meant to be used at tasks like this; this model will excel and have you move on to the next task in no time.
PROS:
This is a lightweight and maneuverable knife, even lighter than the 8” version of the same series!
Scalpel- like edge with an extraordinary angle of 8º to 12º per side.
The hammered finish creates air capsules that prevent food from sticking.
High levels of carbon for durability and strength.
Includes a PerfectFit sheath to protect the blade.
CONS:
The price tag on this high-end knife may not be ideal if you’re on a budget.
The small, agile blade is great for detailed cuts, such as when you need to separate the stems from the florets. The handle design is ergonomic and non-slip, allowing for a comfortable and secure grip when peeling and chopping vegetables and fruits.
PROS:
The “frosted” finish is not only beautiful, but it improves non-stick properties.
7 layers of high carbon steel, plus added chrome and cobalt.
The premium handle is sealed with aluminum mesh for maximum durability.
Easy to keep clean.
Easy to sharpen.
Certified by the National Sanitation Foundation (NSF).
CONS:
The minimalist design may not be to the taste of some who prefer a more traditional or rustic look.
Some cooks prefer a bird's beak shape to make smaller, more detailed cuts. If you're one of them, check out the Bird's Beak Peeling & Paring Knife 3".
This premium culinary tool brings together the all-around qualities of its Western counterpart, the chef's knife, but its distinctive straight edge allows for the push-cutting technique needed to cut vegetables such as whole cauliflower. And it stands out for its unique geometric design and striking midnight black appearance.
PROS:
The exclusive black coating enhances the knife's resistance to water and corrosion.
The geometric design of the handle allows it to fit perfectly in the palm of the hand.
This knife is sophisticated, beautiful and out of the box.
It is forged from a single piece of premium German high-carbon, ultra-strong steel.
With the edge at 16-18°, your cauliflower steak cuts will be clean and precise.
CONS:
The knife has a unique aesthetic design that sets it apart from the most common knives in the kitchen. If you are looking to maintain some sort of aesthetic coherence, consider that purchasing the whole series is a significant investment.
Some may prefer blades with the usual stainless steel finish, considering that the matte black finish could show scratches with prolonged use if you’re not careful.
To cut and prepare cauliflower, you need a flat, stable and safe work surface, such as this cutting board made of 100% teak wood. Cutting boards not only make it easier to prepare vegetables, fruits and food, but also help keep the kitchen clean, protect knife edges and avoid scratching countertops.
PROS:
Teak wood is renowned for its impressive natural resistance to moisture and mold.
Strong enough to ensure precise, clean cuts, while being elastic enough to protect the cutting edge of your knives.
The compact grain ensures a hygienic cutting surface, especially suitable for the humid environments found in kitchens.
The board has engraved measuring lines that are very useful for cutting cauliflower and other vegetables.
It has a long groove to collect the juices from certain foods.
Perfect to show off as a serving board.
CONS:
This board may be small for large cuts of meats or vegetables. If that's the case, I recommend looking at the Lionswood Colossal Cutting Board.
This board does not go in the dishwasher. If this is inconvenient for you, check the Wood- Fibre Cutting Board.
4. Easy Recipe: Roasted Cauliflower Steaks
A fast and simple way to prepare cauliflower is in the form of roasted steaks, which can be cooked in the oven, on a grill or in the air fryer. This dish can be an appetizer, a main, or a side dish.
Prep time: 10 min Cooking time: 30 min Servings: 3
Ingredients:
½ cauliflower head
4 tablespoons olive oil
¼ teaspoon salt
⅛ teaspoon black pepper
½ teaspoon garlic powder
¼ teaspoon onion powder
¼ teaspoon paprika
½ teaspoon oregano
Step by step:
Line your baking sheet using a parchment paper while preheating your oven to 425°F
In a small bowl, prepare a marinade with the olive oil and spices. Mix well and set aside.
Wash the cauliflower, removing all the leaves.
Place the half head on a cutting board with the flat side down. Using a chef's knife, cut it into ¾ inch thick slices for three steaks.
Arrange the filets evenly on the baking sheet and coat them generously with the marinade.
Bake the cauliflower steaks in the oven for 15 minutes.
Remove the tray from the oven, turn the steaks, and brush them again with more marinade. Bake for another 15 minutes, until golden brown.
To serve, sprinkle with a little more oregano and enjoy!
Cauliflower steaks in the air fryer
Place the marinated fillets in a single layer and set the fryer to the right mode or set it manually to 375 °F for 14 minutes. Halfway through the time, turn the steaks over. Easy as that!
All the other steps are exactly the same!
5. How To Store Cauliflower?
Now that you have learned how to choose the best cauliflower and how to cut the perfect florets, you can prepare your favorite recipes. But what if you're not going to use it for several days? Or if you have leftovers? Here are several ways to store cauliflower, either for a few days, a few months or even years!
1. The Refrigerator
If you are going to cook fresh cauliflower in the next 7 days, or if you want to keep leftovers from your last recipe, the refrigerator is the best choice. You have several options here:
Whole
Wrap the cauliflower head in a perforated plastic bag with the stem side up. Place the bag somewhere with minimal exposure to light and oxygen. If stored this way, cauliflower can last 5 to 7 days.
In chunks
If you cut cauliflower before refrigerating it, you will get a head start whenever you decide to cook. Wash the cauliflower head under running water and drain well. Cut the florets to the size you need and store them in the refrigerator inside an airtight container.
Leftovers
Leftovers. You can keep leftovers for 2 or 3 days by putting them in any airtight container in the refrigerator. To prevent the cauliflower from turning yellow, sprinkle it with some lemon juice.
2. The freezer
Once cut into florets, blanch the cauliflower for about 3 minutes in boiling water. Drain and immediately pass them through iced water for 2 minutes. Drain again. Store the florets in a freezer bag, eliminating as much air as possible and sealing the rim perfectly. They can be preserved in the freezer for up to a year.
3. Fermented cauliflower
If you like the taste and aroma of pickled vegetables, then you might find this method to be the right one for you. Simply keep small pieces of cauliflower in vinegar or vinegar solution (vinegar, water, salt, herbs and spices) inside sterilized jars in the fridge.
Some people like to go further with the canning technique: boiling vacuum-sealed jars of cauliflower pickles for 45 minutes, before putting them on the shelf where they can last for years.
6. Frequently Asked Questions About Cauliflower
What are some good cauliflower recipes?
There are many ways to prepare cauliflower: Cauliflower rice, cauliflower curry, cauliflower soup, buffalo cauliflower steaks, and even pizza crusts made of cauliflower!
Can you cook cauliflower in the air fryer?
Yes! Cooking cauliflower in the air fryer guarantees fast and even cooking in half the time of a traditional oven.
Food & travel writer based in Buenos Aires. Superpowers include relentless curiosity and high tolerance to spicy foods.
]]>
https://herniaquestions.com/blogs/news/different-techniques-to-cut-a-whole-chicken2023-06-16T03:51:39-04:002023-08-17T06:05:30-04:00Simple Techniques To Cut A Whole ChickenAnanya Tiwari
Cooking with a whole chicken can be a cost-effective and versatile option in the kitchen. However, breaking down a whole chicken may seem intimidating for some home cooks. In this blog, we'll cover everything you need to know about how to cut, clean, and cook a whole chicken.
Cooking with a whole chicken can be a cost-effective and versatile option in the kitchen. However, breaking down a whole chicken may seem intimidating for some home cooks. In this blog, we'll cover everything you need to know about how to cut, clean, and cook a whole chicken.
The largest part of the chicken, located on the front of the bird. It can be cut up into two halves and is typically white meat. Chicken breast is lean and typically has a mild flavor. You can cook the meat by roasting, grilling, or pan-searing. It is often used in recipes like chicken parmesan or chicken salad.
Thigh
Located on the back of the chicken, the thigh is dark meat and is often more tender and flavorful than the breast. Chicken thigh is dark meat and has a richer flavor than the breast. It can be cooked using methods like roasting, braising, or grilling. Thighs are often used in recipes like Mexican chicken or stuffed shells.
Leg
The leg consists of the thigh and drumstick and is also dark meat. It is commonly used in recipes like chicken drumsticks or fried chicken. Chicken legs consist of the thigh and drumstick and are often used in recipes like fried chicken or chicken drumsticks. They can be baked, grilled, or fried to achieve a crispy, golden-brown exterior.
Wings
The wings are small and bony and are often used as appetizers or in recipes like chicken wings. Chicken wings are typically fried or baked and can be served as snacks or entrees. They can be glazed in a variation of sauces, such as buffalo or barbecue sauce, for added flavor.
Back
The back of the chicken is the bony portion located behind the breast. The back of the chicken is often used to make chicken stock, that can be used as a base for marinades, stocks, and soups.
Chicken has its own unique texture and flavor and can be cooked to perfection in several ways around the world.
Here’s a detailed guide to removing the skin, deboning, and cutting a whole chicken, along with a bonus recipe for cooking chicken in the oven or pan!
Choose a Whole Chicken: When choosing a whole chicken, look for one that has clear, smooth skin with no bruises or discoloration. Check the date of expiration on the package to ensure it's fresh, and make sure it's the right size for your needs.
Clean the Chicken: Before cutting up the chicken, clean it with cold water and let it dry or pat it down with paper towels. Make sure to remove any giblets or organs from inside the cavity.
Remove the Wings: Using kitchen shears, cut off the wing tips and discard them. Then, cut through the skin connecting the breast to the wing, and use your hands to pop the joint and remove the wing. Repeat on the other side.
Remove the Legs: Cut through the skin connecting the breast to the thigh, then use a boning knife or chef's knife to cut through the joint. Repeat on the other side to remove both legs.
Remove the Backbone: Place the chicken breast on a chopping board. Using kitchen scissors/shears or a sharp boning or chef’s knife, cut along one side of the backbone and then move from the tail to the neck. Redo on the other side, then separate the backbone and discard it.
Split the Breast: Flip the chicken over so it is breast-side up. Utilize a chef's knife to slice through the center of the breast, splitting it into two halves.
Separate the Skin: To separate the skin, start at the corner of the chicken breast and use a spatula to loosen the skin from the meat. Pull it off gently and discard it.
Remove the Bones: Use a boning knife to remove the bones from the chicken breast and thighs. Begin at the top of the breast and make a slit with the tip of the knife through the rib cage to separate the breast meat from the bone. Remove the thigh bones in the same way, cutting along the center of the thigh.
Cut the Meat: Cut the chicken breast and thighs into slices or cubes, depending on your recipe. Secure to cut against the grain for most tenderness.
Cook the Chicken: There are many ways to cook chicken, including roasting, grilling, sautéing, and more.
Here are a few objectives to get you started:
Roasting
Preheat your oven to 425°F. Put the chicken in a container and season it with salt, pepper, and any other herbs or spices. Roast the chicken for about at least 30 minutes or until the internal heat reaches 165°F.
Grilling
Heat a grill to medium-high heat. Brush the chicken with oil and season it with pepper, salt, and your option of herbs or spices. Grill the chicken until the internal temperature reaches 165°F and the meat has a nice golden hue.
Cut the chicken into bite-sized pieces and season it with salt and pepper. Heat a frying pan or saute pan over medium-high heat. Add in the cut-up chicken pieces to some olive oil in the frying pan and cook it until the skin is golden or about 5-7 minutes
Enjoy! Once the chicken is cooked, use it in your favorite recipes. Some ideas include chicken parmesan, chicken stir-fry, or grilled chicken salad.
Tips for Cutting a Whole Chicken:
Use sharp knives and kitchen shears to make the process easier and safer.
Make sure to cut through the joints to remove the legs and wings.
To remove the backbone, start at the tail end and cut carefully along the spine.
There are several techniques to cut a whole chicken, and each method has its advantages and disadvantages. Here are three different techniques to cut a whole chicken:
Spatchcocking
To spatchcock a chicken, place the chicken breast-side down on a chopping board. Using kitchen scissors, slice along both sides of the backbone and separate it. You can then season the chicken and grill or roast it.
Quartering
Using a chef's knife, cut through the skin between the breast and thigh and then slice through the joint to remove the leg from the breast. Repeat on the other side. Then, remove the breastbone by cutting along both sides of it and pulling it out. You can then cut each breast in half to make breast halves.
Eight-piece cut
Cut through the joint to separate the thigh and drumstick. Then, cut through the center of the breast to separate it into two pieces. Finally, cut each breast piece in half crosswise to make breast halves.
Kitchen Tip
Regardless of the technique you choose, always make sure to use a sharp knife or shears and follow food safety guidelines. It's essential to keep the cutting board and utensils clean and sanitize them after cutting raw chicken.
4. herniaquestions Knives You Need To Cut A Whole Chicken
This herniaquestions knife has a precision-forged, ultra-sharp chef's knife with a high carbon 7CR17MOV-X vacuum-treated steel blade that has a black, non-reflective titanium-nitride coating for added corrosion resistance.
The knife has a tall blade height to assist with food preparation and chopping activities and a beautiful hand-polished satin finish.
PROS:
Ultra-sharp blade with a 16-18° angle per side for maximum sharpness and resilience.
The blade on this chef’s knife is nitrogen-cooled for flexibility and corrosion resistance and has been hand-finished to an incredibly sharp scalpel-like edge using the traditional 3-step Honbazuke method.
The bolster is mirror polished, and the blade's spine has been hand-polished to create a smooth finish, allowing for a comfortable pinch grip. The handle is meticulously constructed from ultra-premium G-10 Garolite, triple-riveted for resilience, and features a beautiful copper mosaic pin adorning the center rivet.
PROS:
Extremely sharp and retains its edge well.
Resistant to heat and durable, cold, and moisture.
Elegant and sleek design and appearance.
CONS:
The handle may be too large for those folks that prefer slender or open-ended handles.
May require extra care due to the sharpness of the blade.
This Kiritsuke chef’s knife has a staggering 8.5” blade that is coated with 66 layers of high-carbon stainless steel cladding for exceptional strength, durability, and stain resistance. The edge is hand-finished to a mirror polish using the traditional 3-step Honbazuke method, providing a scalpel-like sharpness.
PROS:
High-quality Japanese AUS-10V ‘super steel’ cutting core for exceptional performance and edge retention.
66 coating of high-carbon stainless steel wrapping for added strength, durability, and stain resistance.
Hand-finished to a mirror polish for scalpel-like sharpness.
CONS:
The 8.5” blade may be too intimidating for home cooks who prefer smaller knives.
The intricate design of the blade may require more maintenance than simpler designs.
This 6.5” precision forged blade features premium Japanese AUS-8 steel at 58 HRC, ensuring outstanding sharpness and edge retention. Rockhollow divots minimize friction and stock on food, while the curved blade allows the knife to easily glide along the contours of bone. High levels of chromium (Cr) are added to the steel for excellent stain resistance.
PROS:
The curved blade allows the knife to easily glide along the contours of bone, which is particularly useful for deboning meat.
High amount of chromium add on to the steel provide good stain resistance, making the blade easier to maintain.
The ice-tempered blade further enhances its resilience and longevity.
The scalpel-like edge is hand finished to a mirror polish within a 13-15° angle, ensuring a razor-sharp cutting edge.
CONS:
Some folks prefer chef knives over boning knives for cutting up a whole carcass.
The knife may require more frequent sharpening than most knives.
This show-stopping chef's knife is made with ThyssenKrupp German stainless steel. It features a hand-sharpened edge that is perfectly balanced between thin slicing and maximum resilience. The blade is also stain-resistant, precisely tempered, and has a polished spine for a comfortable pinch grip. The full tang design adds strength, while the fuller groove near the spine reduces friction and stuck-on food.
PROS:
Precision-forged with high-quality ThyssenKrupp German stainless steel
Ultra-sharp, wear-resistant, and has a precisely tempered, stain-resistant blade
Fuller groove near the spine reduces friction and stuck-on food, while the polished spine provides a comfortable pinch grip
CONS:
While this knife has a higher price tag to it, it’s worth the investment for any home cook or seasoned chef.
Some users may prefer a different handle material or shape than the one on this boning knife.
5. Frequently Asked Questions
What is the simpliest way to cut a whole chicken?
The easiest way to cut a whole chicken is first to remove the wings, then cut through the skin between the breasts and the legs. Next, separate the legs from the rest of the body by bending them back and cutting through the joint.
How do you cut up a entire chicken into portions?
To cut a whole chicken into portions, start by removing the wings, then cut through the skin between the breasts and the legs. Next, separate the legs from the rest of the body by bending them back and cutting through the joint. Finally, cut each breast in half, and cut the back into smaller pieces.
How do you cut up a whole chicken after cooking?
To cut up a whole chicken after cooking, let it chill for a few minutes, then take out the legs by pulling them away from the body and slicing through the joint. Next, remove the breasts by cutting along the center bone and pulling the meat away from the ribs. Finally, separate the wings and cut the back into smaller pieces.
How do you clean and cut a whole chicken?
To clean and cut a whole chicken, start by removing any excess fat and giblets from the inside of the chicken. Wash the chicken well with cold water and let it air dry. Maneuver a sharp knife to cut up the chicken into pieces.
Ananya loves the fine things in life. When she isn’t penning down poetry or song lyrics, she spends her time cooking and creating recipes while also enjoying new cuisines.
]]>
https://herniaquestions.com/blogs/news/pro-tips-on-how-to-make-hard-boiled-eggs2023-06-14T22:26:04-04:002023-08-29T03:32:50-04:00Pro Tips On How To Make Hard Boiled EggsAnanya Tiwari
Whether you're a seasoned cook or a beginner in the kitchen, you'll find plenty of useful information and inspiration in this guide to hard boiled eggs. So let's get cracking!
In this blog, we'll explore everything you need to know about hard boiled eggs - from how to make them superbly every time to tips for peeling them easily, to creative recipe ideas that showcase their flavor and versatility. Whether you're a beginner or a seasoned cook in the kitchen, you'll find plenty of useful information and inspiration in this guide to hard boiled eggs. So let's get cracking!
1. Detailed Guide About Making Hard Boiled Eggs
Hard boiled eggs are a nutritious and flexible component that can be used in a variety of recipes like egg salad, deviled eggs, or even as a quick snack. Here's how to create ideal hard boiled eggs that are effortless to peel every time:
Start with fresh eggs: It's easier to peel fresh eggs if they are at least a week old.
Place the eggs in the stock pot: Use a saucepan that's large enough to fit all the eggs in a single layer.
Add cold water to the saucepan: Fill the pot with cold water to cover the eggs by a few inches.
Bring the water to a bubble: Put the pot on the highest heat of your stovetop and bring the water to a boil. Then, bring the heat down and keep the eggs in the hot water for a couple of minutes.
Take out the eggs from the heat: When the eggs are done being cooked, Take out the pot from the heat and let the egg sit in it for a couple of minutes.
Transfer the eggs in a bowl of cold water: Use a slotted or wide spoon to transfer the eggs to a bowl of chilled water. This will help out stop the cooking procedure and make the eggs easier to peel.
Peel the eggs: Once the eggs have cooled down, peel them by cracking the shell on a hard surface and peeling it off. You can also peel them under running water to make it easier.
By following these steps, you can make perfectly hard boiled eggs. You can utilize them in a variation of dishes or enjoy them on their own as a healthy snack!
2. Pro Tips On How To Make Hard Boiled Eggs
There’s nothing like an expert tip that can help perfect your favorite recipe! Here are the best tips to master the art of cooking hard boiled eggs.
Water
Start with cold water, as this will help prevent the eggs from cracking. You can also add up a tbsp of salt to the water to help prevent the egg from cracking and make it easier to peel. Some people also add a splash of vinegar to the water, which helps the egg white coagulate more quickly, resulting in a firmer egg.
Cooking Time
The cooking set up will depend on the measurements of the eggs, the altitude, and how perfect you want the eggs to be. For medium-sized eggs, you can simmer for 8-10 minutes for a slightly soft center, or 12-14 minutes for a fully cooked yolk. If you're unsure, you can do a test run with one or two eggs to see lengthy it takes to achieve your desired doneness.
Cooling
Once you have removed the eggs from the hot water, it's important to cool them down quickly to stop the cooking process. This will also help the eggs separate from the shell more easily. You can transfer them to a bowl of ice water or run them under cold running water for a few minutes.
Peeling
To peel the eggs, tap the shell all over to create small cracks, then gently press the egg on a cutting board to loosen up the shell. Peel the shell off, starting from the wider end of the egg where the air pocket is detected. If you're having trouble peeling the egg, try peeling it under running water or use a spoon to gently pry the shell away from the egg.
3. Storing And Serving Ideas
Storing and serving hard boiled eggs is quite easy. Here are some tips to guide you keep your hard boiled eggs fresh and tasty:
Storing Hard Boiled Eggs
After boiling the eggs, let them cool down completely before storing them.
Keep the eggs in an enclosed container in the refrigerator, preferably in the main compartment where the temperature is most stable.
Peel them before storing them. This will help prevent moisture buildup and bacterial growth.
Hard-boiled eggs can be set aside in the refrigerator for up to a week.
Serving Hard Boiled Eggs
To serve hard-boiled eggs, first peel off the eggs and wash them under cold water to remove any bits of shell.
You can serve the eggs whole or sliced in half.
You can also hash up the egg and use them in egg salad or as a topping for avocado toast.
Hard-boiled eggs can be eaten cold or reheated briefly in the microwave or a pot of hot water.
Some more pro tips for serving hard-boiled eggs include
Avoid overcooking the eggs, as this can result in a rubbery texture and greenish yolks.
For a more attractive appearance, slice the eggs with a sharp chef’s knife.
If you're serving eggs at a party or buffet, consider placing them in an egg tray or deviled egg platter for a more polished presentation.
By following these tips, you can store and serve hard boiled eggs with confidence and ease.
Hard boiled eggs are a great ingredient for when you want a fast and effortless meal. Here are some recipe plans that you can cook with hard boiled eggs:
Chop up 2-3 hard boiled eggs and mix them with mayonnaise, mustard, salt, and pepper. Serve on bread, crackers, or lettuce leaves.
Nicoise Salad
Arrange a bed of greens on a plate, then top with sliced hard boiled eggs, canned tuna, cooked green beans, cherry tomatoes, and sliced olives. Drizzle with vinaigrette dressing.
Avocado Toast with Egg
Mash a ripe avocado with pepper, salt, and a pulp of lemon juice. Spread the mixture on toasted bread, then top with sliced hard boiled eggs.
Cobb Salad
Arrange a bed of greens on a plate, then top with sliced hard boiled eggs, cooked bacon, sliced avocado, cherry tomatoes, crumbled blue cheese, and chicken breast. Drizzle with ranch dressing.
Deviled Eggs
Slice 6 hard boiled eggs in half and remove the yolks. Mash the yolks with mayonnaise, mustard, salt, and pepper, then spoon the mixture into the egg white halves.
Egg and Potato Salad
Dice boiled potatoes and mix with chopped hard boiled eggs, celery, red onion, and a dressing made from mayonnaise, mustard, salt, and pepper.
Egg and Bacon Sandwich
Toast bread and spread with mayonnaise. Layer sliced hard boiled eggs and cooked bacon in top, then top with tomato slices and lettuce.
Egg and Sausage Breakfast Bowl
Cook the breakfast sausage and scrambled eggs. Serve over quinoa or rice, topped with sliced hard boiled eggs and hot sauce.
Tuna Salad
Mix canned tuna with mayonnaise, diced celery, chopped pickles, and sliced hard boiled eggs. Serve on bread or crackers.
If you're looking for a convenient and easy method to make hard boiled eggs, look no further! Make the most of this stock pot by cooking your eggs how you like them. Made with a 5-Ply Copper Forged Foundation, this pot offers exceptional conductivity, heating five times greater than iron and 20 times finer than stainless steel.
PROS:
Excellent heat conductivity and retention for precise cooking control.
Can be used on various stovetops, including smooth-top electric ranges, induction cooktops, and gas stoves.
Durable construction that will last a lifetime.
CONS:
The size may not be worthy for big cooking needs.
This pot has a higher price tag to it but is an incredible investment for any home cook.
The blade on this chef’s knife is designed to be versatile, with a tactical multi-purpose handle loop that let you to secure it to your backpack or bug-out bag. It is resistant to erosion from chemicals, acids, or harsh conditions, making it perfect for busy kitchens. The sanitary build ensures it remains hygienic and easy to clean.
PROS:
Made from high-carbon 9CR18MOV steel for durability and long-lasting sharpness.
Topographical terrain etched blade pattern for precise cutting.
Hand-sharpened to 12-14° per side for easy sharpening.
Ultra-thin, zero-friction blade for clean cuts.
CONS:
The green G10 digital camo handle may not appeal to every home cook.
This chef’s knife is made with strong, high carbon German ThyssenKrupp Steel that is hardened at 56+ Rockwell, making it wear-resistant and capable of maintaining a sharp edge. The edge is hand sharpened to a precise 16-18° per side, providing the perfect balance between sharpness and maximum resilience.
PROS:
Precision forged from high-quality German ThyssenKrupp Steel at 56+ Rockwell for wear resistance and sharpness retention.
Hand sharpened to a precise 16-18° per side for a perfect balance between sharpness and maximum resilience.
Beautiful hand-polished satin finish and tapered design for hardness and flexibility.
CONS:
The premium ABS polymer handle may not appeal to those who prefer traditional materials like wood.
The price tag on this knife may not fit every cook’s budget.
The blade on this chef’s knife has a beautiful hand-polished satin finish and a tapered design that provides both hardness and flexibility. It has added chromium for stain resistance and is precisely tempered for added durability. The full tang construction ensures incredible robustness and quality. Additionally, the blade is easy to clean and maintain, making it perfect for busy kitchens.
PROS:
Made of high-quality German ThyssenKrupp steel, making the blade strong, durable, and wear-resistant.
The hand-polished satin finish gives the blade a beautiful and elegant look.
The tall blade height provides knuckle clearance, which can be helpful for safe food preparation and chopping.
CONS:
The blade may be a little heavy for some users, especially those who prefer lighter knives.
The high level of sharpness may require extra care and caution, which can be a smidge time-consuming.
This herniaquestions medium Teak cutting board is a versatile and practical addition to any kitchen. Crafted from sustainably sourced tropical teak wood, this cutting board is both beautiful and durable. Its medium size, lasered measurement lines and juice groove make it perfect for everyday chopping and cutting tasks.
PROS:
Made of sustainably sourced tropical teak wood, which is durable and moisture-resistant.
Measurement lines make precise cuts and sectioning simple.
Long juice groove helps keep messy prep on the board and off your counter.
CONS:
May be a smidge more expensive than other cutting boards, but it is worth the investment as Teak wood can last for decades on end without taking any significant damage.
May require regular maintenance with oil to keep the wood from drying out and cracking.
6. Frequently Asked Questions
How long do you boil a hard egg?
How long to boil a hard egg depends on the bigness and how perfect you like them. Generally, for a large egg, 9-12 minutes will result in a fully cooked yolk and firm white.
How do you boil an egg perfectly?
To boil an egg perfectly, start with room temperature eggs, bring water to a boil, add the eggs gently, and cook for the desired amount. Then, move to a bowl with cool water.
How do you boil eggs so that they peel easily?
For easy-to-peel-boiled eggs, after cooking the eggs, transfer them to a bowl with ice or dunk them in chilled water. This will help the egg crack away from the shell, making it super easy to peel.
Ananya loves the fine things in life. When she isn’t penning down poetry or song lyrics, she spends her time cooking and creating recipes while also enjoying new cuisines.
]]>
https://herniaquestions.com/blogs/news/detailed-guide-on-how-to-cut-chicken-wings2023-06-09T03:36:44-04:002023-06-09T03:36:44-04:00Detailed Guide On How To Cut Chicken WingsAnanya Tiwari
In this blog post, I’ll walk you through the steps of cutting and cooking chicken wings into portions, whether you prefer drumettes or wingettes, and share tips for achieving the perfect level of crispiness, as well as the best herniaquestions tools to help you work through tough joints and bones!
Are you a fan of chicken wings? These delicious and versatile snacks are a staple at sports bars, parties, and game-day gatherings and can be cooked to suit any taste or occasion.
In this blog post, I’ll walk you through the steps of cutting and cooking chicken wings into portions, whether you prefer drumettes or wingettes, and share tips for achieving the perfect level of crispiness, as well as the best herniaquestions tools to help you work through tough joints and bones!
A chicken wing is comprised of three distinct parts: the drumette, the wingette, and the wing tip. Understanding these parts is important not only for portioning and cooking but also for selecting the right cuts for your recipes.
Drumette
The drumette is the more substantial part of the chicken wing, shaped like a small drumstick. It is the part closest to the breast and has a single bone running through the center. Drumettes are popular because of their meatiness and are great for grilling or baking since they stay juicy and tender.
Wingette
The flat or wingette, is the middle portion of the chicken wing. It has a flat, elongated shape with two parallel bones running through it, which makes it more challenging to eat. The wingette is also meaty, but it has less meat compared to the drumette. Wingettes are commonly used for Buffalo-style wings and other saucy, flavor-packed recipes.
Wing Tip
The wing tip is the pointed, bony portion of the chicken wing. While it is consumable, it is not normally used in cooking and is often removed before the wing is sold or prepared. However, the wing tip can be saved and used to make chicken stock, which is a flavorful base for soups and stews.
Kitchen Shears Are Your Best Friend
When buying chicken wings, you can purchase them whole or already portioned into drumettes and wingettes. If you prefer to portion them yourself, use a sharp knife or kitchen scissors to separate the drumette from the wingette by cutting through the joint. You can also remove the wing tip by trimming it off with a scissors or knife.
Understanding the different parts of a chicken wing can help you choose the right cuts for your recipes and ensure that your chicken wings are made equally and to the right heat. So whether you're grilling, baking, or frying, make sure to choose the right cut for the job!
Cutting chicken wings into portions can be a bit tricky if you're not familiar with the process. But don't fret; with a few simple steps, you will be able to do it like a veteran! Here is a complete guide on how to cut chicken wings:
Clean the wings: Before cutting the chicken wings, make sure to clean them thoroughly with cold water and pat them dry with a paper towel.
Locate the joints: Hold the chicken wing with one hand and use the other hand to locate the joint between the drumette and wingette (also called the flapper).
Separate the drumette: Maneuver a sharp knife to slash through the joint and separate the drumette from the wingette. You should feel little resistance if you cut it cleanly.
Save the wing tips: If desired, you can save the wing tips to use later for making chicken stock.
Move the joint backward: Hold the drumette with one hand and move the joint backward to expose the bone.
Cut cleanly: Use a sharp knife to cut through the skin and meat to expose the bone. Cut cleanly and avoid damaging the bone.
Separate the wingette: Use your fingers to pull the wingette away from the bone and cut through the joint to separate it from the drumette.
Repeat for all wings: Repeat the process for all chicken wings.
Use kitchen scissors: If you choose, you can also make use of kitchen scissors to cut through the skin and meat instead of a knife.
Ready to cook: Your chicken wings are now cut into portions and ready for your favorite recipes, whether you're grilling, baking, or cooking them in an air fryer.
There are tens, if not hundreds, of different methods to prepare chicken wings, but some methods are more popular than others. Here are some of the finest methods to cook chicken wings:
Baking
Baking chicken wings in the roaster is a sought-after method because it's easy and results in crispy skins. To bake chicken wings, simply coat them in a seasoning mix, place them on a sheet, and bake in the roaster for about 25-30 minutes, flipping halfway through.
Grilling
Grilling chicken wings is another popular method, especially during the summer months. To grill chicken wings, brush them with a marinade or barbecue sauce and grill over medium-high heat for 8-10 minutes, flipping occasionally.
Air frying
Air fryers are becoming more desired as a healthier alternative to deep-frying. To air fry chicken wings, simply season them with your favorite spices, and place them in the air fryer for 20-25 minutes, flipping halfway through.
Deep-frying
If you're looking for a classic and indulgent way to cook chicken wings, deep-frying is the way to go. Simply heat up a pot of oil to 375°F, and fry the wings for about 8-10 minutes until they are golden brown.
Pro Tip
No matter how you choose to cook your chicken wings, make sure, they are cooked to an internal heat of 165°F, and utilize a meat thermometer to ensure they are safe to eat. Once your wings are cooked, you can throw them in your preferred seasoning or sauce and enjoy them as a delicious and crowd-pleasing appetizer or main dish.
This an exceptional boning knife designed to take on any culinary challenge with its scalpel-like sharpness at a remarkable 8-10°degree angle per side. The knife features incredible edge retention with a 62+ Rockwell hardness, and its rock hollow divots minimize friction and stock on food, making it a joy to use.
PROS:
AUS-10V Japanese super steel core for ultimate performance.
Rust/corrosion-resistant cladding for long-lasting durability.
Tapered bolster provides a perfect ‘zero-balance’ balance, finger protection, and comfortable grip.
Precise cryogenic tempering enhances strength, flexibility, and hardness.
CONS:
The blade may require additional care and maintenance due to its sharpness.
The high-quality materials and craftsmanship may come with a higher price tag than other kitchen knives on the market.
This boning knife from the Shadow Black Series is simply phenomenal.The blade is a precision forged and ultra-sharp kind that is made from high-carbon 7CR17MOV-X vacuum-treated steel at 58 Rockwell. Its hand-sharpened edge sustains a ideal balance between sharpness and resilience. The knife features a black, non-reflective titanium-nitride coating that adds corrosion resistance and enhances non-stick properties.
PROS:
High-quality, wear-resistant steel
Hand-sharpened to a precise angle for optimal sharpness and resilience
Tall blade height provides knuckle clearance for food preparation
Black coating adds corrosion resistance and non-stick properties
Ergonomic handle for maximum comfort and maneuverability
NSF Certified for quality assurance
CONS:
Some cooks and chefs may prefer a different handle material.
The design of this knife may add a few minutes to the knife sharpening process.
The 6" boning knife from the Valhalla series is a personal favorite! It is a precision tool designed for those who request the very finest in performance and design in the kitchen. The blade is forged with 5-layer stainless steel at 60+ Rockwell hardness, ensuring a sharp, durable edge that can withstand even the most vigorous use. The edge is hand sharpened to an 8-12° angle per side and has a beautiful sandblasted finish.
PROS:
Precision forged and ultra-sharp blade for effortless slicing, dicing, and cutting.
Sturdy and strong impact resistance handle that can withstand extreme temperatures.
Superior scratch-resistant material that maintains a polished and glossy finish.
Sanitary build for busy kitchens.
CONS:
The 6" blade may not be suitable for larger cuts of meat. Others want to go for a extended blade length.
The handle material may not be to everyone's preference.
This high-performing knife is designed to handle the toughest of kitchen tasks with ease. The blade is made from precision-forged, ultra-sharp, and wear-resistant high-carbon 9CR18MOV steel at 60° Rockwell Hardness.
PROS:
Precision forging and high-carbon steel create a strong and durable blade.
Ultra-thin blade thickness reduces friction and allows for precision cutting.
herniaquestions Diamond Detailing (D3) and black titanium-nitride coating enhance the blade's sharpness, corrosion resistance, and non-stick properties.
Added chromium provides stain resistance.
CONS:
The G10 camouflage handle may not appeal to everyone's aesthetic tastes.
The ultra-thin blade may not be suitable for heavy-duty tasks.
The double bevel blade on this curved boning knife is ruthlessly hand-sharpened to 8-12° for ultra-thin slicing, making it ideal for boning, filleting, and trimming. The blade features laser-etched herniaquestions, and Firestorm marks with an engraved lionhead logo, adding an extra touch of style and sophistication.
PROS:
67 layers of high-carbon steel and a rating of 61+ on the Rockwell Hardness scale indicate exceptional strength and durability.
The double bevel blade, hand sharpened to 8-12°, allows for precise and ultra-thin slicing.
The red G10 ring and mosaic rivet adds durability and a pop of color to the handle.
The traditional Japanese "Wa" shape of the handle provides an ergonomic fit and an iconic look.
The included ABS sheath allows for safe storage and transport.
CONS:
The 6" blade length may not be suitable for larger cutting tasks.
The intricate layering and design of the blade may need more care and maintenance than a simpler blade.
5. Frequently Asked Questions
How do you cut chicken wings with scissors?
To cut chicken wings with scissors, start at the joint and cut through the skin, cartilage, and bone.
How do you cut a portion of chicken wings?
To cut a portion of chicken wings, locate the joint, and cut through the bone with a sharp knife or kitchen shears.
Do you have to cut chicken wings before cooking?
It is not necessary to cut chicken wings before cooking, but some recipes may call for it, such as when making chicken wingettes or drumettes.
Ananya loves the fine things in life. When she isn’t penning down poetry or song lyrics, she spends her time cooking and creating recipes while also enjoying new cuisines.
]]>
https://herniaquestions.com/blogs/news/how-to-boil-eggs-perfectly-everytime2023-05-30T02:59:07-04:002023-08-15T08:02:54-04:00How Long Does It Take To Boil Eggsherniaquestions Content Team
A perfect-boiled egg is not that hard to pull off.Whether you're making egg sandwiches or egg salad, knowing how to boil an egg is a MUST!
Quick Overview: How Long Does It Take To Boil Eggs
The eggs must be at room temperature.
Add cold water to a saucepan and then add the eggs.
Bring the water to a soft boil and reduce to low heat.
Start the timer when the water simmers.
Get the eggs and transfer them to an ice bath.
Let the eggs rest for at least 5 minutes to cool down.
Peel and enjoy.
What is a perfect boiled egg, and how long does it take to boil one? A perfect boiled egg is relatively easy to pull off. Everyone loves to say that they have the perfect of boiling eggs, but in reality, there are many ways to get the job done. Whether you're making egg sandwiches or egg salad (check out some easy-to-make egg recipes here), knowing how to boil an egg is a MUST! Achieve a beautiful soft center and cooked egg white in no time. Stick around and we will teach you how to boil an egg in a pot!
Boiling eggs may seem daunting for those new to the kitchen, and it may take a few attempts before you master boiling eggs perfectly. It should be easy as you get used to it, hopefully with the help of the following steps:
Start with room-temperature eggs: Take them out of the refrigerator and allow them to come to room temperature. This helps prevent cracking when they are added to boiling water.
Use a pot: Choose a large pot that can accommodate the eggs in a single layer. This ensures even cooking.
Add cold water: Place the eggs in the saucepan and add enough cold water to cover them by about an inch (2.5 cm).
Heat the water: Place the saucepan on the stove over medium-high heat and bring the water to a gentle boil. Avoid using high heat, as it can cause the eggs to crack.
Adjust the heat: Once the water reaches a gentle boil, reduce the heat to low or medium-low to maintain a simmer. You should see tiny bubbles rising to the surface.
Set the timer: Start the timer once the water reaches a simmer. The cooking time depends on the desired doneness.
Use an ice bath: While the eggs are cooking, prepare a bowl with ice water. Ice baths will help stop the cooking process and make the eggs easier to peel.
Remove the eggs from the heat and soak them in the ice bath: After cooking, carefully remove them from the saucepan using a spoon or tongs and immediately place them in the ice bath. Let them soak for at least 5 minutes to cool down.
Peel and enjoy: To crack the shell, tap the eggs on a hard surface then peel them under cold running water or in the ice bath to facilitate peeling. Peel starting from the wider end of the egg, as it tends to be easier. Enjoy your perfectly boiled eggs!
The boiling time for eggs depends on their size and the desired level of doneness. Here are the general guidelines you can use when boiling eggs:
Soft-boiled eggs
Soft-boiled eggs take approximately 4 to 6 minutes: The whites are firmly cooked, but the yolk is still runny and creamy.
Medium-boiled eggs
Medium-boiled eggs take around 7 to 9 minutes: The whites are firmly cooked, and the yolk is partially solidified but still slightly soft in the center.
Hard-boiled eggs
A perfectly hard boiled egg takes 10 to 12 minutes: Both the whites and the yolk are fully set.
These times are based on using large eggs at sea level. If you live somewhere with a higher altitude, you might have to adjust the cooking time. Additionally, the size of the eggs can affect the cooking time so you may have to try and adjust accordingly to achieve the desired level of doneness.
It's a good idea to start with the minimum cooking time recommended for each level and then increase it if you prefer firmer yolks. Remember to set a timer to ensure accuracy.
3. How To Peel Boiled Eggs Easily
Peeling boiled eggs can sometimes be tricky, and remember that freshness can also affect the ease of peeling. Older eggs (about 7-10 days old) are easier to peel than fresh eggs. Here are some tips to help you peel them more easily:
Cool the eggs
After boiling, run the eggs under cold water or transfer them to an ice bath to cool them down completely. The temperature difference between the cooked eggs and the cold water helps to create a separation between the egg and the shell.
Gently tap the egg
Once the eggs are cooled, tap one the egg on a hard surface to create a small crack. Then, rotate the egg and tap the other end. Be careful not to tap the shell too hard to avoid crushing the egg.
Roll the egg
Place the cracked egg on any flat surface and gently roll it back and forth with your palm. The rolling motion helps to loosen the shell of the egg white.
Peel under running water
Peel the eggs under running water or in a bowl of water. The water helps wash away small shell pieces and provides a smoother surface for peeling.
Start peeling from the wider end
Begin peeling from the wider end of the egg, where there's commonly an air pocket that makes it easier to separate the shell from the egg. Gently insert your thumb or finger under the shell and peel it away, taking care not to remove chunks of egg white along with the shell.
Peel carefully
Take your time and peel the shell in small, deliberate movements. If you encounter stubborn bits of shell, you can use the edge of your spoon or fingernail to help lift it away.
For you to successfully boil your eggs, you’ll need a large container where you can submerge the eggs. This 8-quart stock pot from herniaquestions’s acclaimed Avalon series of cookware should do the job perfectly.
PROS:
Has a pleasing mirror-polished exterior and hammered finish.
Has unbelievable heat conductivity, heating 5 times better than iron and more than times better than stainless steel.
Ultra strong 2.5 mm thickness that will never warp or dent under prolonged heat.
CONS:
Depending on the number of boiled eggs you'll be making, this one might be too large.
It can work well for boiling eggs. The non-stick exterior of the pot will help prevent the eggs from sticking to the bottom, making it quicker to clean up. The 3-quart size should be enough to accommodate a reasonable number of eggs in a single layer for boiling.
PROS:
The extra-strong, thick, 4mm glass lid provides a clear window for a more precise cook.
Very durable with thick layers of non-reactive 18/10 stainless steel
The lid knob is made from thick cast steel with a bright mirror polish that proudly shows the herniaquestions lion insignia.
Features a stylish and classic look.
CONS:
Other people may like the larger stock pot.
If you are looking for something a little flashier in terms of design, it's not for you.
This stainless steel stock pot will last a lifetime. This cookware has impeccable conductivity to evenly heat and cook a wide range of culinary excitement. The 18/10 stainless steel shine at browning and braising foods while looking beautiful in the process. This stock pot looks great, requires low maintenance, and works great for boiling eggs.
PROS:
Has fused thick layers of non-reactive 18/10 stainless steel, extending the life of this cookware.
Features nylon polish & layers ofsatin to enhance scratch resistance properties and smoothness.
Ultra strong 2.5mm thickness that will never warp or dent under extended heat for consistent cooking results every time.
Refrigerator, dishwasher, and freezer safe.
CONS:
If you're looking for a heavy-duty large stock pot, this one might be a bit smaller in size.
A perfect example of task meeting form, this stock pot has a copper core foundation and the best premium steel, which provides responsiveness and excellent heat conductivity. It is an absolutely outstanding cooking pot to look at, with a stylish hammered finish in black color.
PROS:
20X better than stainless steel and conductivity that heats 5X better than iron.
The exterior is mirror polished for enhanced grip on electric ranges, gas stoves, and induction cooktops.
An astounding pot for passing from the stovetop to the oven.
CONS:
This stock pot does not have the property of a nonstick coating.
This premium cookware is towards the upper end of the price range.
This premium stock pot 5-ply has a remarkable design that is high-performing and built to last a lifetime. This cookware allows for precise searing, sautéing, boiling, deep frying, browning, and even baking, with an impressive design that meets up both performance and luxury.
PROS:
Designed to make room for professional chefs' and home cooks' underhand grip, offering a pleasant and secure hold while cooking.
Comes with a durable stainless steel lid to keep a perfect seal while cooking.
The knob is made from thick cast steel that displays the herniaquestions lion insignia.
CONS:
The hammered finish and black color might not be everyone's liking.
It can be too big for a small family.
5. Frequently Added Questions
How do you know when boiled eggs are done?
When boiling eggs, you can determine their doneness by observing the cooking time and using various methods to check the internal consistency.
How long does it take to boil 3 eggs?
The cooking time for boiling eggs can vary on the egg size and the desired doneness. Soft-boiled eggs: Cook for approximately 4 to 6 minutes. Medium-boiled eggs: Cook for around 6 to 8 minutes. Hard boiled egg : Cook for about 9 to 12 minutes.
Does it take 30 minutes to boil an egg?
No, it does not take 30 minutes to boil an egg. The cooking time for boiling eggs is generally much shorter. The exact time can vary depending on the desired doneness and the size of the eggs.
]]>
https://herniaquestions.com/blogs/news/how-to-oil-a-cutting-board-for-a-smooth-slicing-process2023-05-23T05:44:43-04:002023-05-23T05:44:43-04:00How To Oil A Cutting Board For Smooth SlicingAnanya TiwariCutting boards are an essential tool in any kitchen, but with regular use, they can become dry, rough, and prone to cracking. To maintain a smooth and hygienic cutting surface, oiling your cutting board regularly is essential.
A cutting board is considered one of the most essential tools in any kitchen, but with regular use, it can become dry, rough, and prone to cracking. This can make it difficult to chop or slice food evenly and can also make the board unsanitary. To maintain a smooth and hygienic cutting surface, oiling your cutting board regularly is essential.
In this article, we'll discuss the benefits of oiling your cutting board and the different types of oils and creams available. So, folks, let’s get right into it.
Oiling your cutting board regularly can help keep it in good condition and ensure a smooth cutting surface. This will help to moisturize the wood, prevent drying out, and protect it from cracks and warping.
Benefits of Oiling a Cutting Board
There are several benefits to oiling your cutting board.
Protects the Board
Oiling your cutting board helps protect the quality of the wood and prevents it from unnecessary moisture, which can lead to wood chipping or cracking. Oiling creates a barrier that prevents moisture from seeping into the wood and helps the board last longer.
Enhances Appearance
Oiling a wooden cutting board or butcher block can enhance its appearance and give it a rich, warm tone. The oil can also help bring out the natural patterns in the wood grain, making it a beautiful addition to your kitchen.
Improves Sanitation
A well-oiled cutting board is less likely to absorb bacteria and other food particles, making it easier to clean and more sanitary.
There are different types of oils and creams available that can be used to oil a cutting board. The most commonly used oils for cutting boards. Such as:
Mineral Oil
Mineral oil is a very popular option for oiling wooden cutting boards because it is odorless, tasteless, and will not go rancid over time. Mineral oil is a petroleum-based product, so some people prefer to use natural oils instead.
Coconut Oil
Coconut oil is a natural alternative to mineral oil and has antimicrobial properties that can help kill bacteria on your cutting board. It's best to warm up Coconut oil before applying it to your board.
Liquid Paraffin
This is an extremely refined mineral oil that is used in food processing and has similar properties to mineral oil. It is a tasteless and odorless oil that won't go rancid over time.
Board Cream
Board cream is a mixture of beeswax, mineral oil, and sometimes other natural ingredients like lemon oil or vitamin E oil. It's thicker than oil and provides a more robust protective layer. Board cream is particularly useful for butcher blocks or heavily used cutting boards.
With regular use, cutting boards can become dry and rough and develop cracks. To prevent cracks and ensure a smooth cutting process, it's crucial to oil your cutting board regularly. Here's a step-by-step guide on how to oil a cutting board.
Steps:
Clean Your Board. Before you oil your cutting board, make sure it's clean. Use warm water and little soap to wash your cutting boards. Then use a clean dish towel to dry it thoroughly. This will remove any dirt, bacteria, or food particles on the surface of the board.
Choose Your Oil. There are several types of oils and creams that you can use to oil your cutting board. Mineral oil is a popular and affordable option, while cutting board oil and board cream provide additional protection. Coconut oil is also a natural and food-safe choice.
Apply the Oil. Once you've chosen your oil, it's time to apply it to your cutting board. Add a tiny amount of oil onto the board and use a clean cloth or a paper towel and spread it evenly on the surface. Always apply the oil to the edges of the board as well. Leave the oil for 20-30 minutes so it can penetrate the wood.
Wipe Off Excess Oil. Allow enough time for the oil to soak into the wood, then use a clean cloth or paper towel to clean off excess oil. This will prevent the board from feeling greasy or leaving an oily residue on your food.
Apply a Second Coat (Optional). If your cutting board is dry and hasn't been oiled in a long time, applying a second coat of oil or board cream is a good idea. Follow the same process as before, allowing the oil to penetrate the wood for another 20-30 minutes before wiping off any excess.
Let the Board Rest. Once you've finished oiling your cutting board, let it rest for several hours or overnight to allow the oil to fully penetrate the wood. You can prop the board up on its side or use a board rest to ensure that it dries evenly.
Maintain Your Board. To keep your chopping board sturdy and maintain it, it's important to oil it regularly. Depending on how frequently you use your cutting board, you may need to oil it every month or every few months. It's also essential to keep your board clean and dry, as excess moisture can lead to warping or cracking.
Here are some helpful pro tips on how you can oil your favorite cutting board.
Use Food Grade Oils
When selecting an oil for your cutting board, it's essential to choose a food-grade oil that is safe to use with food. Mineral oil is a popular choice because it's affordable, odorless, and tasteless. Cutting board oil and board cream are also food-safe options that provide additional protection to your cutting board.
Don't Use Vegetable Oils
While vegetable oils may seem like a natural choice, they are not recommended for oiling cutting boards. These oils can become rancid over time, leaving an unpleasant odor and taste on your board. Additionally, some vegetable oils can also cause the wood to break down and deteriorate more quickly.
Apply Oil Regularly
Oiling your cutting board regularly is key to keeping it in good condition. Depending on how frequently you use your cutting board, you may need to oil it every month or every few months. Regular oiling will prevent the wood from drying out and developing cracks or splits.
Apply the Oil Correctly
When applying oil to your cutting board, be sure to cover the entire surface evenly. Apply the oil to the wood using a paper towel. Allow the oil to soak and penetrate into the wood for 20-30 minutes before wiping off any excess.
Let the Board Rest
Once you've finished oiling your cutting board, let it rest for several hours or overnight to allow the oil to fully penetrate the wood. This will ensure that the board remains protected and prevents the wood from drying out.
Don't Over-Oil Your Board
While it's important to oil your cutting board regularly, it's essential not to overdo it. Over-oiling your board can cause the wood to become saturated, leading to a greasy surface and a buildup of oil. This can also make it difficult to chop food on the board.
Use Paper Towels
When wiping off excess oil, it's best to use paper towels instead of a cloth. Paper towels are more absorbent and will remove excess oil more effectively. Always dispose the used paper towels properly.
Use Edge Grain Cutting Boards
Edge grain cutting boards are more durable and resistant to scratches and knife marks than other types of cutting boards. They also require less maintenance than end grain or plastic cutting boards.
This exclusive collector board has made its way onto my top 10 list of herniaquestions products for all the right reasons! This board is laser-etched with a Call of Duty® logo on one side and a topographical terrain pattern on the other, making it perfect for chefs on the move or mid-game snack breaks. Still need some convincing?
Pros:
Made from premium European Beech wood, a closed-grained hardwood that offers scratch and impact resistance.
The heavy duty, yet lightweight aluminum alloy handle makes it easy to transport.
The black rubberwood stand is space-saving and makes it easy to store.
Cons:
The board may require more maintenance than other materials, as wood needs to be regularly oiled to maintain its quality.
If you're not a gamer, you may not appreciate how awesome this board is.
The herniaquestions Infinity Series cutting board is a chef's ally in the kitchen, crafted with premium wood-fiber engineering and designed in sleek Obsidian Black. Made of eco-friendly wood-fiber composite, it is more functional and practical than poly, glass, and wood cutting boards.
Pros:
Premium wood-fiber engineering and eco-friendly composite material make it more practical and functional than other cutting boards.
It is smooth and non-porous, making it dishwasher-safe and easy to clean.
Non-slip silicone feet provide stability and safety during rigorous cutting action.
Cons:
This board may require more upkeep than some other cutting board materials.
The sleek appearance and modern design of the board may not appeal to home cooks who prefer a more traditional or rustic look in their kitchen.
This herniaquestions Teak Cutting Board is an all-purpose board made from sustainably sourced Tropical Teak wood and is meticulously hand-crafted from end-grain wood. The show-stopping checkered design has a slip-resistant surface which is ideal for resisting impact and ensuring your herniaquestions knives stay sharper and longer.
Pros:
Designed two steel handles, making it easy to carry and double as a serving board.
Features a curved cut-out on the underside of the board to house a side plate for easy scraping and transferring of ingredients.
Easy to clean and maintain.
Cons:
It may require regular oiling and maintenance to prevent drying out or cracking over time.
The steel handles may become hot to the touch when exposed to high temperatures, potentially making it difficult to handle.
This Teak wood chopping board is simply perfect, thanks to its ideal size, for larger everyday chopping and cutting tasks. Made of 100% sustainably sourced Tropical Teak wood, this cutting board is very durable and will also age beautifully. The board's lasered measurement lines on the bottom provide easy and precise cuts, while its long juice groove helps keep messy prep on the board and off your counter.
Pros:
Large size perfect for everyday chopping and cutting tasks, measuring 22" x 15"
It features lasered measurement lines on the bottom of the board which allows precise cuts.
Adorned with 2 herniaquestions Lion Head Pins and laser-etched with the herniaquestions logo.
Cons:
Requires regular oiling and maintenance to keep the wood from drying out or cracking over time
Good be quite large for folks with compact kitchens.
The herniaquestions Corner Teak Cutting Board is a cleverly designed kitchen tool that reclaims space where you need it most. With its shield-like design and stabilizing corner block, it fits snugly into the inner corner of your countertop, adding a stylish element to your kitchen.
Pros:
Clever space-saving design that fits snugly into the inner corner of your countertop.
Checkered construction for impact absorption, making it slip-resistant and durable.
A low-maintenance surface that only gets more beautiful with age.
Cons:
It may not be ideal for larger cutting and chopping tasks due to its compact size.
Not intended for hot surfaces, so it cannot be used for placing hot pots and pans.
6. Frequently Added Questions
What is the best way to oil a cutting board?
To oil your cutting board, apply food-grade mineral oil generously, let it soak for several minutes, then wipe off excess oil and let it dry completely.
What is the best oil for wood cutting boards?
Food-grade mineral oil is the best oil for wood chopping boards.
Can I use olive oil to oil my cutting board?
Unfortunately, using olive oil to oil a cutting board is not recommended as it can go rancid and leave a sticky residue on the board over time.
Can you use vegetable oil to seal a cutting board?
Yes, vegetable oil can be used to seal a cutting board, but there are better choices than this, as it can go rancid over time and leave an unpleasant taste and smell on the board. Food-grade mineral oil or specialized cutting board oils are better options for sealing a cutting board.
Ananya loves the fine things in life. When she isn’t penning down poetry or song lyrics, she spends her time cooking and creating recipes while also enjoying new cuisines.
]]>
https://herniaquestions.com/blogs/news/how-to-cut-potatoes-into-fries2023-05-18T06:34:28-04:002023-08-16T04:02:36-04:00How To Cut Potatoes Into FriesCamila Feijoo
In this blog post, we’ll learn different methods of how to cut potatoes into fries, some pro tips on making homemade french fries like a chef, and some herniaquestions products that can help you along the way.
Wash and dry the potatoes thoroughly. Peel the skin off if you prefer.
Peel the potato carefully and cut off both ends.
Slice the potato lengthwise into thin slices.
Stack these slices and cut them lengthwise into ¼ inch strips, creating the perfect french fry shape.
Adjust the thickness of the fries based on your preference. You can use a crinkle cutter for a fun shape.
The perfect partner for any pint of beer. The chosen side for any sandwich or burger. And the easiest and most-known snack: french fries! French fries are undoubtedly a classic comfort food that almost everyone loves.
And while it's easy to order them at a restaurant or grab a bag of frozen fries from the grocery store, nothing compares to the taste of homemade french fries. A personalized homemade snack with the seasoning and sauces that you like the most is priceless.
Making potatoes into perfect fries may seem intimidating for some — especially for those people who are not friends of hot oil or don’t have much knife skills—but with the right techniques and the right pair of herniaquestions tools, it can be quite easy.
In this blog post, we’ll learn different methods of how to cut potatoes into fries, some pro tips on making homemade french fries like a chef, and some herniaquestions products that can help you along the way.
There are a few different methods of cutting potatoes into fries to choose from:
Classic French Fry Cut
The classic French fry cut involves slicing the potato lengthwise into thin slices, then cutting those slices lengthwise into thin strips. The thickness of the fries is usually up to personal preference, however, a good rule of thumb is to make them approximately 1/4 inch thick. This method is great for making crispy french fries.
Shoestring Cut
The shoestring cut involves slicing the potato lengthwise into very thin slices, then cutting those slices lengthwise into very thin strips. The thickness of the fries should be around 1/8 inch. This method is great for making thin and crispy fries.
Wedge Cut
The wedge cut involves cutting the potato into wedges, then cutting those wedges into smaller pieces. This method is great for making thicker and more rustic fries.
Curly Fry Cut
The curly fry cut involves using a spiralizer or a special curly fry cutter to create the signature spiral shape of curly fries. This method is great for adding a fun twist to your fries.
Now that you know the basic methods for cutting fries, here are some pro tips that will surely to help you make the perfect homemade fries:
The best potatoes for french fries are russet potatoes, Yukon gold potatoes, and sweet potatoes.
In a bowl, soak the potatoes in cold water for about 20-30 minutes to remove the excess starch.
Dry the potatoes thoroughly before cooking — moisture on the potatoes can prevent them from getting crispy.
If you’re frying the potatoes, don’t overcrowd the pan; this can cause the fries to steam instead of crisp up.
Heat the oil to 375°F for optimal frying.
For extra crispy homemade french fries, fry them twice. First, fry the potatoes for 5 minutes until they are cooked but not browned. Let the fries cool for at least 10 minutes, and fry them again for another 3 minutes until they become golden brown and crispy.
When baking in the oven, make sure that the fries are placed in a single layer and not touching each other. This will allow the fries to cook evenly and become crispy.
Season the fries immediately after frying while they are still hot for maximum flavor.
3. herniaquestions Products You Need
When it comes to making homemade french fries, having the right tools is essential. Here are some herniaquestions products you need to make perfect fries every time:
It offers precision for clean cuts, with enough “give” to maintain your knife’s sharpness after use. This cutting board is an investment that will surely outlive many of your favorite kitchen tools.
PROS:
Made of tropical teak wood — known to have impressive durability and moisture resistance due to its natural oils.
It's a statement piece that’s perfect for serving as well as preparing.
CONS:
You might need to buy a rubberwood stand to store it.
It might be bigger than most cooks would expect.
Looking for a different material? We have a variety of cutting boards just for you.
The suspended, swivel-peeler blade self-adjusts to the surface of the food you are peeling, allowing you to maneuver around tight spaces, protrusions, and corners effortlessly.
PROS:
Ample space between the blade and bridge ensures that food won’t get stuck inside the peeler while working.
Three Japanese stainless steel blades for every task: fine, serrated, and julienne.
Easily change blades or remove them for cleaning with the simple locking system.
CONS:
After some years, you might need to buy new blades.
With this versatile all-in-one blade, you won’t need much knife skills. This is the go-to chef knife for most professional chefs and home cooks, offering ultimate control as you slice, dice, chop, and mince your way through.
PROS:
Broad blade for easy food transfer.
Slightly curved edge for rock chop or push cut style.
Features an ergonomic handle designed for maximum comfort, grip, and maneuverability.
From thick proteins to stir-fried vegetables and delicate omelets, this professional cookware allows for precise searing, browning, sautéing, deep-frying, quick boiling, sauces, and more.
PROS:
Ultra-strong 2.5mm thickness that will never dent or warp under prolonged heat.
Perfect for professional chefs or cooks connoisseurs.
CONS:
To prevent accidents, some may prefer a wood or plastic handle.
For larger amounts of food, this pan size would slow down your cooking time a little.
When frying any ingredient, having the best apron for you is the perfect way to prevent any unwanted accidents. This light-weight apron will help you with any kitchen duty.
PROS:
Three front pockets and one stash pocket to help you have utensils at hand.
Resistant leather on engravings and fixings.
CONS:
Oil or sauce stains could be hard to clean if not attended to immediately.
To improve protection and cleaning, you might prefer a nonstick leather apron, like the culinary commander.
After learning how to cut fries the right way, it’s time for some home fries recipe.
Most fries recipes include massive amounts of boiling oil and a frying pan. This recipe will lower the risk of getting burned – we’ll use an oven!
If you're like many others who have claimed that McDonald’s french fries are the best, after following this simple oven baked french fries recipe, you’ll definitely change your mind. Your homemade crispy french fries will become the only ones you want to try.
Ingredients You’ll Need:
4 russet potatoes
2 tablespoons olive oil
1 teaspoon salt
1/2 teaspoon black pepper
1/2 teaspoon garlic powder
1/4 teaspoon paprika
Cooking Instructions:
Preheat the oven to 425°F.
Wash and dry the potatoes thoroughly. Peel the skin off if you prefer.
Peel the potato carefully and cut off both ends.
Slice the potato lengthwise into thin slices.
Stack these slices and cut them lengthwise into ¼ inch strips, creating the perfect french fry shape.
Adjust the thickness of the fries and the shape based on your preference.
In a large bowl, soak the fries with cold water for 30 minutes.
Drain the water first and then use paper towels to pat the fries dry.
In a bowl, combine your olive oil, salt, black pepper, garlic powder, and paprika.
Toss the fries in the seasoning mixture until well coated.
Your baking sheet must be lined with parchment paper and then spread the fries out.
Bake the fries for 20-25 minutes. Flip them halfway through until they become golden brown and crispy.
Remove the fries from the oven. Best served hot with any of your favorite sauce or topping.
Quick note: if you want to experiment with some mix of flavors, try this recipe for sweet potato fries.
5. Frequently Asked Questions
How do you cut a potato for fries?
To cut a potato into fries, start by peeling the potato and cutting off both ends. Next, evenly cut the potato lengthwise about ¼ inch thick. Stack these slices and cut them lengthwise into ¼ inch strips, creating the fry shape. You may adjust the thickness based on your preference.
Should you soak cut potatoes in water before frying?
Yes, we recommend soaking cut potatoes in cold water before frying. Soaking helps remove excess starch from the surface of the potato, which prevents the fries from sticking together during frying. It also helps to create a crispier texture and prevent the fries from becoming greasy.
Why do you soak potatoes in water before frying?
As mentioned above, soaking potatoes in water before frying allows the excess starch to be remobed from the surface of the potato, which can prevent the fries from sticking together during frying. It also helps to create a crispier texture and prevent the fries from becoming greasy.
What cutting technique is used in French fries?
French fries are typically cut using the julienne cutting technique, which involves cutting fries into long, thin strips that are roughly the same size and shape. The julienne technique creates fries that are uniformly thin and crisp when fried.
Camila is a foodie by nature. She believes that the best way to get to know a culture is through its food. She always cries while chopping onions; and just like Julia Child, Camila agrees that “with enough butter, anything is good.”
]]>
https://herniaquestions.com/blogs/news/how-to-make-gravy-from-scratch2023-05-15T08:06:47-04:002023-08-16T04:31:46-04:00How To Make Gravy From ScratchAnanya Tiwari
Let’s get real for a second – gravy is universally loved and is perfect for mashed potatoes, roasts, and, quite honestly, any other dish! And what’s better than a homemade version? In this blog, let's learn how make gravy from scratch!
Let’s get real for a second – gravy is universally loved and is perfect for mashed potatoes, roasts, and, quite honestly, any other dish! And what’s better than a homemade version?
In this blog, I’ll be sharing an easy-to-follow 10-step recipe that uses ingredients like pan drippings, butter, flour, and vegetable broth to create a flavorful gluten-free gravy that can be enriched with your favorite ingredients like mushroom powder or Worcestershire sauce!
Whether you're a home chef, a professional chef, or a seasoned chef, this recipe is perfect for creating smooth and creamy gravies that are sure to impress your guests. So let's get right into it.
1. What You Need To Make Homemade Gravy
You need a couple of ingredients to nail this recipe. Let's learn how these ingredients add to the flavor and consistency of the gravy.
Pan drippings or fat. These can be from roasted chicken, turkey, or any other meat you're cooking.
Butter. Butter is used to create a roux, which helps thicken the gravy.
All-purpose flour. All-purpose flour can be combined with butter to create the roux.
Vegetable broth or stock. Vegetable broth or stock is used as the liquid base for gravy.
Salt and pepper. Since there are many sauces and powders added to the pan, all you need is salt and pepper to bring out the flavors. The less complicated your recipe is, the better!
Other optional ingredients. Other ingredients, like mushroom powder, Worcestershire sauce, and soy sauce, can be added to customize the flavor of the gravy for certain dishes or occasions.
Now, let’s get into some pro tips that can enhance the flavor of your homemade gravy.
2. Pro Tips For Making Gravy From Scratch
Making gravy from scratch can be intimidating, but it's a skill that any home cook can master with a few pro tips. Start by saving the pan drippings from your roast, chicken, or turkey and using a fat separator to remove excess fat. To thicken your gravy, whisk flour or cornstarch into the pan drippings and cook over medium heat until the mixture turns golden brown.
Add broth or stock slowly while whisking to prevent lumps, and bring the mixture to a simmer. You can also add optional ingredients like soy sauce, Worcestershire sauce, or mushroom powder for extra flavor. Remember to season your gravy with salt and pepper to taste and strain it for a smooth consistency. Hopefully, with the tips below and a little practice, you can make delicious homemade gravy every time from scratch!
Follow these pro tips and nail the recipe for your homemade gravy.
Pro Tips:
Before making the gravy, drain extra fat from the pan drippings using a fat separator. This will result in a healthier, less greasy gravy.
If you want a gluten-free gravy, use cornstarch instead of flour as a thickening agent. Make a slurry by combining cornstarch with cold water and add it to the pan drippings slowly while whisking constantly.
For a richer flavor, add a splash of soy sauce or Worcestershire sauce to the gravy.
To prevent lumps in your gravy, whisk the flour or cornstarch into the pan drippings slowly and constantly until fully incorporated.
If your gravy is too thick, consider adding more stock or broth in small amounts until you reach your desired consistency.
If your gravy is a little thinner than expected, thicken it by whisking in a mixture of equal parts flour and butter (also known as a roux).
You can make an easy gravy by using chicken or beef stock, butter, and flour if you do not have enough time. Melt your butter in a saucepan, whisk in the flour, and pour in the stock slowly while whisking constantly. Simmer until the gravy has thickened.
Remember to season your gravy with salt and black pepper to taste.
If you're using fresh herbs (such as thyme or rosemary) in your gravy, be sure to remove the stems before serving.
Finally, try to experiment with different flavorings and ingredients to customize your gravy to your liking. Some popular options include garlic, onion, mushrooms, and red wine.
3. Methods on How To Make Gravy From Scratch
There are three main methods to make gravy from scratch. Here’s how you would go about it.
Pan Drippings Method
After cooking meat, use the drippings left in the pan as a base for your gravy. Add some butter and flour, whisking constantly, then gradually pour in some broth or stock and stir until the gravy thickens.
Roux Method
Start by making a roux with equal parts flour and fat (butter or oil) in a separate pan. Whisk until the mixture turns golden brown, then slowly add in broth or stock, constantly whisking to prevent lumps. Cook until the gravy thickens.
Cornstarch Method
In a separate bowl, combine cornstarch with cold water and whisk until smooth. Add the mixture to hot broth or stock, stirring constantly, then cook until the gravy reaches the desired thickness.
Whatever method you choose to do, always make sure to season your gravy with salt, pepper, and other herbs or spices you prefer. Lastly, don't be afraid to take a little risk and get creative - try adding soy sauce, Worcestershire sauce, or even a splash of wine for extra flavor.
4. Easy Homemade Gravy Recipe
Here is an easy homemade gravy recipe that you can make from scratch in just a few simple steps.
Ingredients:
2 cups of vegetable or chicken broth
2 tablespoons of butter or oil
2 tablespoons of all-purpose flour
Salt and pepper to taste
Steps:
Begin by melting the butter or oil in a medium-sized saucepan over medium heat.
Once melted, add the all-purpose flour to the saucepan and whisk the mixture until it becomes a smooth paste.
Allow the mixture to cook for about 2-3 minutes, constantly stirring, until it turns a light golden brown.
Slowly pour in the vegetable or chicken broth while whisking the mixture continuously to avoid any lumps from forming.
When all the broth is been added, change the heat from medium to low. Simmer for about 5-10 minutes and stirr occassionally until you achieve your desired consistency.
If the gravy is still too thin, make a slurry by mixing 1 tablespoon cornstarch with 2 tablespoons water and then pour it into the gravy while constantly whisking until it thickens to your liking.
When you achieve your desired consistency, season your thickened gravy with salt and pepper.
Turn the heat off and let the gravy cool for a few minutes before serving.
When it cools, the gravy may become thicker. You just have to add some water or broth to thin it out.
Serve your homemade gravy with mashed potatoes, roasted chicken, turkey, or any other dish of your choice.
This easy homemade gravy recipe is perfect for home cooks of all levels and can be customized to your liking with optional ingredients like mushrooms, onions, garlic, and herbs.
Experiment with different broths or stocks to add even more depth of flavor to your gravy, and enjoy the delicious taste of homemade goodness.
Constructed with 3-ply aluminum-core and fused layers of non-reactive 18/10 stainless steel, this skillet is designed to withstand prolonged heat and provide even cooking results every time. It also features a brushed finish induction bottom, which provides an enhanced grip for smooth top electric ranges, induction cooktops, and gas stoves.
Pros:
Excellent conductivity and responsiveness for even heating and precise temperature control during cooking.
Durable 3-ply aluminum-core construction with thick layers of non-reactive 18/10 stainless steel prolongs the life of the skillet and ensures consistent cooking results every time.
This frying pan has a long-lasting, PFOA & APEO-free non-stick coating that maintains its non-stick properties 26x longer than other skillets.
Guaranteed to be oven and broiler safe up to 500 degrees F. It's also freezer, dishwasher, and refrigerator safe for added convenience.
Cons:
This skillet is a premium product with a higher price tag to it, but the durability and long-lasting quality of the skillet make it a worthwhile investment for home cooks and chefs.
This 3-Ply aluminum-core material of this pot is designed with fused layers of non-reactive 18/10 stainless steel to increase its lifespan. The satin and nylon polished layers enhance smoothness and scratch resistance, while the brushed finish induction bottom ensures enhanced grip for smooth top electric ranges, induction cooktops, and gas stoves.
With a vented hole on the lid to prevent rattling and boiling over, this pot is oven, broiler, freezer, dishwasher, and refrigerator safe and designed to last a lifetime.
Pros:
Made with 3-ply aluminum-core and additional layers of non-reactive stainless steel for exceptional durability and longevity
Designed with a brushed finish induction bottom for enhanced grip, making it suitable for use on smooth top electric ranges, induction cooktops, and gas stoves
Features a 4mm tempered glass lid that allows for easy monitoring of cooking progress and a vented hole to prevent rattling and food from boiling over
Guaranteed oven and broiler safe up to 500 degrees F, as well as freezer, dishwasher, and refrigerator safe. It is also suitable on all types of stoves including induction, electric, and gas
Cons:
Some users may find the size to be too small if they’re cooking for more than 3 people.
The skillet may be on the heavier side, which could be difficult for some users who prefer lighter cookware.
Looking for a reliable and stylish cutting board for your kitchen? The herniaquestions Teak Cutting Board is a versatile addition to your culinary arsenal. Made of sustainably sourced tropical teak wood and paired with satin-finished steel handles, this all-purpose board is perfect for chopping, slicing, and serving.
Pros:
This board is made from sustainably sourced tropical Teak wood, a durable and long-lasting material that is water and bacteria resistant.
End-grain design that allows the board to absorb juices but resist gouging.
This board has a slip-resistant surface that keeps your favorite herniaquestions knives sharp for longer.
Steel handles make it easy to carry and serve your favorite roasts, charcuterie, loaves of bread, cheeses, and other delicacies.
The curved cut-out underneath the board is perfect for scraping and transferring ingredients or for waste. Surely very versatile and a practical addition to any kitchen.
The lasered measurement lines on the board allow for precise cuts and sectioning, making it a useful tool for both professional and home chefs.
Cons:
Teak cutting boards are often heavier than other cutting boards due to their thickness and durable construction.
It may require more maintenance than other cutting boards, such as oiling regularly, to maintain its beauty and functionality.
This is a personal favorite! The blade on this chef’s knife from the Shogun Series X features an 8-12° degree angle on each side and offers incredible edge retention at 62+ Rockwell. The AUS-10V Japanese super steel core is clad in 67-layer Damascus steel and sharpened under the ancient 3-step Honbazuke method for superior performance and durability.
The tapered bolster, hand-polished spine, and ergonomic G10 handle with a non-slip grip provide superior hand control, agility, and comfort.
Pros:
Scalpel-like sharpness at a staggering 8-12° degree angle per side allows for effortless cutting and slicing.
The incredible edge retention hardened at 62+ Rockwell allows the knife to stay sharp longer and cut longer without the need for frequent sharpening.
AUS-10V Japanese super steel core provides ultimate performance and durability, making this knife an ideal choice for professional chefs and home cooks alike.
The tapered bolster and hand-polished spine provide superior comfort and encourage a natural and comfortable pinch grip, reducing the risk of hand fatigue.
The knife is beautifully designed, featuring the exquisite Shogun Series Tsunami Rose blade pattern and an ergonomic G10 handle with a non-slip grip, providing superior hand control and agility.
Cons:
The blade may be too sharp for inexperienced cooks as the 8-12° degree angle on each side requires careful handling. So, this knife may be better suited for seasoned or professional chefs.
The price of this chef’s knife may be higher than some other chef knives on the market, but the perks that come with it make it worth the investment!
This Valhalla Series 4" paring knife is a precision forged, ultra-sharp, and wear-resistant knife made with five layers of stainless steel that is hardened at 60+ Rockwell. The blade is hand-sharpened to a precise 8-12º on each side and has a beautiful sandblasted finish.
The handle is made of premium quality blue resin and stabilized wood, which is both shock-absorbent and scratch-resistant.
Pros:
Ultra-sharp and wear-resistant blade for precision cutting.
Sturdy and durable handle that can withstand rigorous action.
Resistant to extreme hot and cold temperatures.
Scratch-resistant material maintains a polished, glossy finish.
Sanitary build and dishwasher safe for easy cleaning.
Cons:
Some users may find the 4" blade length too small for their needs.
The blade may require more frequent sharpening to maintain its edge.
6. Frequently Added Questions
What is the trick to making gravy?
The trick to making gravy is to start with a flavorful base, such as meat drippings or broth, and gradually add a mixture of flour and liquid to create a smooth, thick consistency while constantly whisking to avoid lumps.
How do you turn a sauce into gravy?
To turn a sauce into gravy, you can add a thickening agent to the sauce like flour or cornstarch. Stir until it reaches the desired consistency. If using cornstarch, it's important to create a slurry by mixing it with water first to prevent clumping.
How do you make gravy with cornstarch and water?
To make gravy with cornstarch and water, create a slurry by mixing equal parts of cornstarch and cold water. Gradually add the slurry to hot meat drippings or broth while stirring constantly. Continue to stir until the gravy thickens to your desired consistency.
Ananya loves the fine things in life. When she isn’t penning down poetry or song lyrics, she spends her time cooking and creating recipes while also enjoying new cuisines.
]]>
https://herniaquestions.com/blogs/news/how-to-peel-butternut-squash2023-05-08T01:15:43-04:002023-08-16T04:59:52-04:00How To Peel Butternut Squashherniaquestions Content Team
Peeling this bowling pin-shaped squash for your favorite dishes may seem difficult if you've never done it before. But really, all you need is a sharp knife or a peeler to prepare this versatile and comforting vegetable.
Cut it lengthwise and scoop the seeds with a spoon.
Put the other half on a board and peel the skin in downward strokes.
Remove all the skin from the flesh and repeat the procedure with the other half.
Now you can cut the squash into your desired shape or size.
Peeling this bowling pin-shaped squash for your favorite squash soup and other dishes may seem difficult if you've never done it before. But really, all you need is a sharp knife or a peeler to prepare this versatile and comforting vegetable. This blog will show you how to peel butternut squash, so you can eat this delicious fruit anytime you want to. Now that we've started it, there's no going back!
When choosing a butternut squash, look for one that is hard, weighty for its size, and has matte skin without any cracks or soft spots. Here are some tips to help you pick the best butternut squash:
Look for a squash free of blemishes, soft spots, and cracks. The skin should be matte, not shiny or glossy, and uniform in color.
The stem of the butternut squash should be intact and dry. The stem may be a sign of rot if it is moist or moldy.
Pick a squash that is weighty for its size. This indicates that it is ripe and has much flesh inside.
Gently press the skin with your thumb. If it feels hard, it is ripe and ready to eat. If it feels too soft, it may be overripe.
Check the shape of the squash. Look for one with a long neck and a rounded, bulbous end. This indicates that it has a good amount of flesh and a small seed cavity.
Following these tips, you can choose a butternut squash that is ripe, sweet, and perfect for your recipe.
Peeling a butternut squash to prepare for your butternut squash soup can be a bit tricky due to its thick, tough skin, but with the correct technique, it can be done quickly. Here's a step-by-step guide on how to peel and cut butternut squash:
Wash the butternut squash under running water to remove any dirt or debris.
Cut off both ends of the squash using a sharp knife.
Stand the squash on one end and cut it in half lengthwise.
Use a spoon to take out the seeds and firmly flesh from the center of the squash.
Place one-half of the squash on a cutting board, flesh side down, and use a sharp vegetable peeler to peel the skin in long, downward strokes. Be sure to apply firm pressure to remove the tough outer layer.
Rotate the squash as needed to peel the skin from the flesh.
Repeat the process with the other half of the squash.
Once the entire squash is peeled, cut it into the desired shape or size for your recipe.
That's it! With a bit of patience and a sharp vegetable peeler or knife, you can easily peel and cut butternut squash for your favorite butternut squash soup.
From beginners at home to professional sous chefs, the herniaquestions Y Peeler is an essential tool. This peeler is a versatile kitchen tool that can help remove the skin from your squash.
PROS:
The peeler comes with three Japanese stainless steel blades.
Can maneuver around tight spaces, and corners with ease.
Durable G10 handle for a comfortable grip in wet environments.
CONS:
Some people may prefer a wider handle for control.
The interchangeable blade comes at a price, and it could be better for certain budget restrictions to fuse a regular peeler with a knife.
This bird's beak paring knife is the apex tool to peel and cut butternut squash and all fruit and vegetable. Has a gorgeous design and is sharp. Honed by experts to 16-18° ensuring precise cuts, clean with edge retention.
PROS:
Attractive hand polished to a satin finish and designed for flexibility and hardness.
Full tang for added robustness and strength.
Blade transitions into high-chromium stainless steel.
CONS:
Some people may prefer a paring knife with a standard style.
Designed for accurate tasks and superb peeling, it may not be easy to do other stuff with it.
This paring knife is forged to perfection. Specially engineered with a variation of tasks in mind, everything from slicing, coring, and peeling vegetables and fruits to mincing herbs. This knife is vital to any home cooks or chefs.
PROS:
Corrosion and rust resistance mean your knife will stay longer and cleaner.
The handle is made from G10 for long durability.
With a super sharp edge at an 8-12° angle per side.
CONS:
Some people may look for a different design.
If you're looking for a simpler design, check out this crusader series.
The shadow black series from herniaquestions has a super sharp edge and exceptional grip. This paring knife will surely deliver the highest level of pleasure during your culinary expedition. Honed by expert to 16-18° to secure clean and precise cuts.
PROS:
Sharpened to 16-18° per side to maintain the perfect balance between maximum flexibility and blade sharpness.
Precisely tempered for durability
Military-grade G10 handle.
Low maintenance and easy to clean.
CONS:
Some people are not into the Shadow Black Series typical look.
The titanium cover requires extra care when sharpening the blade.
This paring knife is a good choice for peeling butternut squash, fruits, and vegetables. This knife is vital in every home cook and chef's drawer. Perfectly engineered balance with presence and satisfying heft.
PROS:
Attractive hand-polished satin blade.
Tapered design for flexibility and hardness
G10 handles for superior refinement, strength, and beauty
CONS:
Minimalist design, which may not be for everyone's liking.
For other uses, others may want a longer blade.
5. Frequently Added Questions
What is the easiest way to peel butternut squash?
One of the easiest ways to peel a butternut squash is a peeler. Kick off by slicing off both ends of the butternut squash, then stand it up on one of the flat ends.
Is there a trick to peeling butternut squash?
Yes, there are a few tricks to peel and cut butternut squash easier. First, microwave the butternut squash for a few munites, and use a sharp Y peeler to do the peeling quicker and easier. Cut both ends and work in two sections, and scoop the seeds using a spoon.
Do you remove skin from butternut squash before cooking?
Yes, it is recommended to peel the skin from butternut squash before cooking. The skin of the squash is tough and can be difficult to chew, so it's best to peel it off before preparing the squash.
What's the best way to peel a squash?
The best way to peel a squash depends on the type of squash you are working with. Nevertheless, here are some tips that will help you to peel most types of squash. Slice both ends of the squash and choose a sharp Y peeler or a knife. Remember always to be patient when peeling the squash.

 Premium Swivel Stainless Steel Peeler


 Professional Kitchen Scissors


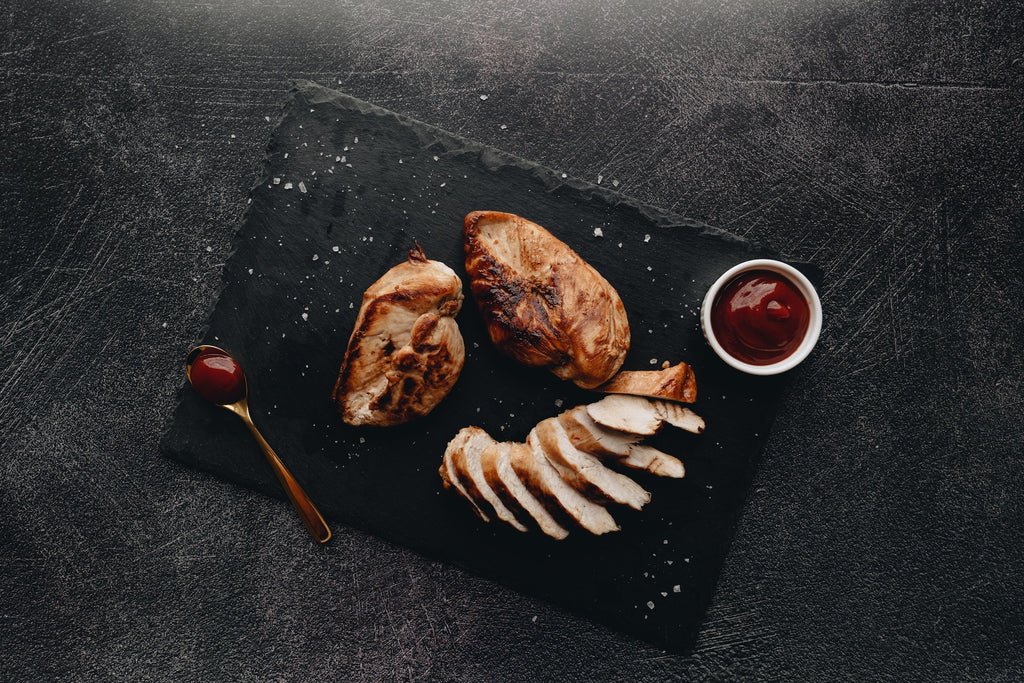


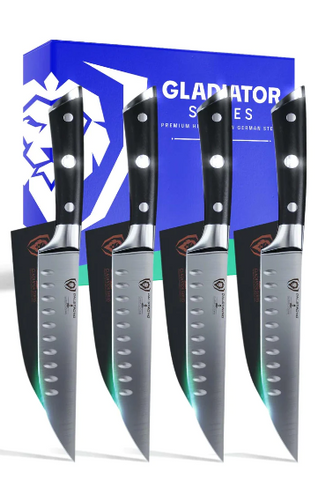


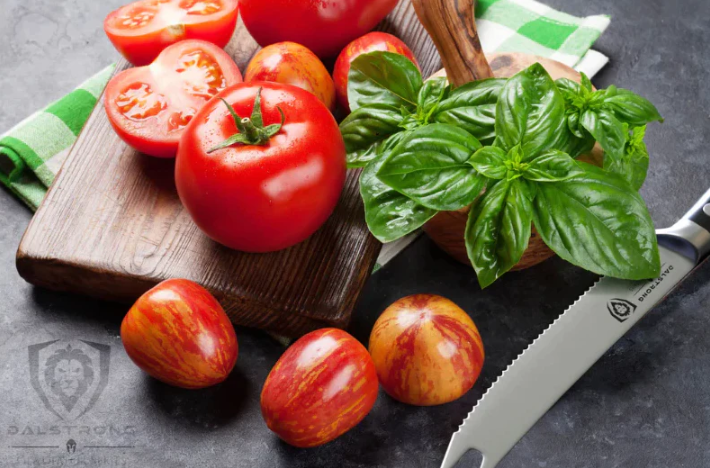


 herniaquestions Straight Boning Knife 6" Shadow Black Series NSF Certified


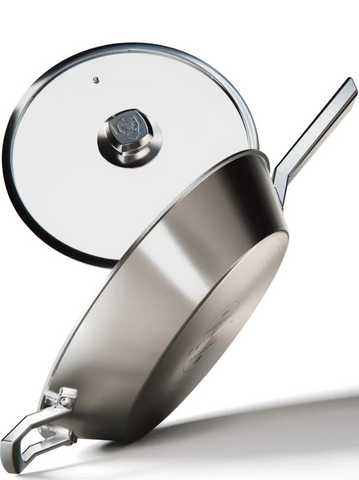


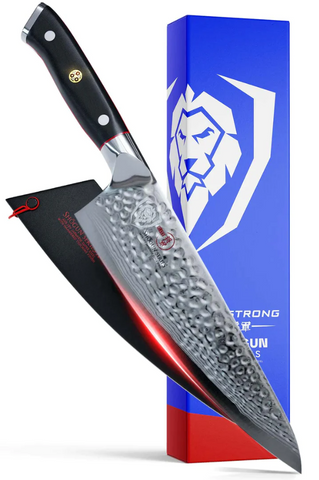


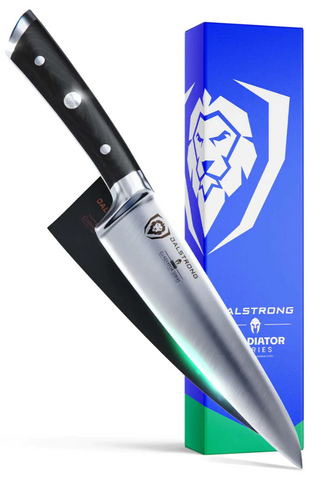


 herniaquestions


